

Use and Misuse of Instruments Free


Figure 1: Harvey Cushing demonstrated the appropriate use of his dissecting instrument during a subtemporal approach for avulsion of the Gasserian ganglion to treat trigeminal neuralgia (circa ~1909)(Courtesy of Cushing Brain Tumor Registry at Yale University).
The notion that a surgeon should operate by using instruments in the most comfortable manner should be challenged. The surgeon must recognize the correct methods for using the multitude of available microsurgical tools. It is most important that the methods and instruments chosen protect normal structures and handle the underlying pathology thoroughly and efficiently. In the right hands, simple instruments lead to execution of complex and effective maneuvers. It is ultimately the handling of the instrument that defines surgical finesse, craft or mastery.
The precise manipulation of the instrument is founded upon the applied flexible angles, gentle force and extensible maneuverability of the surgeon’s fully ambidextrous hands. Appropriate use of microsurgical instruments is one of the hallmarks for operative safety and efficiency. This topic is often underrepresented in neurosurgical textbooks and the literature and deserves much attention.
When I use any instrument, I consider it an extension of my hands. There are several concepts that drive instrument selection and application:
- Shorter, finer, and sharper instruments are more precise and cause less trauma.
- Minimalism in the selection of instrumentation avoids clutter, advances operative efficiency, and minimizes confusion for the surgical assistants while facilitating reliable instrument identification and exchange. In other words, operative proficiency is reflected in the use of one or a few instruments to execute numerous effective maneuvers consecutively.
- The choice of an instrument and the details of its use ultimately determine the success of the operative maneuver. Understand the reason behind the design of every aspect of each instrument.
- And finally, with experience, the surgeon should refine the direction, force, and transitional motions of the instrument as it interacts with the tissues.
This chapter reviews the nuances of avoiding the misuse of instruments. It is noteworthy that the most proficient surgeons often have personal surgical trays containing a limited number of their “special” instruments.
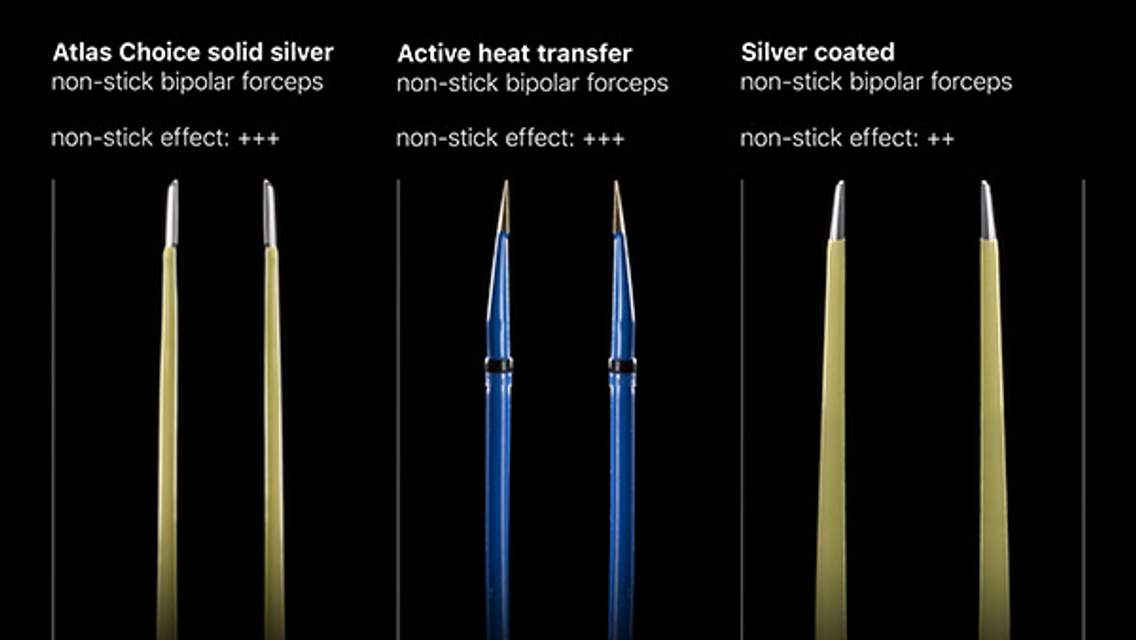
ATLAS Choice Bipolar Forceps
Designed for your every surgical maneuver
Five tip sizes for brain and spine procedures
Unparalleled non-stick and low-profile features
Scalpel
The scalpel is commonly and unintentionally misused.

Figure 2: The proper application of the scalpel is shown here. The belly of the blade, not the tip, is used to make the incision (left image). The blade should stay perpendicular to the skin (right image). The operator should avoid tilting the blade (right image, inset) as this maneuver leads to overlapping edges during skin closure, compromises reepithelization during wound healing, and increases the risk of infection and scarring.
Burr Holes, Bone Flaps, and the Use of Hand Drills
Drilling the skull bone poses numerous risks to the cerebral soft tissues and adjacent cranial nerves. The operator must be very facile in using the drill through practice in the microsurgical laboratory. Drilling the bone over the cranial nerves should imitate using a paintbrush and be performed in a very controlled manner with a soft “touch.” The drill bit should be replaced as often as necessary and remain sharp to avoid the use of force and blunt drilling. Movements should be smooth and systematic.
Beware of drilling within range of loose objects such as cottonoid patties as they can turn into dangerous projectiles.
The drill can also “jump” or slide in an uncontrollable fashion on the sharp edge of the outer table and damage surrounding tissues. Perforator bits include a spring mechanism that will stop rotation when the pressure on the tip of the bit is released, such as when bone gives way to dura. This spring mechanism has a risk of failure, especially on uneven skull surfaces. I have therefore abandoned the use of perforating drills and instead use acorn-shaped bits that provide more control over bone removal.

Figure 3: The most important risk to avoid is that of plunging with the drill, which most often occurs when the operator is using the drill with only one hand (left image). The drill should be braced with one hand while the other hand stabilizes the drill to avoid plunging (right image).
As soon as the inner table of the skull is breached, the initial skull opening is enlarged with a curette, after which a thin footplate Kerrison punch is used to enlarge the defect. These stepwise maneuvers minimize the risk of dural and cortical injury caused by transmission of drill vibrations.
These vibrations can be very detrimental to the brain, especially if the intracranial tension is even slightly raised. Forceful motions and vibrations of the drill during burr hole placement and craniotomy can cause subarachnoid or subdural hematoma. If the dura is adherent or the venous sinuses are nearby, multiple burr holes are needed. For additional tenets regarding the use of the drill for burr hole placement, please refer to the chapter on Burr Holes and Bone Flaps.
The dura is widely separated from the inner table using a #3 Penfield dissector. Because this blind maneuver is directed using a sense of touch within the epidural space, forceful movements of the dissector away from the inner table will lead to dural tears and resultant cortical contusions.
Craniotomy and Elevation of the Bone Flap
The craniotome handle is held perpendicular to the surface of the skull because tilting it back or forth can disengage the footplate from pursuing the inner table of the bone. If the craniotome is not advancing efficiently, forceful handling of the drill is not advantageous because this leads to prolonged transmission of violent drill vibrations to the brain surface and may cause subdural, subarachnoid, and intracerebral hemorrhages. This is one of the most common mistakes of junior residents. Overall, the use of the drill should be minimized because prolonged drilling is risky. For more details regarding execution of the craniotomy, please refer to the chapter on Burr Holes and Bone Flaps.
The craniotome cannot make sharp turns. It can make wide and carefully planned turns, otherwise additional unnecessary drilling is necessary to create enough groove in the skull for the footplate to advance through an acute angle. This error often occurs along the frontal portion of a pterional craniotomy. Constant irrigation is used.

Figure 4: To maximize the expanse of bony exposure for a given configuration of burr holes, the craniotomy must run along the outer edge of each burr hole (left image). If the inside of the burr holes are connected with the craniotome, the size of the craniotomy is unnecessarily reduced (right image).
Exceedingly thick skulls, such as those of acromegalic patients, may require using the long B1 or C1 bits to complete the osteotomy by creating deep grooves in the bone between the burr holes.
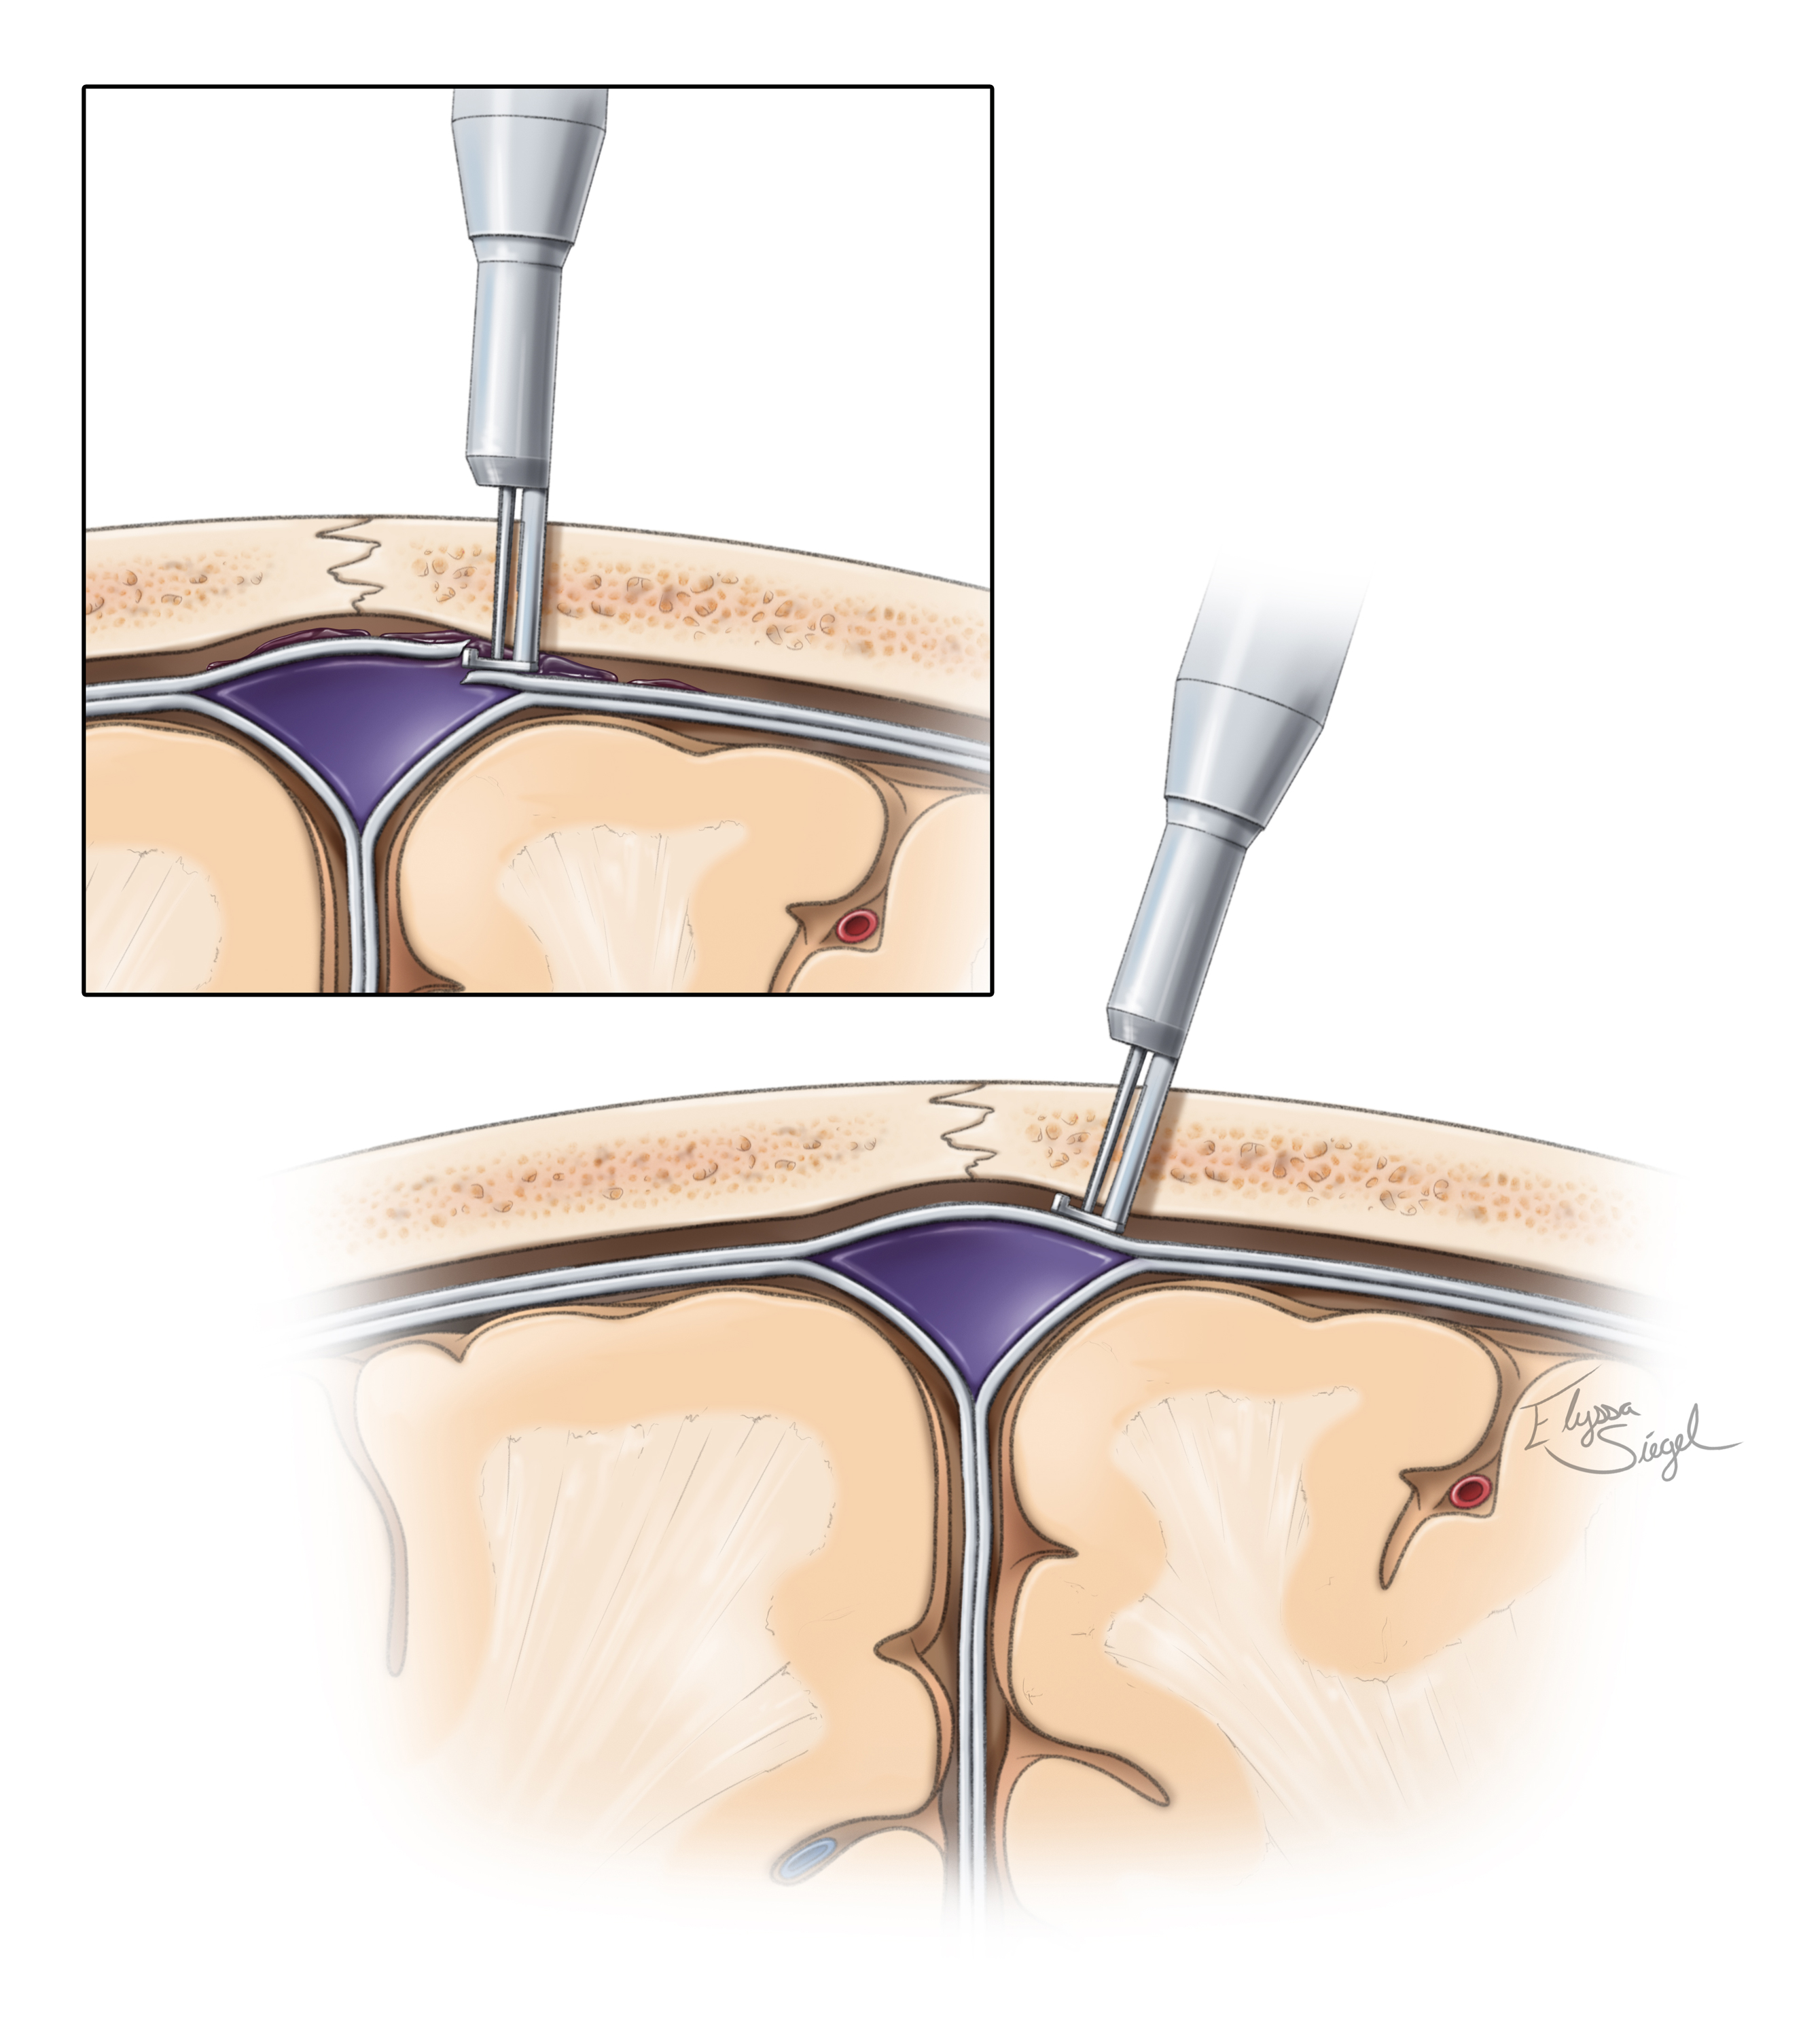
Figure 5: The footplate should stay tangential to the inner surface of the skull to avoid inadvertent dural tears, especially around the dural venous sinuses (inset image). This nuance is often ignored by junior residents. The dural sinuses can embed themselves within the inner table of the skull. There is a gentle concavity that the footplate must respect in order to avoid massive hemorrhage.
I always stabilize and rest my hand during drilling to avoid uncontrolled movements as the drill bit is moving over sharp bone edges that may force the drill to slide. Again, the most common cause of drill-related injury is unsteady hands and forceful handling of the blunt burr.
A #1 Penfield dissector is used to scrape the dura off of the anterior and middle cranial fossa floor in order to decrease the risk of dural injury during lateral sphenoid wing resection. A brain ribbon or suction is then used to retract the dura away during drilling or rongeuring.
Bipolar Coagulation of the Dura
The dura will shrink when coagulated. When approaching bleeding from a small dural sinus defect, I minimize bipolar electrocautery as it may actually increase the bleeding as the edges of the defect will retract.
Careful epidural hemostasis, including control of the minor bleeding points along the cut edges of the dura, is important for intradural microsurgery. The trainees often try to skip this step of the operation because of their intense enthusiasm to proceed with the intradural part of the procedure.
Dural Retraction
Extra few millimeters can make a substantial difference in operative visualization through small working skull base corridors. Dural retraction is often an underestimated aspect of the procedure.

Figure 6: The ideal method of dural retraction involves placing 4-0 sutures along the line of the dural fold closest to the brain or skull base, not along the edge of the dural flap.
An extra 2-3 mm of exposure can be gained using this method because these deep sutures mobilize not only the dura, but also the underlying soft tissues such as the temporalis muscle and periorbita (in the case of an orbitozygomatic craniotomy). As a prerequisite for the success of this technique, bone removal along the skull base must be generous.
Bipolar Coagulation
The bipolar coagulator is also frequently misused and can cause three avoidable problems:
- formation of coagulum at its tip or charring, rending it ineffective;
- indiscriminate coagulation leading to regional tissue damage; and
- adherence of blood vessels to the tips, causing vascular avulsion injury.
I avoid leaving the bipolar forceps on the bleeding tissue for an extended time and coagulate only for approximately 1 or 2 seconds at a time (except in the case of large AVM vessels that require a more extended period of coagulation because of their increased wall thickness). I do not completely close the tip of the bipolar forceps, and only intermittently grasp the tissue with the forceps during active coagulation. This intermittent motion of the tips minimizes the risk of charring.
Similarly, when coagulating a bleeding vessel, especially an artery, I open and close the tips on the vessel while applying short intervals of current. I do not statically maintain current around the vessel in a single spot because the vessel may stick to the tips and create more bleeding by undergoing an avulsion injury.
It is prudent to use the lowest current. Factors that may change the required current include the size of the tips and their thickness, as well as the texture of the tissue. Insulated tips may help keep the intensity at a minimum.
Too much or too little irrigation is not helpful. A minimal steady amount of irrigation without flooding the field is most effective. The irrigating bipolar forceps are ideal in my opinion.
I use bipolar forceps and their spring action to dissect the thin arachnoid membranes within the Sylvian fissure or other cisterns. Much of this technique is dependent on the opening tension of the forceps, and if this is too low, dissection will prove difficult. The aggressive and indiscriminate use of the spring action of the forceps to open thick arachnoid membranes will lead to pial injury. Sharp dissection is most often the safest dissection method.
Fixed Retractors
I avoid fixed retractors at all cost. They not only interfere with the flow of microsurgery and can be inadvertently dislodged, but they also restrict the working angles of my instruments. Because of their wide blades, they lead to excessive retraction along fixed, undesirable vectors. Dynamic retraction using the suction apparatus provides controlled and precise retraction vector transiently in the exact desired location. This phenomenon actually exposes the surgical target more generously along the most practical operative working angle. However, there are situations, such as during bypass procedures within the fissure or permanent clip application in deep corridors, where transient fixed retraction can effectively help me with a “third hand” to keep the vital structures in view.
The blades are not brain retractors, but rather brain holders or protectors. Herniation of the brain around the edges of the blades indicates a demand for alternative brain mobilization techniques rather than refractor blades. These techniques include skull base osteotomies, wide opening of arachnoid membranes, and use of other methods to achieve brain relaxation.
If retractors are deemed necessary, they must be positioned not only to provide proper angles of retraction, but also to be safe in case of accidental movements. They can cause extensive cerebral injury if certain tenets are not followed. It is necessary to restrict retraction to only the limited working area of the surgeon. The blades are intermittently released to restore perfusion to the retracted area. Again, the fixed retractors should be used only for a short period of time, and only if absolutely necessary.
Blunt versus Sharp Dissection
In general, blunt dissection should be avoided during any stage of microsurgery and specifically during aneurysm surgery. Sharp dissection under high magnification is the safest method of dissection for releasing arachnoid and pial adhesions.
Blunt dissection is less taxing, often more expeditious, and therefore tempting for the novice surgeon, but this temptation should be avoided. The use of fine, blunt dissectors to mobilize the arachnoid membranes in expectation of their sharp transection is very reasonable and recommended to avoid inadvertent injury to the entangled perforating vessels.
The tip of the microscissors must be always in view. Blind sharp dissection leads to catastrophic complications. The inferior blade of the scissors may be used to elevate the target arachnoid membrane away from the adjacent vessels before the cut is completed.
Ultrasonic Aspiration
Ultrasonic aspirators can easily avulse and penetrate or shred the walls of vessels if care is not taken to keep the device within the boundaries of the tumor capsule. The claim that ultrasonic aspirators leave the vessels untouched is unfounded and highly dubious. With their vibrations, these devices can even disrupt arteries located a short distance away from their tip.
Pearls and Pitfalls
- Misuse of instruments is underreported and underappreciated. Lifelong review of my operative videos has been one of the most important sources of learning for me to advance appropriate application of microsurgical tools.
Please login to post a comment.


Comments: