Skull Clamp Placement Free


Figure 1: A patient of Harvey Cushing’s is shown positioned on the operating room table to undergo resection of her acoustic neuroma. Note the anesthesia machine and the note pad used for recording anesthesia details (circa ~1930)(Photo courtesy of the Cushing Brain Tumor Registry at Yale University.)
The discussion in this chapter describes the correct application of the Mayfield® three-point skull stabilization and fixation device (Integra LifeSciences, Plainsboro, NJ) primarily during craniotomy procedures. This device has stood the test of time and its sophistication relies on its simplicity.
The initial step in skull fixation involves firm application of the two-point arm to the patient’s cranium before applying pressure with the contralateral single pin. When considering clamp placement, the surgeon must be mindful of the anatomy of the patient’s head to avoid pin slippage and resultant clamp fixation failure, hemorrhage, and other complications.
The arterial neurovascular structures of interest to avoid pinning include the superficial temporal artery, occipital artery, and supraorbital artery (and nerve). The surgeon should remain cautious when applying the device to the temporal squamosa because this bone lacks the integrity to withstand aggressive forceful pinning.
Lastly, the surgeon must be mindful of the underlying venous dural sinus anatomy to avoid placement of pins over the transverse or sigmoid sinuses in patients with thin skulls.
The videos accessible within each section of this chapter describe and illustrate application of the Mayfield skull clamp in the safe zones for each cranial approach. These zones usually will allow two of the three pins to stay below the cranial equator. This principle allows gravity to maintain the stability of the patient’s head, even if the pressure applied by the pins is suboptimal. I admit that I have not consistently followed this rule during pin placement, but some operators place much more emphasis on it.
The general guidelines for placement of the fixation device warrant a brief discussion. The key concept for clamp application dictates that the patient’s head should be positioned so it is “falling into the pins.” This factor, in addition to the pressure applied by the pins, will stabilize and fix the head in space.
In summary, following are the key axioms to consider during skull clamp application:
- The safety of pin placement can be maximized by keeping the pins within the “sweatband” region (along the superior temporal and nuchal lines,) which allows the operator to avoid placing the pins within the muscle. This principle minimizes the risk for pin slippage.
- Place the skull clamp in the position where the opposing arms cross the vertical or sagittal plane of the cranium, as defined by the superior sagittal sinus.
- The vertical plane in which the single pin is located should bisect the two-pin arm, which can be achieved by adhering to the second key principle above.
Atlas Choice Tapered Pattie Collection
Low-profile for maximal visualization and protection
Tapered shape designed for retractorless surgery
Unparalleled flexibility and non-stick features
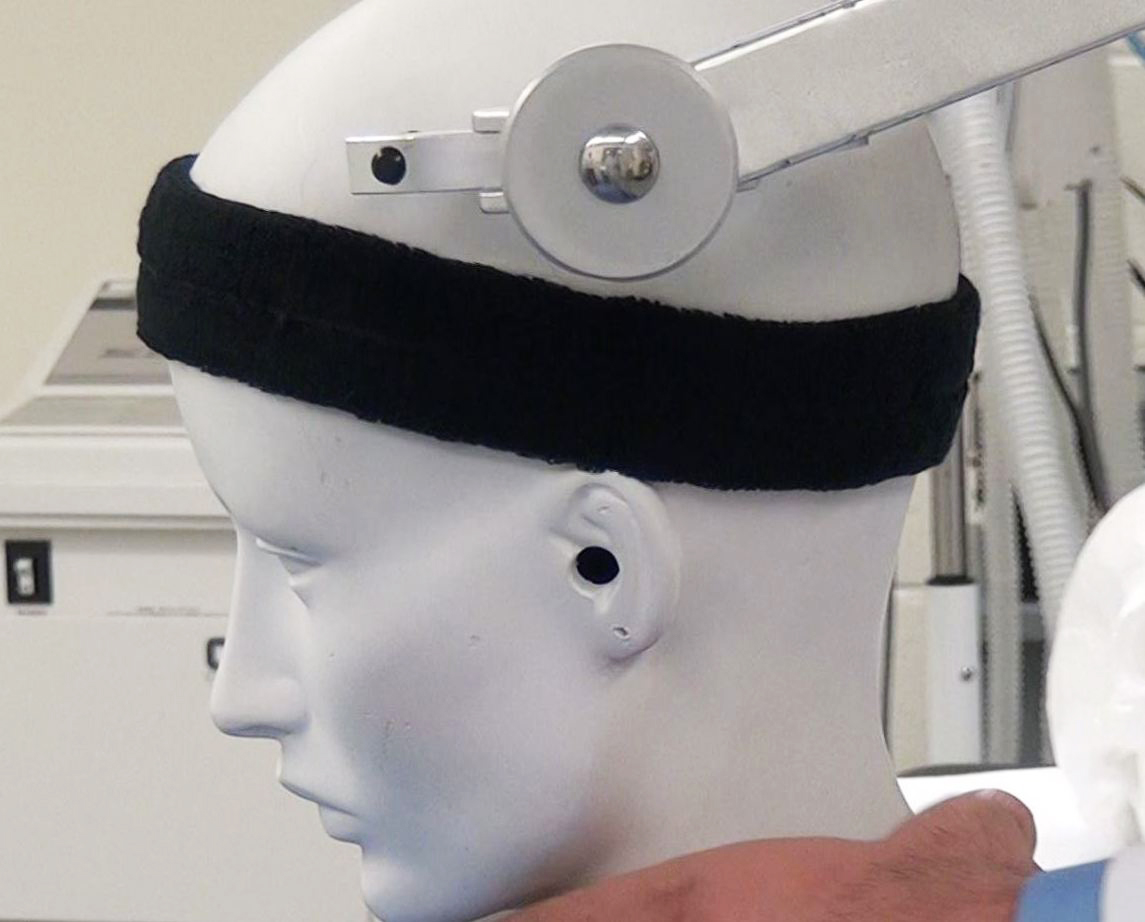
Figure 2: Improper placement of the pins outside the sweatband area can significantly compromise fixation.
Pterional Craniotomy
The pterional approach is one of the most widely applicable craniotomy and skull base routes and provides exceptional access to the skull base for parasellar, cavernous sinus, and anterior skull base pathologies.
The pin placement on a patient in preparation for a pterional craniotomy is designed to maximize access to the pterion. Most surgeons apply the double-pin arm ipsilateral to the pterion of interest: one pin rests on the mastoid process and the other superolateral to the inion. The contralateral single pin is placed along the superior temporal line. This pin configuration allows two pins to be placed below the cranial equator, thereby facilitating fixation that is stabilized by gravity.
Placement of the pins in this configuration avoids iatrogenic injury to the supraorbital artery and nerve, so that the single pin is placed lateral to these structures.
I use an alternative method of pin placement as shown in Figure 3.

Figure 3: The patient is positioned supine and with a shoulder roll for patients who have limited neck mobility. The pins are placed well behind the planned incision. I prefer to place the dual pins along the contralateral superior temporal line and the single pin on the ipsilateral mastoid bone. The head is slightly turned and extended to allow the frontal lobes to fall away with gravity. This configuration exposes the widest area of the scalp with no interference from the pins.
Temporal and Subtemporal Craniotomy
For temporal and subtemporal craniotomies, the patient’s head is turned contralaterally and the ipsilateral shoulder is supported on a bulky gel rest. The single pin is implanted along the ipsilateral supraorbital region, at least 1 cm superior to the eyebrow and lateral to the supraorbital notch. The double-pin arm is positioned posteriorly, just superior to the nuchal line. This allows the horizontally oriented double-pin arm to set one pin adjacent to the inion and the other laterally. This setup allows the vertical plane of the single pin to bisect the double-pin arm.
The single pin can be improperly positioned in a potential danger zone. Correct placement of this pin prevents its slippage into the orbital region or the frontal sinus.
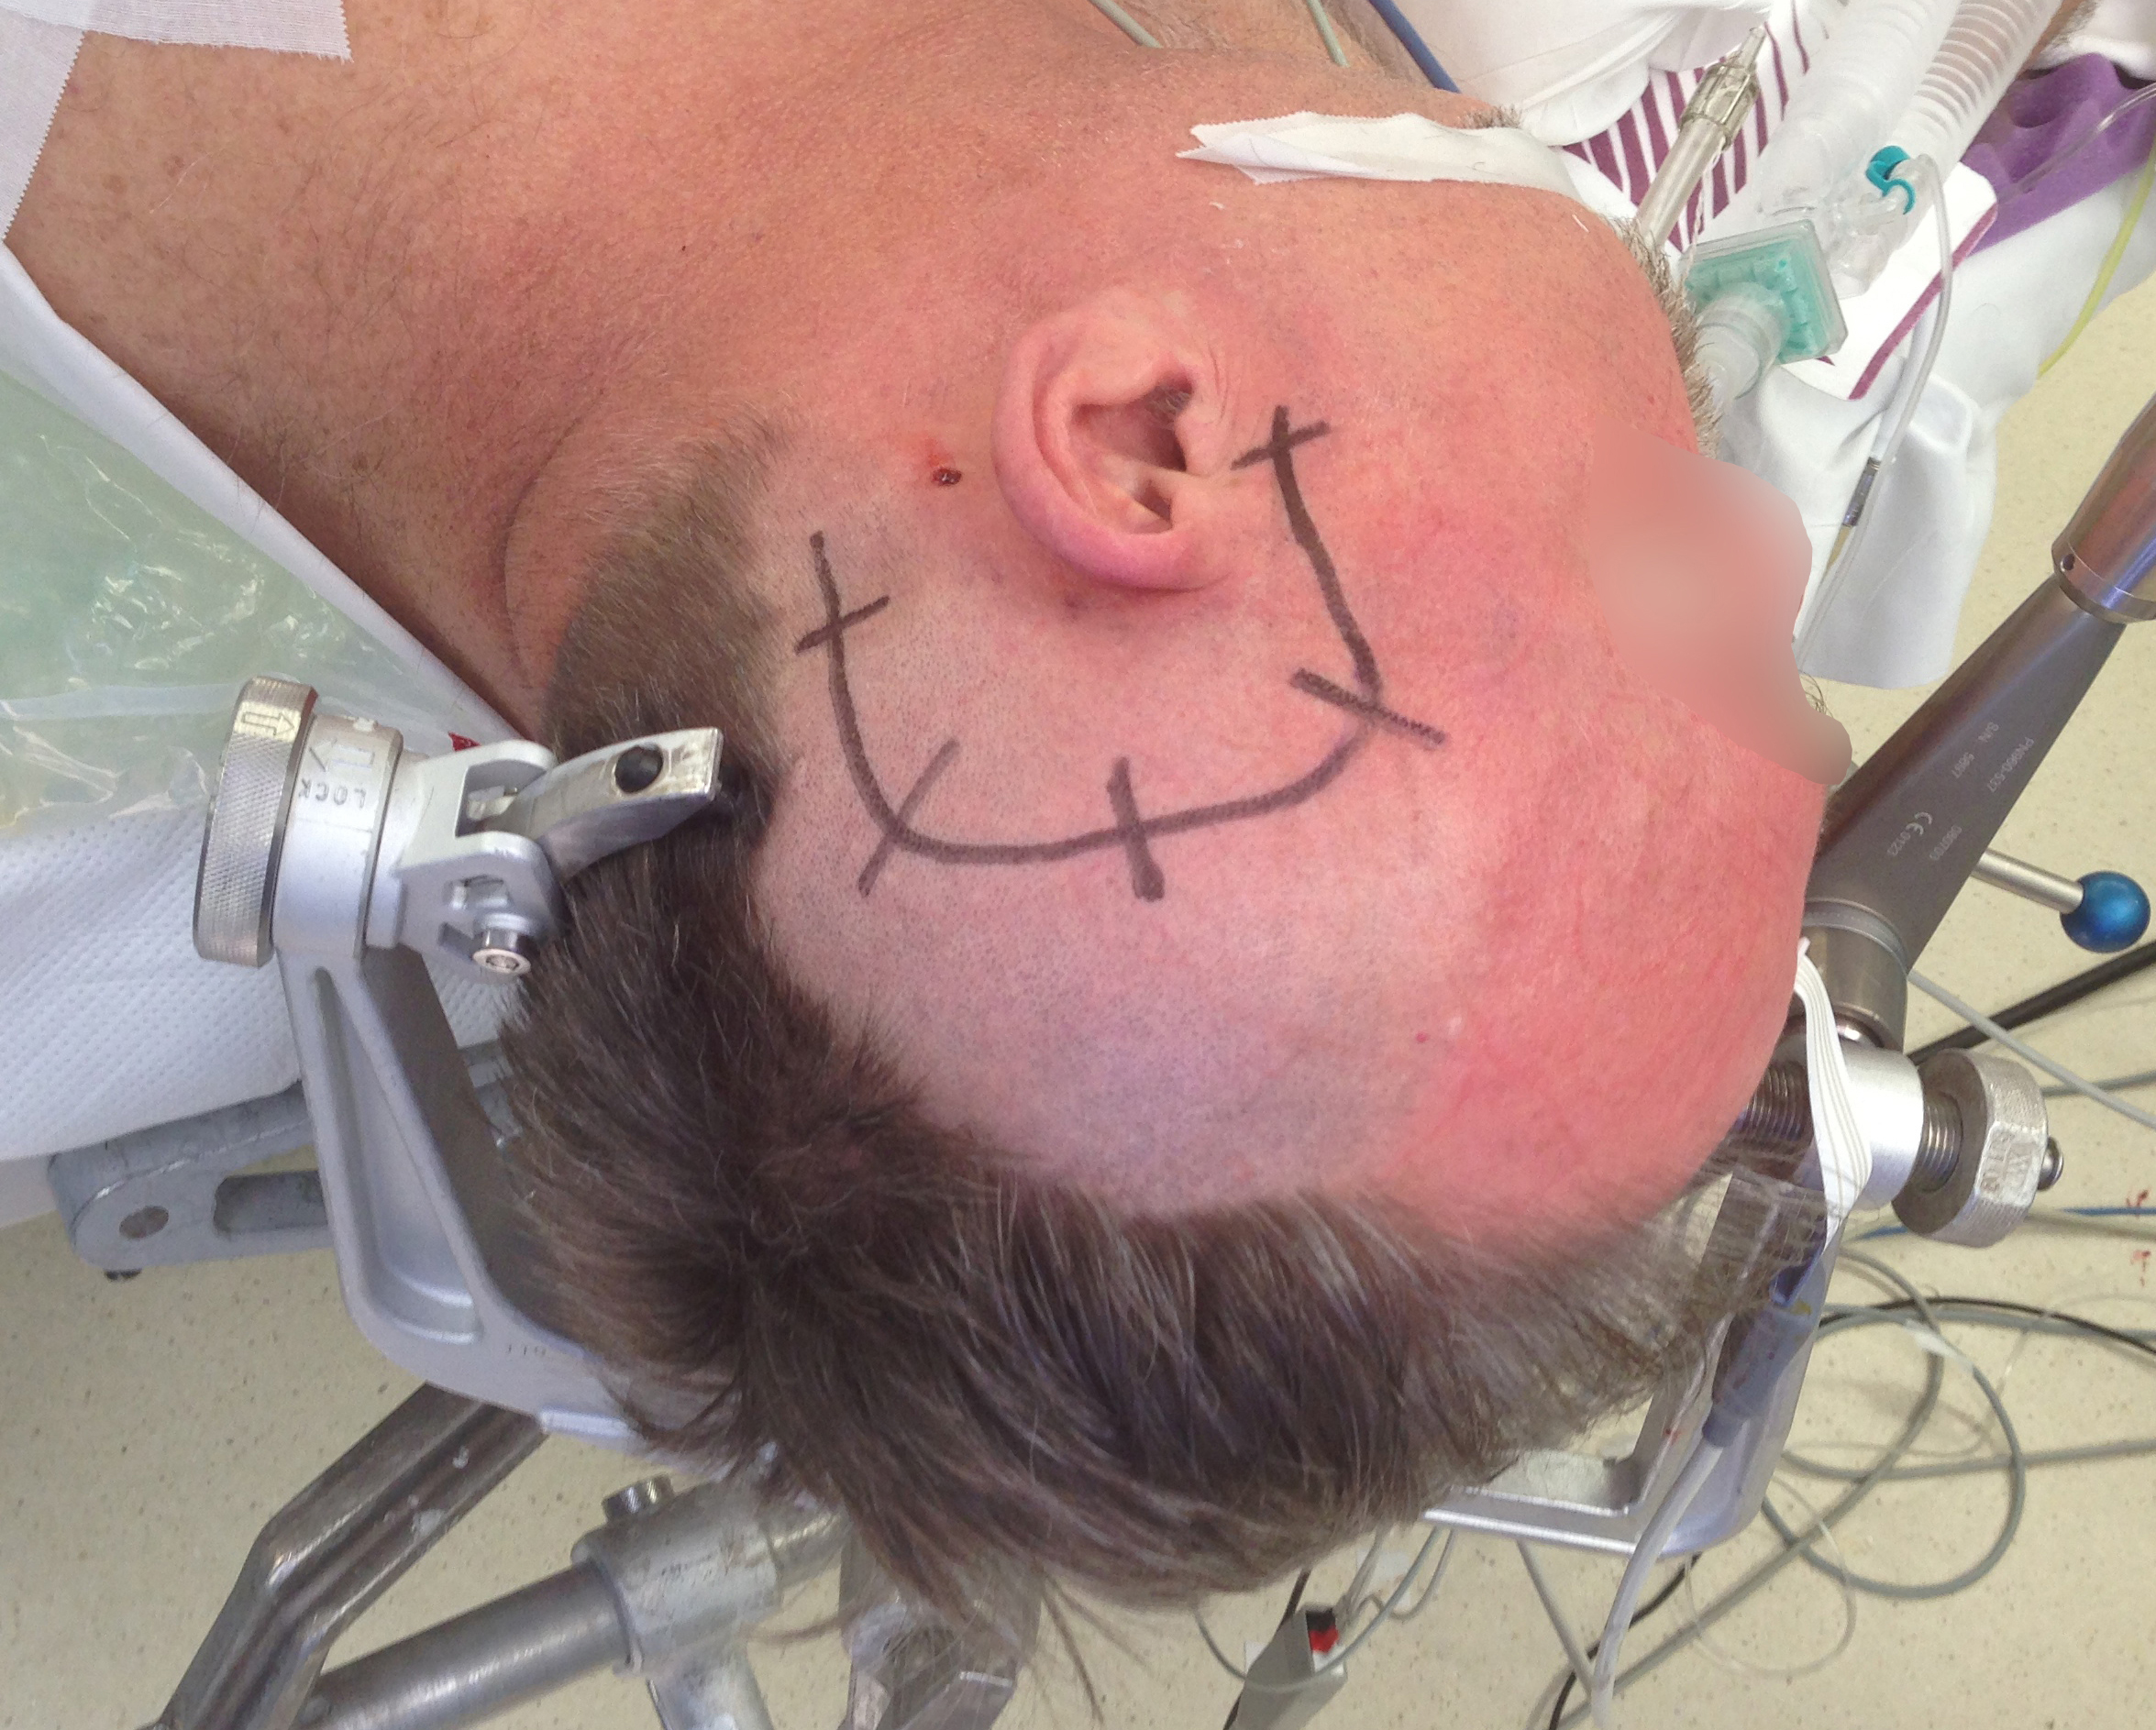
Figure 4: The position of the skull clamp for a temporal or subtemporal craniotomy.
Frontal Craniotomy
The frontal craniotomy provides access to the frontal lobe for resection of parenchymal tumors. The double-pin arm positions its pins along the posterior aspect of the superior temporal line. The contralateral single pin is positioned to rest superoposteriorly to the pinna at the posterior margin of the temporal fossa, avoiding the temporal muscle.
The positions of all three pins should be below the cranial equator, allowing the cranium to fall into the pins under the influence of gravity. The head can subsequently be turned appropriately to accommodate the exposure required for the underlying pathology. For the interhemispheric route, the patient’s head should be positioned at a neutral anatomic posture to keep the operator oriented intraoperatively relative to the midline structures. In these cases, I prefer the lateral approach to use gravity retraction.

Figure 5: The configuration of the skull clamp for a right frontal craniotomy. The location of the metastatic tumor is marked with the + sign.
Parietal Craniotomy
Pin placement for a parietal craniotomy is simple; all three pins rest above the ears. The single-pin arm is implanted in the thin posterior aspect of the temporalis muscle superior to the ipsilateral ear. The double-pin arm is placed so both pins are situated along an axial plane and superior to the pinna on the contralateral side.
The placement of the clamp during this approach can be hazardous because there is a risk of the arms of the clamp contacting facial structures. The nose is of particular interest due to the risk of its compression as a result of swelling or motion during the procedure. I ensure good clearance between the patient’s face and the clamp arms and sometimes apply padding to the nose before draping.
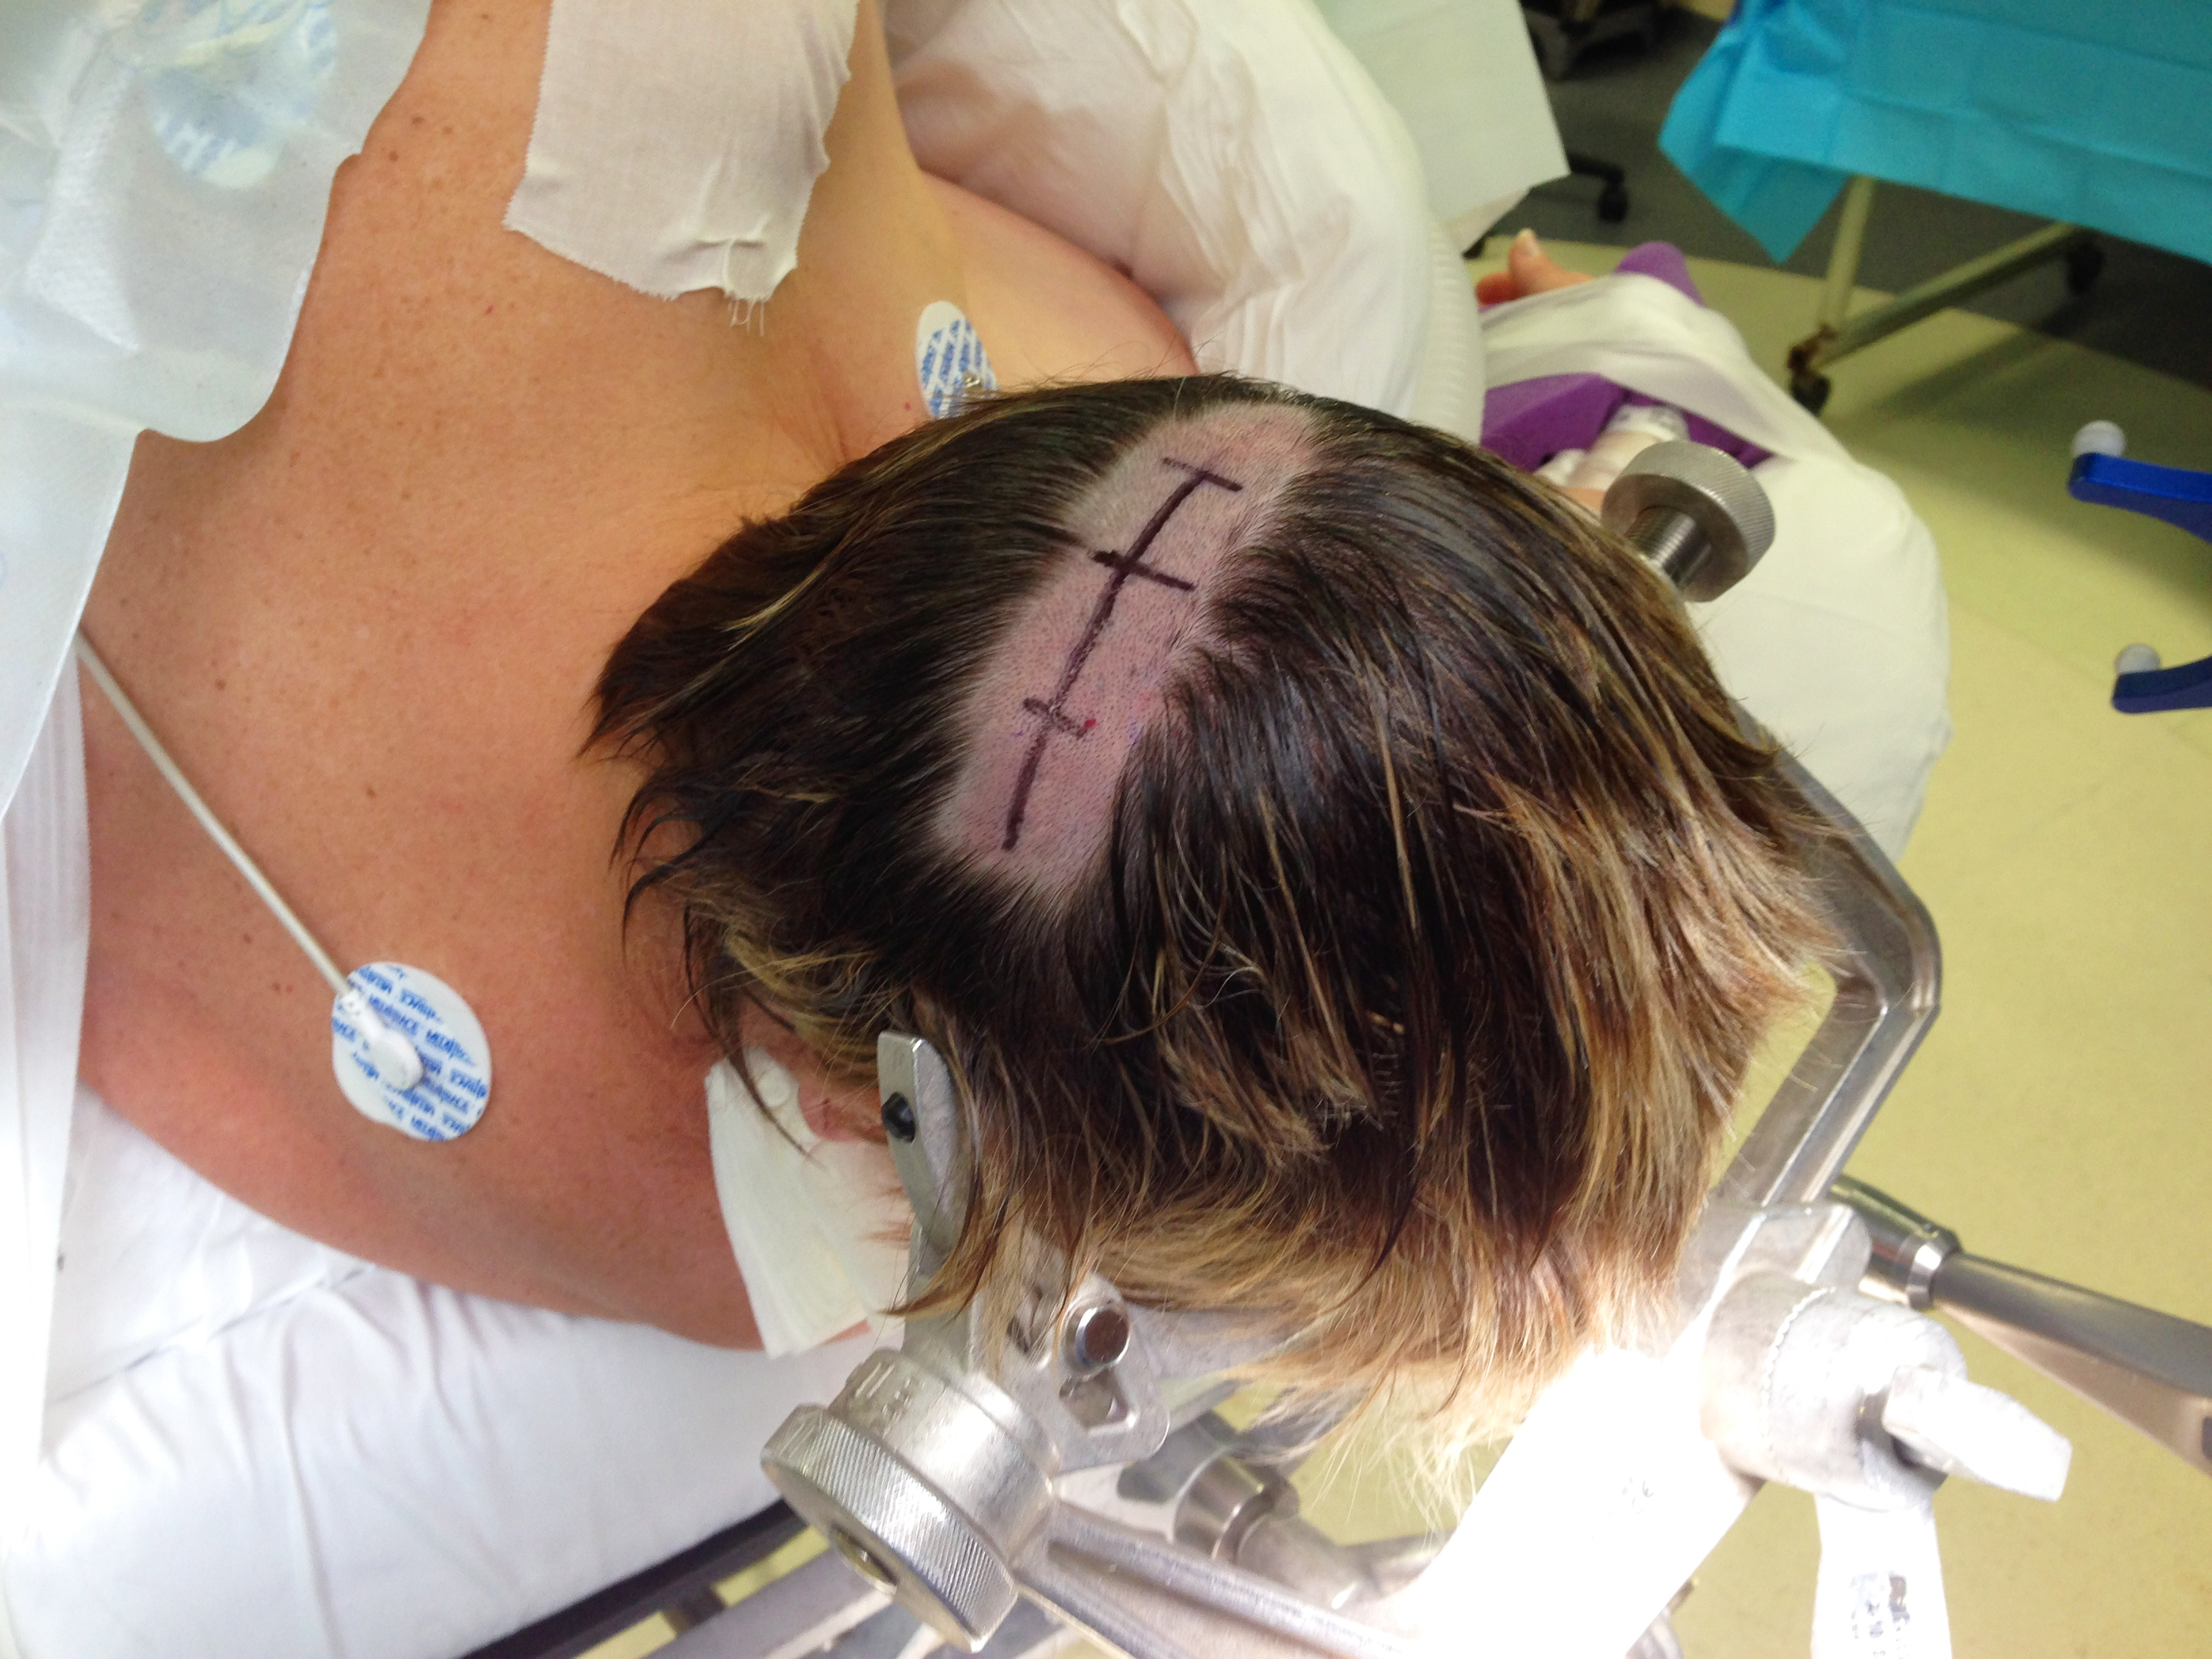
Figure 6: The composite for a parietal craniotomy.
Bifrontal Craniotomy
Pin placement for this operative corridor can be challenging because there is a need for a large incision spanning both sides of the cranial equator. Placement of the vertically rotated double-pin arm positions both pins above the patient’s ear. The contralateral single pin rests superoposteriorly to the pinna. Vertical rotation of the double-pin arm is pertinent to provide the space needed to adequately drape the incision.
If the pins are not adequately implanted, they can occasionally slide slightly more posteriorly during surgery and lead to some retraction of the incision line. This can complicate scalp closure.

Figure 7: Skull clamp fixation for a bifrontal craniotomy.
Retrosigmoid Craniotomy
For this cranial approach, all three pins may be placed superior to the patient’s ears. I usually place the single pin above the superior temporal line and just along the hairline. The clamp can be rotated to avoid pinning the forehead; this can cause an undesirable cosmetic result.
The double-pin arm is positioned parallel and just posterior to the superior temporal line.
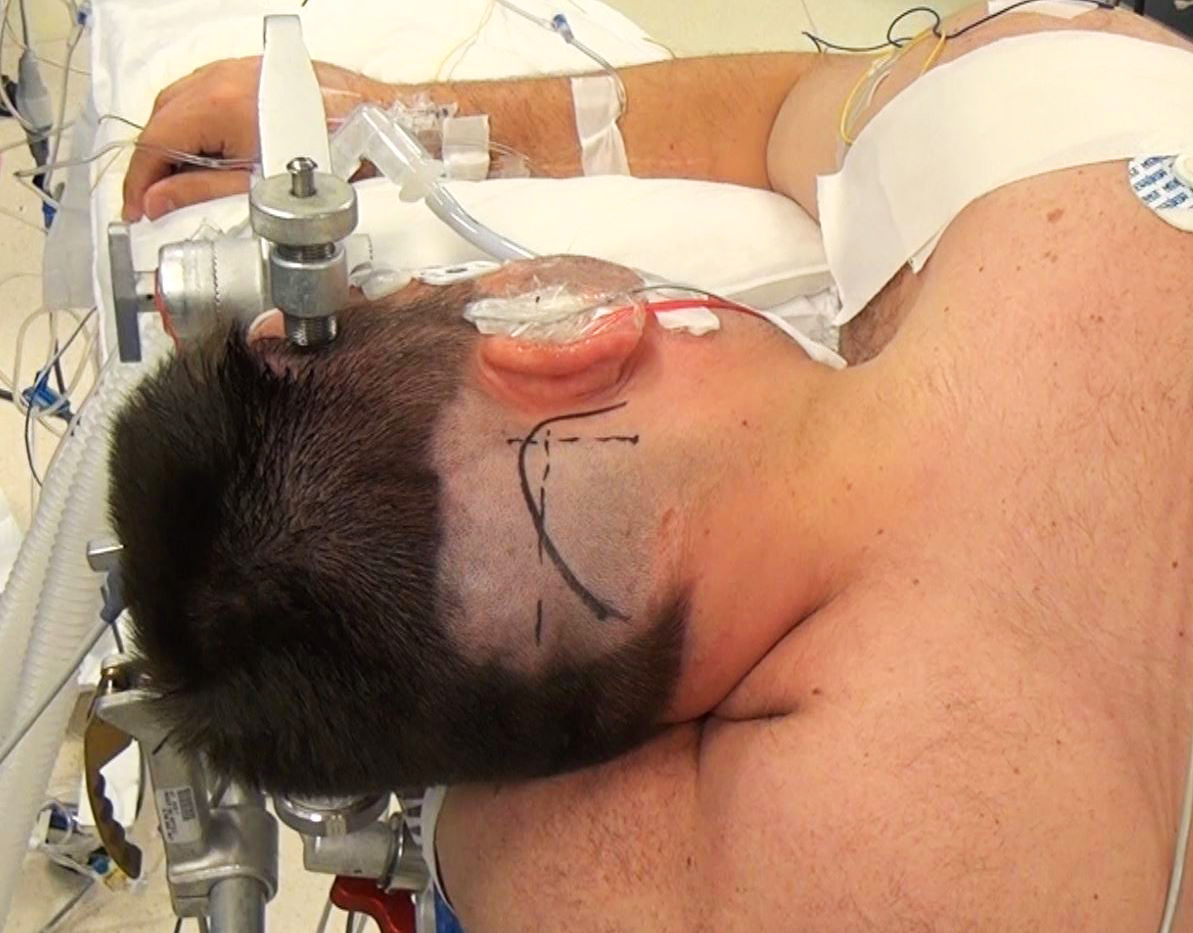
Figure 8: Pattern of pin placement for a retromastoid craniotomy.
Suboccipital Craniotomy
The pins are placed superior to the pinna bilaterally and slightly anteriorly to facilitate neck flexion. Avoiding the temporalis muscle will decrease the risk of compromising fixation; therefore, the pins should be placed at or above the superior temporal line.
Similar the case for a parietal craniotomy, there is a potential hazard that the arms of the clamp might contact the facial structures.

Figure 9: Skull fixation for a midline suboccipital craniotomy.
Large and Trauma Scalp Flaps
The large size of these incisions offers special challenges for pin placement. I use the pterional pattern of pin placement. I place the single pin on the mastoid bone, ipsilateral to the side of surgical interest, to facilitate scalp exposure without pin interference. The double-pin arm is placed along the superior temporal line on the contralateral side.
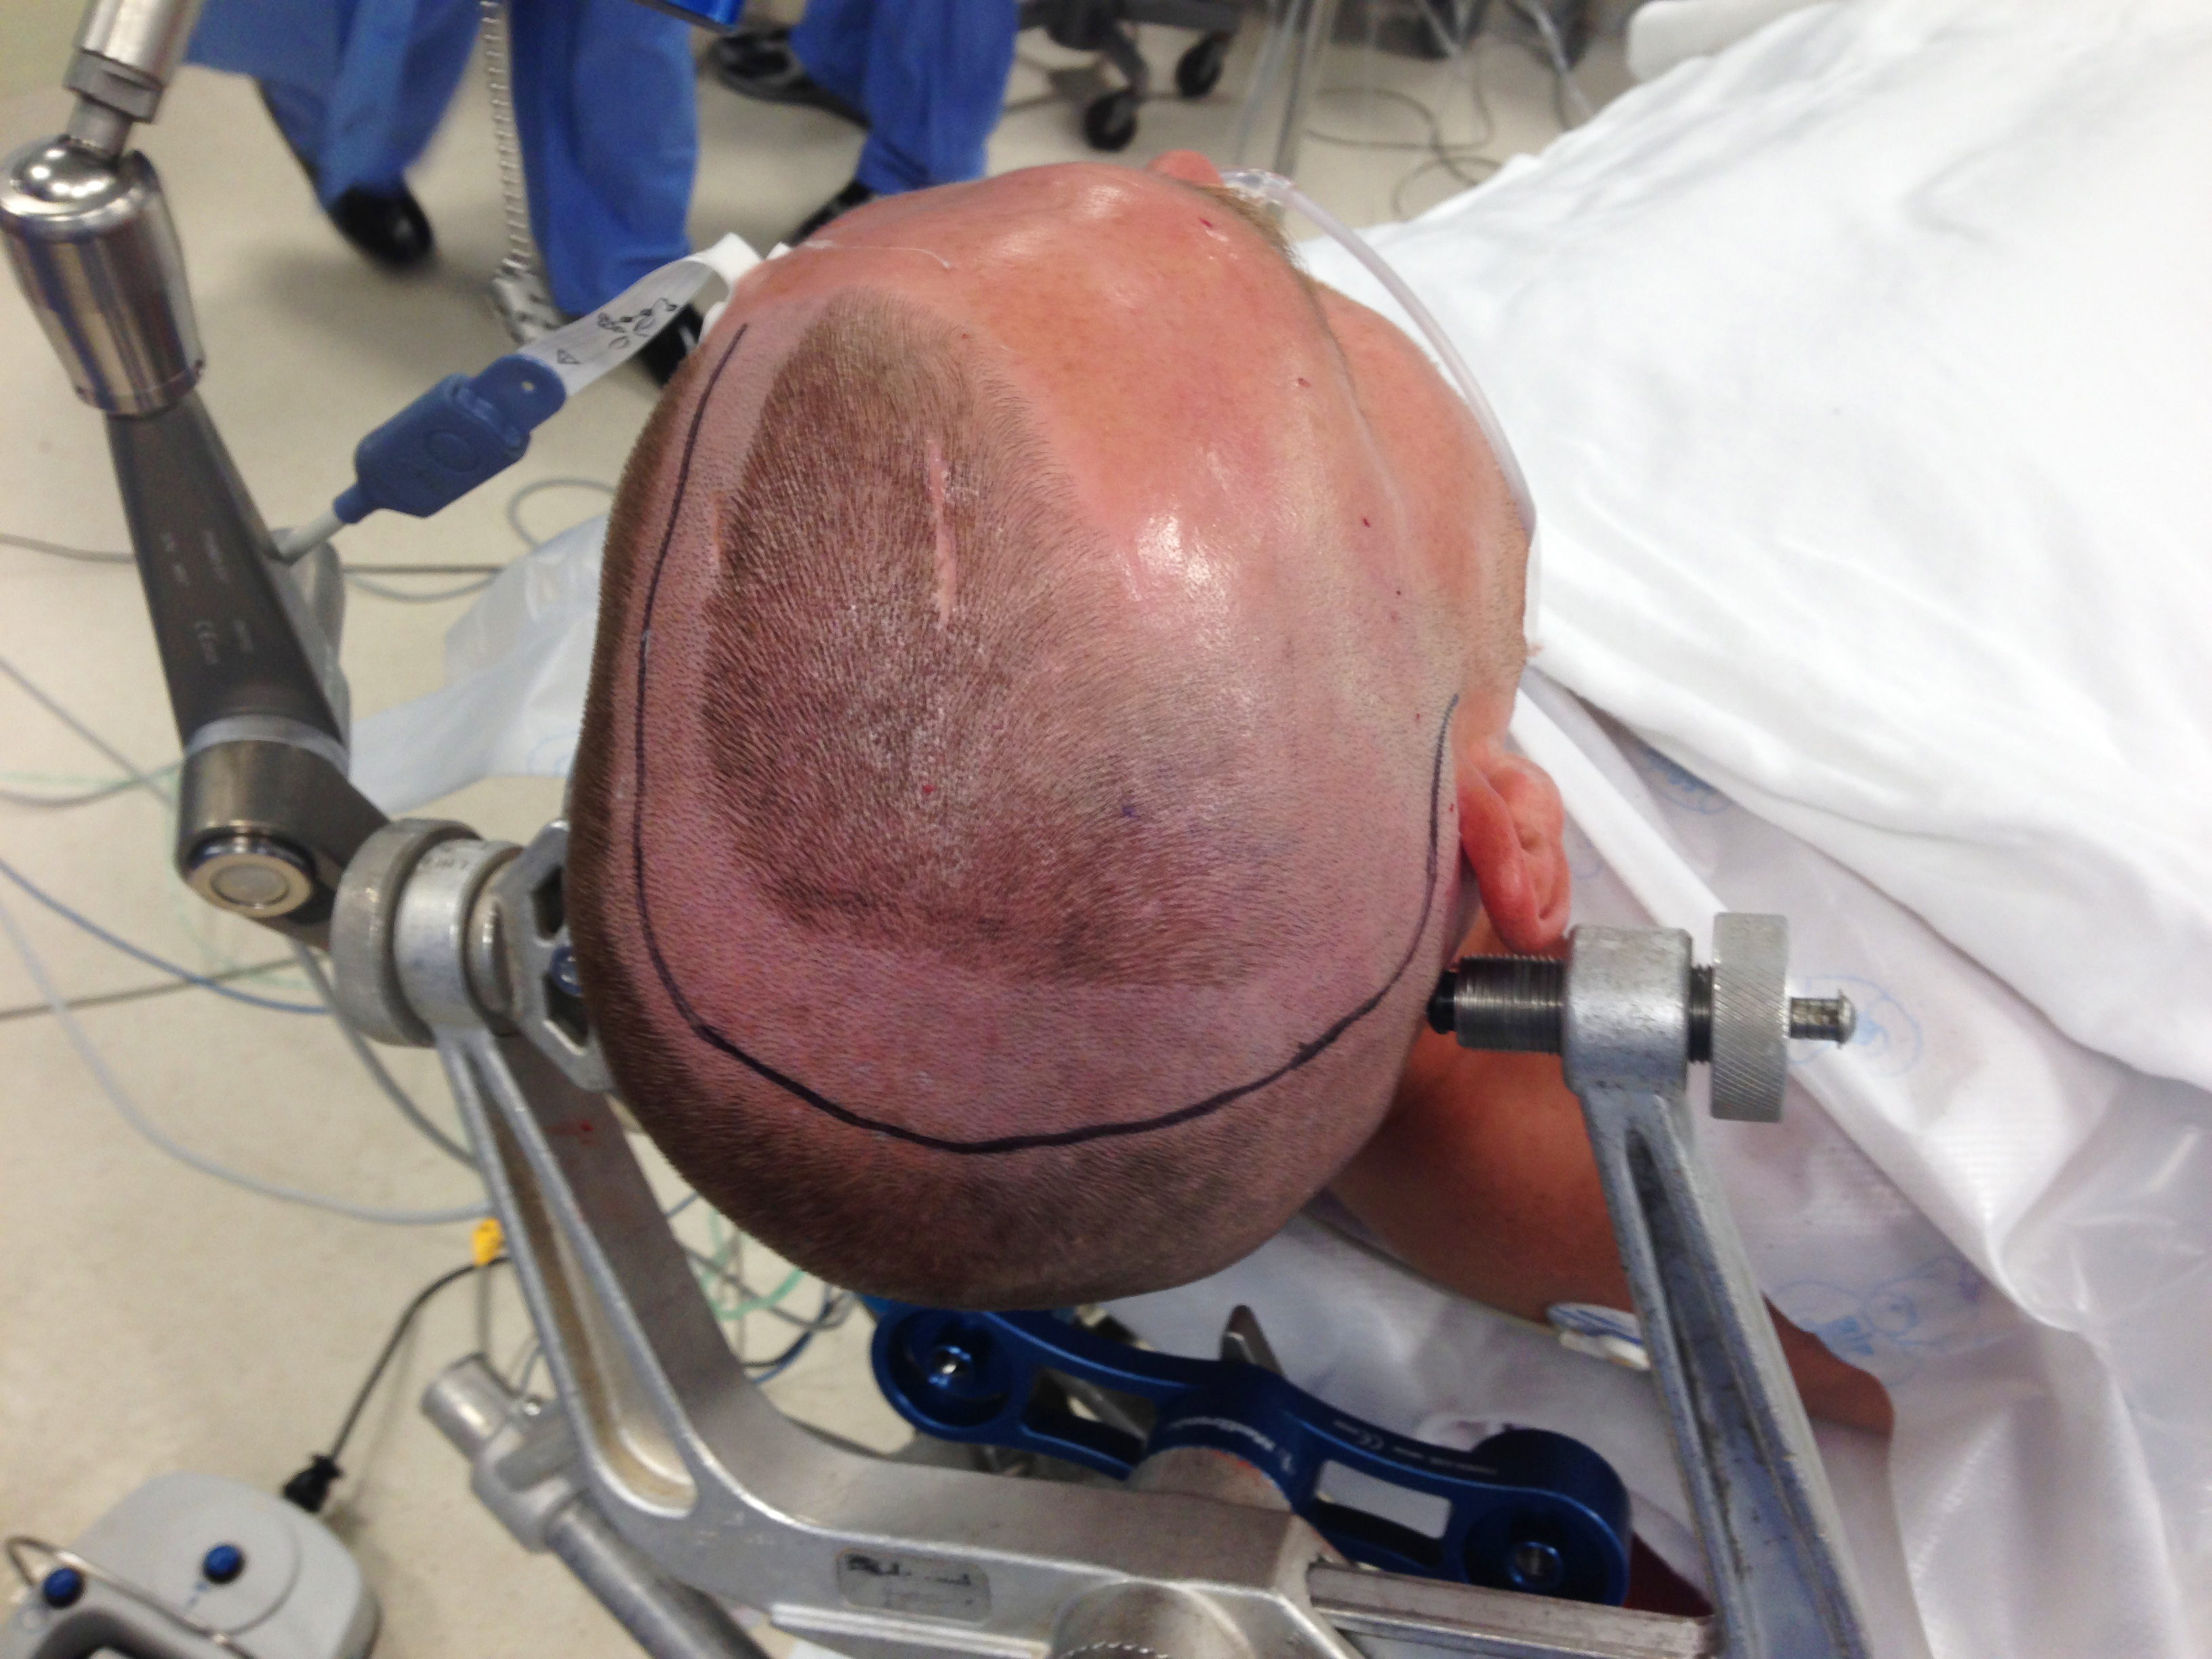
Figure 10: This mode of clamp fixation allows the most unobstructed space for large scalp flaps.
Cervical and Prone Procedures
For this approach, all three pins are placed along the superior temporal line to avoid the temporalis muscle. Forceful overflexion of the patient’s neck can lead to fixation failure.
Pediatric Patients
The use of a skull clamp is contraindicated for pediatric patients younger than 3 years old because of the risk of skull fractures. The Mayfield Infinity support system incorporates a combination of a horseshoe headrest and a skull clamp, which requires less force to achieve cranial fixation. This accommodates the lower suggested pressure for pinning pediatric patients, 30-40 pounds, compared with 60-80 pounds in adults.
Complication Avoidance
The general concepts for complication avoidance were discussed in the above sections. The clamping pressure should be limited to 60-80 pounds for adult patients and 30-40 pounds for pediatric patients older than three years. The pressure or the torque knob should be turned to the corresponding magnitude, so that each line that extends laterally on the knob represents 20 pounds.
However, there is a notable exception. I use 80 pounds as my upper limit of normal force for fixation during awake craniotomies to ensure that the skull clamp remains fixed even during patient agitation and attempted head movements.
Again, these are key elements for avoiding complications related to clamp failure:
- Implanting the pins near the vertex of the skull (outside the “sweatband” region) increases the risk for dislodging the arms. If pin placement requires positioning the pins outside the sweatband zone, I make sure that at least two pins are maintained within or below the sweatband zone.
- Apply the three-point fixation device so that the vertical plane in which the single pin lies bisects the plane of the double-pin arm.
Pearls and Pitfalls
- Application of the pins within the “sweatband” region (along the superior temporal line and superior nuchal line) enhances the safety of pin placement.
- Avoid pinning within the temporalis or suboccipital muscles because of the risk of inadequate pin implantation. The added thickness of the scalp in these regions may lead to scalp pressure necrosis at the shoulder of the pins.
- Application of pins on children younger than 3 years of age is contraindicated.
Contributor: Benjamin Hendricks, MD
Please login to post a comment.