Applying for Neurosurgery Residency

Applying
The first rule for starting your application is to start as early as possible. You will have to make an account in the Electronic Residency Application Service (ERAS) to begin your application. This is an online application service in which you build your residency application and then use to apply for residency programs.
For more information, please also see the Applying to Neurosurgery section of this Atlas for US medical students.
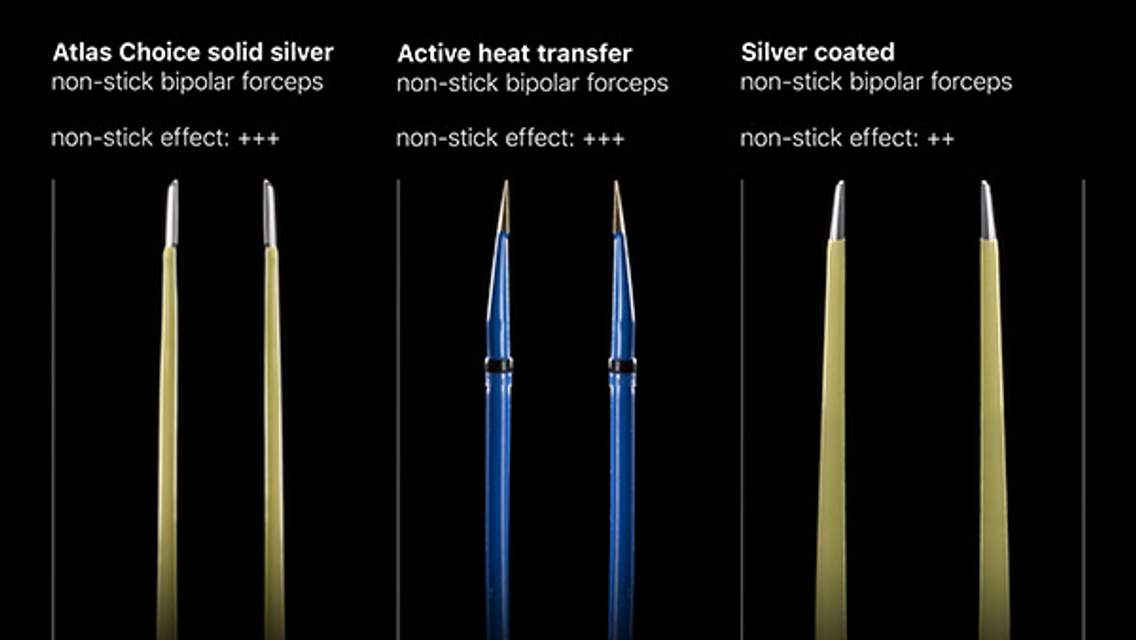
ATLAS Choice Bipolar Forceps
Designed for your every surgical maneuver
Five tip sizes for brain and spine procedures
Unparalleled non-stick and low-profile features
Getting Started
You will have to buy a token from the ERAS portal to start your application, usually around June of the year in which you are applying. This token will give you a login. Make sure to start as early as possible, because preparing and then uploading all the necessary documents can be time-consuming. You will not have to upload a resume or curriculum vitae (CV) on the ERAS. As you fill in the required information and upload your documents, the ERAS will automatically generate a CV in its own specific format, and all the programs will see it when they receive your application.
Required Documents
Other than the information you are required to fill in yourself, you must provide the following documents:
- Dean’s letter/Medical Student Performance Evaluation (MSPE)—this letter must be uploaded by your medical school.
- Medical school transcript—this information also must be uploaded by your medical school.
- Personal statement—you will write this yourself.
- Letters of recommendation—you can upload as many letters of recommendation as you want but can send no more than 4 to any one specific program. At least 3 such letters are required for your application to be considered complete. It is very important to request your referees for them as soon as possible, because this is a process that can take time, depending on the schedule of who you request to write a letter.
Sections of the ERAS
The ERAS includes the following sections
- Personal information (name, address, contact, etc.)
- Education
- Training
- Experience
- Publications
- Licensure information
- Self-identity
- Language fluency
- Miscellaneous
Filling out the ERAS
The ERAS portal has a simple and interactive interface. Start by filling in your personal information, which will help you become familiar with the interface. This section also requires your photograph for the application. Be sure to obtain a good professional photograph (clear head shot of you in professional clothing.) Fill in everything that is requested and save your entries as you go along. You can also edit the information later.
There are 3 categories in which you can list your research. The first section is for published papers. In this section, list only what you have published in PubMed-indexed scientific journals. In the second section, you can also list your research projects that you have submitted, and in the third section, any posters/abstracts that you have presented.
The ERAS is self-explanatory. When filling out your work experience, you can describe your role, but keep all such descriptions brief and to the point. You can edit everything on the ERAS until you certify and submit your application. Afterward, you can still edit your personal information, such as contact number and address, if anything changes.
You need to upload everything on the ERAS by the time the “certify and submit” option becomes available, which is typically in the first few days of September. There is a 10-day window during which you can certify and submit your application. September 15 is the first date that the ERAS is available for the programs to start downloading your application. Therefore, it is strongly recommended that you submit your application before September 15. Keep a personal deadline for completing your application well before this date to avoid any unforeseen delays.
Applying to Programs
When applying, open the website for each individual program and review the requirements. You will use these requirements to determine which program(s) to choose. These requirements can include:
- Visa sponsorship—if you are an international medical graduate (IMG) who is not a US citizen or green card holder, you will have to exclude certain programs that will not sponsor a visa or will sponsor only a certain type of visa.
- Clinical experience—some programs require a certain amount of clinical experience in the United States for them to consider you for an interview.
Individual programs can have other requirements as well. After viewing each program’s requirements, you can decide whether to apply for it. Look for IMG-friendly programs, and be sure to apply to them. Other things to keep in mind when applying are the institution’s academic standing, opportunities for research and funding in the future, pathway to fellowships, and location, among others.
Contributors
Ahmed Habib, MD
Aida Kafai Golahmadi, BS
Ayesha Quddusi, MD
Saad R. Alghamdi, MD
Victor E. Staartjes, BMed
Vittorio Stumpo, MD
Please login to post a comment.