Principles of Endoscopic Microsurgery


Any endoscopic endonasal skull base procedure can be divided into the same three phases that are described for traditional “open” skull base operations: 1) approach (exposure), 2) definitive procedure (resection), and reconstruction (closure). Our rhinology colleagues primarily undertake the first and last phases of the operation and drive the endoscope during the resection phase. Importantly, this team approach and mutual learning advances the care of our patients.
Each of these phases requires a different set of goals and objectives, as well as techniques. In this chapter, I will discuss the basic tenets of surgical technique and equipment for each phase of binasal bimanual endoscopic skull base procedures. More specific details may be found in the other chapters in this volume. Our standard leading operative team consists of a rhinologist and a neurosurgeon.
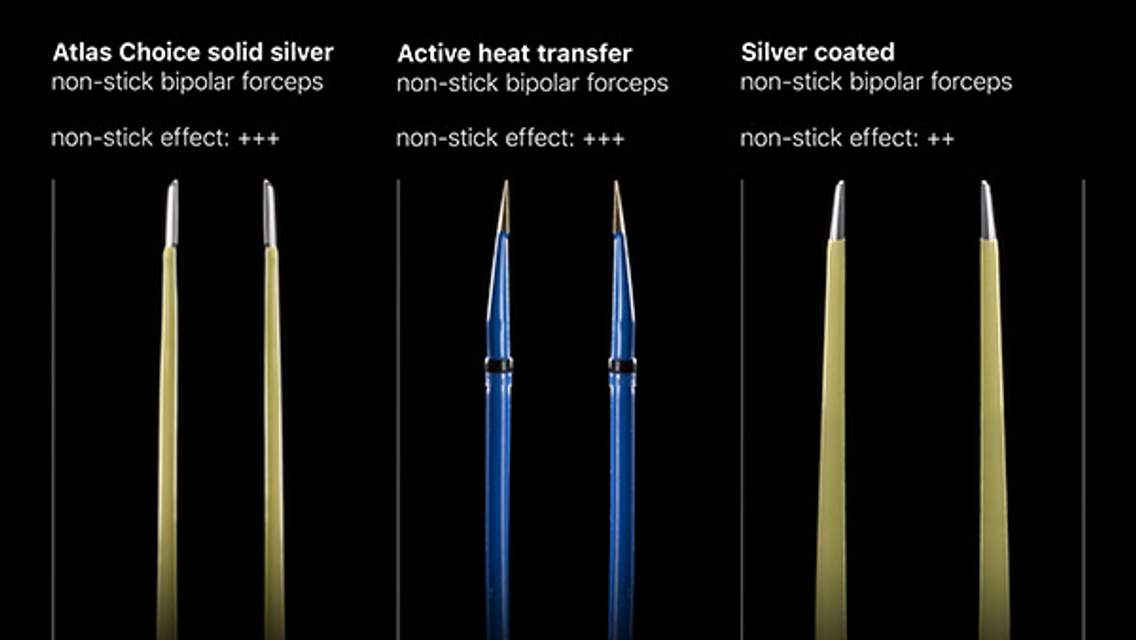
ATLAS Choice Bipolar Forceps
Designed for your every surgical maneuver
Five tip sizes for brain and spine procedures
Unparalleled non-stick and low-profile features
Operating Room Setup and Approach
Patients are positioned supine, endotracheally intubated under general anesthesia, on a donut gel headrest or similar nonfixating headholder. The patient’s face from the hairline to the upper lip is prepped and draped, leaving the forehead, eyes (covered in Tegaderm dressing), nose, and upper lip exposed.
I employ neuronavigation using a thin-cut (maxillofacial protocol) computed tomography (CT) as a standard part of every endoscopic skull base surgery; the reference frame is adhered to the forehead and the images are registered to the face. The navigating monitor is placed at the patient’s head. A high-definition monitor showing the endoscope video output feed is placed on either side of the operating room table for ergonomic use by the operative team.

Figure 1: The operating room setup for an endoscopic skull base procedure is shown (top photo). This setup is fitted for a right-handed surgeon standing on the right side of the patient. Please note the location of the two video monitors across each operating surgeon. The navigation monitor is placed to ensure that the neurosurgeon conducting the microsurgical portions of the operation can view it. The patient’s head is turned 30 degrees toward the side of the surgeon so that the surgeon is not leaning over the patient’s head. Note the location of the anesthesiologist. The neurosurgeon uses both of the patient’s nostrils for microsurgery based on the location of the surgical target relative to the midline. I rely heavily on the “cross-court” approach. In the bottom photo, the left side of the surgical target is aimed at while the endoscope remains in the patient’s right nostril. In general, maintaining the suction device and endoscope in one nostril with the endoscope above the suction while using the dissector in the other nostril minimizes the risk of “swording” and provides the highest degrees of surgical freedom and maneuverability for the instruments.

Figure 2: The operating room setup for a left-handed neurosurgeon is shown. Similar principles as those discussed in the Figure 1 caption apply.
Other teams prefer to have the surgeon stand on the right side of the patient and the rhinologist stand near the patient’s head on the same side as the neurosurgeon.
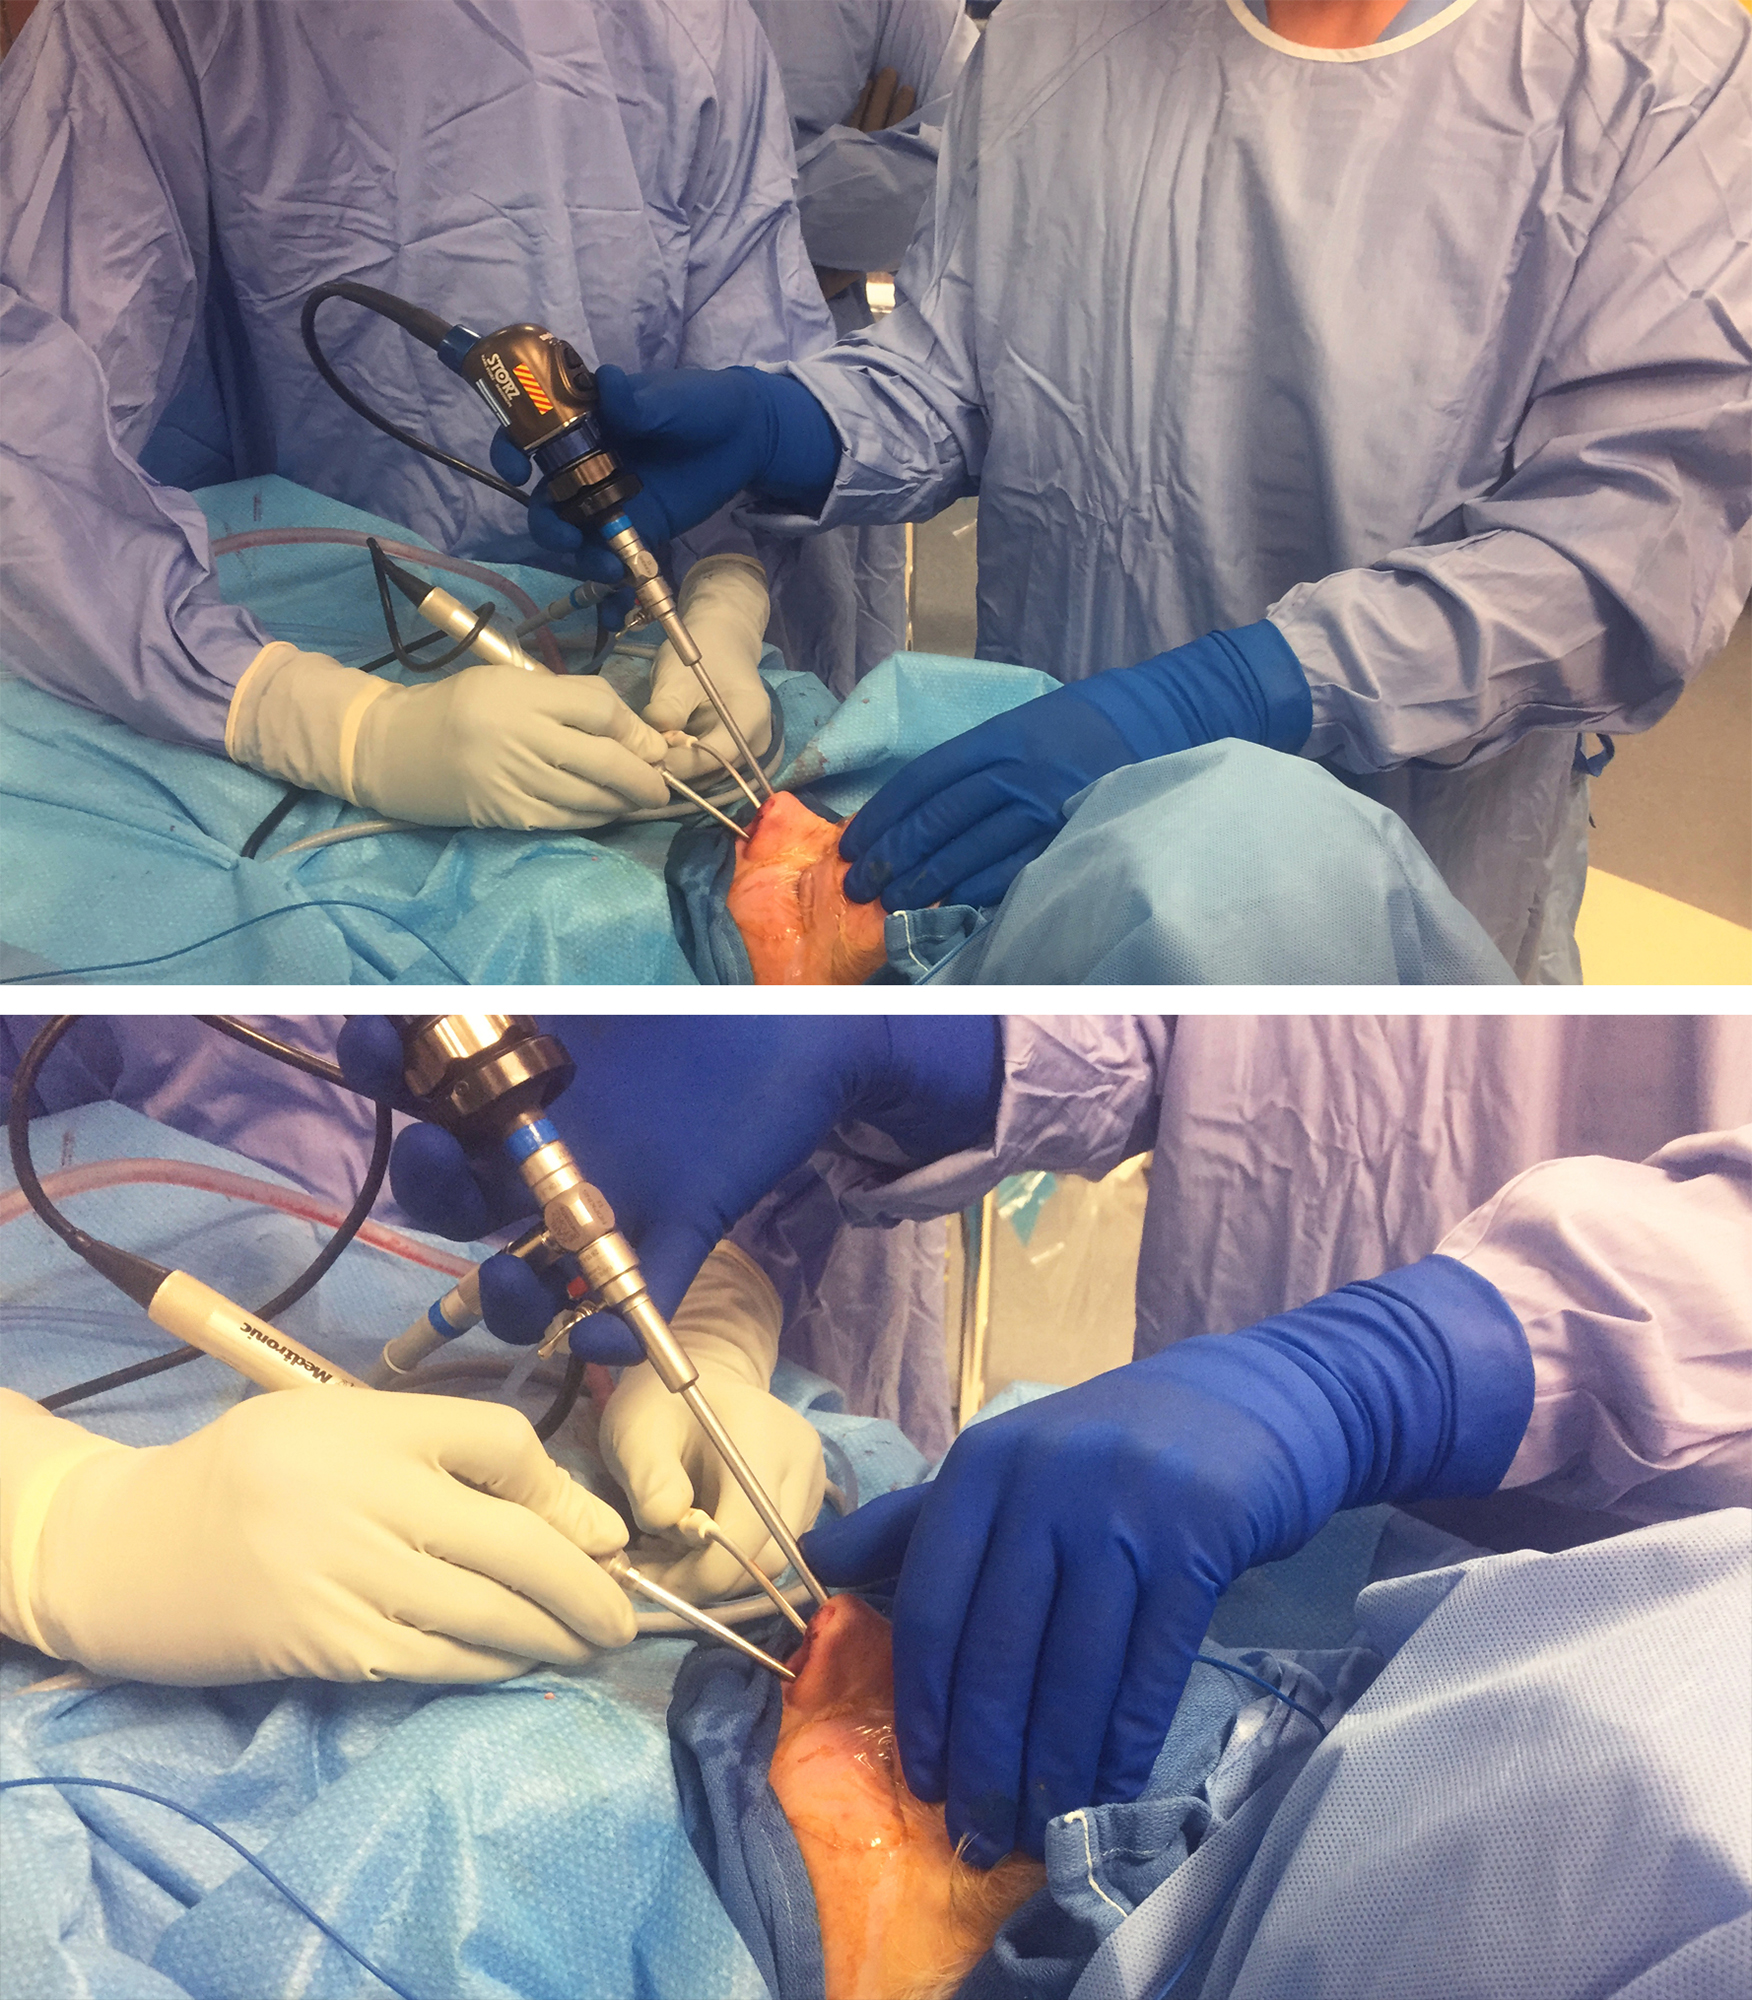
Figure 3: An alternative method of operating room setup allows both rhinologist and neurosurgeon to stand on the same side of the patient. The advantage of this setup is that neither surgeon needs to lean over the patient (top photo). The rhinologist can rest his or her left hand on the patient’s head to stabilize the scope (using the left thumb) and easily focus attention on the monitor (bottom photo) or help irrigate the field, if necessary.
The rhinologist performs the first phase of the approach. For a more limited exposure, the middle turbinates are outfractured, but not resected. The sphenoid ostia are then identified. Usually starting on the right, a microdebrider is used to remove the superior turbinate and enlarge the ostium to create a sphenoidotomy. If a nasoseptal flap is required, it is typically harvested and then placed in the nasopharynx for most cases, or into the maxillary sinus for clival tumors. I find intraoperative CT-guided navigation helpful to identify variant sinus anatomy and critical landmarks, especially for avoiding inadvertent opening of the skull base.
Both sphenoidotomies are then connected by creating a posterior septectomy with either the microdebrider or cold-steel dissection. This is carried anteriorly as far as needed for the particular pathology at hand and its sagittal extent. In general, patients will not suffer from any significant complications derived from this septectomy as long as it does not extend past the anterior edge of the middle turbinate. At this point, the surgeon may use a 30-degree scope to open the posterior ethmoid cells, or if a coronal expansion is needed, to remove the middle turbinate and open the maxillary sinus.
The rostrum of the sphenoid is removed with a heavy rongeur, and the sphenoidotomy is expanded until flush with the roof of the sphenoid sinus superiorly, the floor inferiorly, and the orbital apex so that the opticocarotid recesses are visualized laterally, and so that instruments are able to reach around the surgical target. For example, for a purely intrasellar tumor, a suction should be able to be placed inferiorly into the clival recess.
Definitive Procedure (Bone removal and Tumor Resection)
The operative team switches to a two-surgeon format at this point. The neurosurgeon positions his or her body in the most ergonomic position and uses his or her dominant hand to perform the procedure.
The skull base procedure is then performed. The standard working setup at the patient’s nose is the “three-hand technique.” The neurosurgeon holds the working instrument in his or her dominant hand and the patient’s contralateral nostril (e.g., right hand in the patient’s left nostril); the suction is kept in the other nostril. The standard camera and endoscope position is in the nostril containing the suction device.
Generally, the endoscope should be kept superiorly while using suction below it to avoid instrument conflict (a “swording” effect). The endoscope should be partially retracted in patients with narrow nasal anatomy or during the entry of bulkier instruments in order to allow an unobstructed maneuverability for all instruments within the operative field. The use of an endoscope irrigator such as the Endoscrub is crucial for efficiently maintaining visualization. Standard principles similar to microscope-assisted microsurgery apply, with a few exceptions:
- Bayoneted instruments are used during microscope-assisted microsurgery to keep the operator’s hands out of the line of sight of the microscope. This offset is counterproductive in the endoscopic setting where the camera is inside the operative field and limits the ability to rotate the instrument. Therefore, longer, straight instruments have been designed to accommodate for this layout and offer superior operator’s control.
- In most cases, instruments cannot be completely visualized from entry into the nostril until arriving near the surgical target. Sharp-tipped instruments have endoscopic equivalents that are retractable to avoid enroute nasal injury. Care should be taken to avoid entering the surgical field too quickly because the instrument is not visualized until it is within a few centimeters of critical structures. The camera should be pulled back slightly so that the instrument can be seen ahead of the surgical target and within the nasal cavity.
- The camera often is not providing a straight, midline view, but rather a slightly oblique view due to its entry via one nostril. Also, when manually driven, the camera can slightly and inadvertently rotate as the operation proceeds. These factors can lead to a gradual drift for the location of the midline and cause operator’s disorientation; consequently, periodic navigation and reorientation are critical.
- The “endoscopic dance” between the neurosurgeon and rhinologist is associated with a learning curve and requires practice and longstanding collaboration. The dynamic in-and-out motion of the endoscope provides cues for the microsurgeon to appreciate the much-needed three-dimensional anatomy and depth of field. These important but often overlooked nuances require practice and will ultimately allow for facile four-handed surgery (simultaneous use of two dissecting instruments along with the endoscope and suction device, please see below).
The fine microsurgical movements affordable through the transcranial approaches are not easily reproducible when using the transnasal route. However, with experience and through indescribable nuances, the operator will find maneuvers that will accomplish similar microsurgical goals via different and restricted operative angles. Again, the ultimate surgical goal is to reach the target and do more through longer, but more restricted, operative spaces while maximizing maneuverability by means of advancing operative angles. In other words, decreased surgical freedom is compensated for via more nontraditional operative angles using appropriate instrumentation.
The transcranial microsurgical techniques are not directly transferrable to transnasal microsurgical methods. The stages of endoscopic training are founded based on the level of technical difficulty, potential risk of neurovascular injury, and unfamiliar endoscopic anatomy. These stages involve 1) repair of cerebrospinal fluid (CSF) leaks, 2) resection of pituitary tumors, 3) removal of midline parasellar intradural tumors (craniopharyngioma, tuberculum sella meningioma, etc), and 4) removal of extradural paraclival tumors, such as chordomas and chondrosarcomas, and 5) excision of paramedian and lateral skull base intradural lesions (cavernous sinus, Meckel’s cave lesions).
Endoscopic transnasal surgery plays a limited role, if any, in managing cerebrovascular disease (aneurysms, arteriovenous malformations, etc).
Drilling and Bone Work
Endoscopic endonasal drilling of the skull base requires extensive practice best accomplished in the microsurgical cadaver laboratory. The importance of this experience cannot be overstated.
After the surgeon masters drilling techniques in the laboratory, he or she should become intimately familiar with the osteology of the skull base. The drill is used in gentle directed and planned motions like “the brush of a skilled painter.” A coarse diamond bit is employed when working on bone which is at some distance away from the cranial nerves, and the soft diamond burr is used when unroofing the neurovascular structures. Constant irrigation is key to avoid thermal injury.
The drill bit should be changed when dull to avoid the need for the operator to press on the device to drill the bone. Unfortunately, bone dust often contaminates the camera and frequent cleaning of the endoscope is necessary. Curved shafts are quite useful for drilling the planum and cribriform plate. This shaft is especially helpful for drilling the planum without the need for extensive ethmoidectomy.
For exposing the paraclival carotid, I first use the diamond bit to expose a small segment of the displaced or unaffected artery where the anatomy is more reliably predictable. Next, I use the Kerrison rongeurs to follow the route of the vessel and unroof the artery where the vessel is affected by the underlying pathology. In other words, I work from normal toward the abnormal anatomy.
Overall, I prefer the drill the bone down to a thin layer and then use curettes and Kerrison rongeurs to remove the thin shell of remaining bone. Generally, Kerrison rongeurs provide the best control when removing bone and are the most efficient tool for bone removal through the nose.
Bone removal at the start of the procedure must be conducted with skull base reconstruction at the end of the operation in mind. The creation of indiscriminately large skull base defects “just to see everything” is not advised and is associated with a significant risk of postoperative CSF leaks. For example, I remove only the anterior half of the sella for exposure of most craniopharyngiomas. The remaining bone over the sella not only protects the pituitary gland, but also facilitates the use of the “gasket seal” technique for skull base reconstruction. If the entire floor of the sella is removed, the acute anatomic angle between the clivus and the planum will prevent the use of a solid construct and may increase the risk of CSF fistulas.
On the other hand, the most common cause of inadequate tumor removal, and specifically in the case of pituitary tumors, is inadequate bone exposure. The balance of proper exposure while minimizing postoperative leakage is a fine art.
Resection and Instruments
Once the skull base defect has been created, dural opening is conducted using a retractable knife. The use of microdoppler ultrasonography is very helpful for avoiding the carotid arteries. The affected portion of the dura is resected. Epidural and transdural veins are packed with hemostatic materials. The edges of the dura are coagulated so they can be retracted.
A number of instruments are utilized for resection. I believe in minimalism for selecting my favorite or preferred repertoire of instruments for endoscopic skull base procedures. The instruments that I most commonly use are shown in the following figures.

Figure 4: Curved blades are especially effective for cutting “toward” the surgeon and extending the dural incisions around the neurovascular structures (first row of images). The “pancake” dissector and curved dissector (bottom row, left) and 45-degree ring curettes (bottom row, right) are my favorite dissecting instruments for endonasal microsurgical skull base surgery. Their appropriately angled tips allow adequate visualization and easy maneuverability.

Figure 5: Angled suction devices are also especially effective for removal of tumors that are exposed via angled endoscopes.
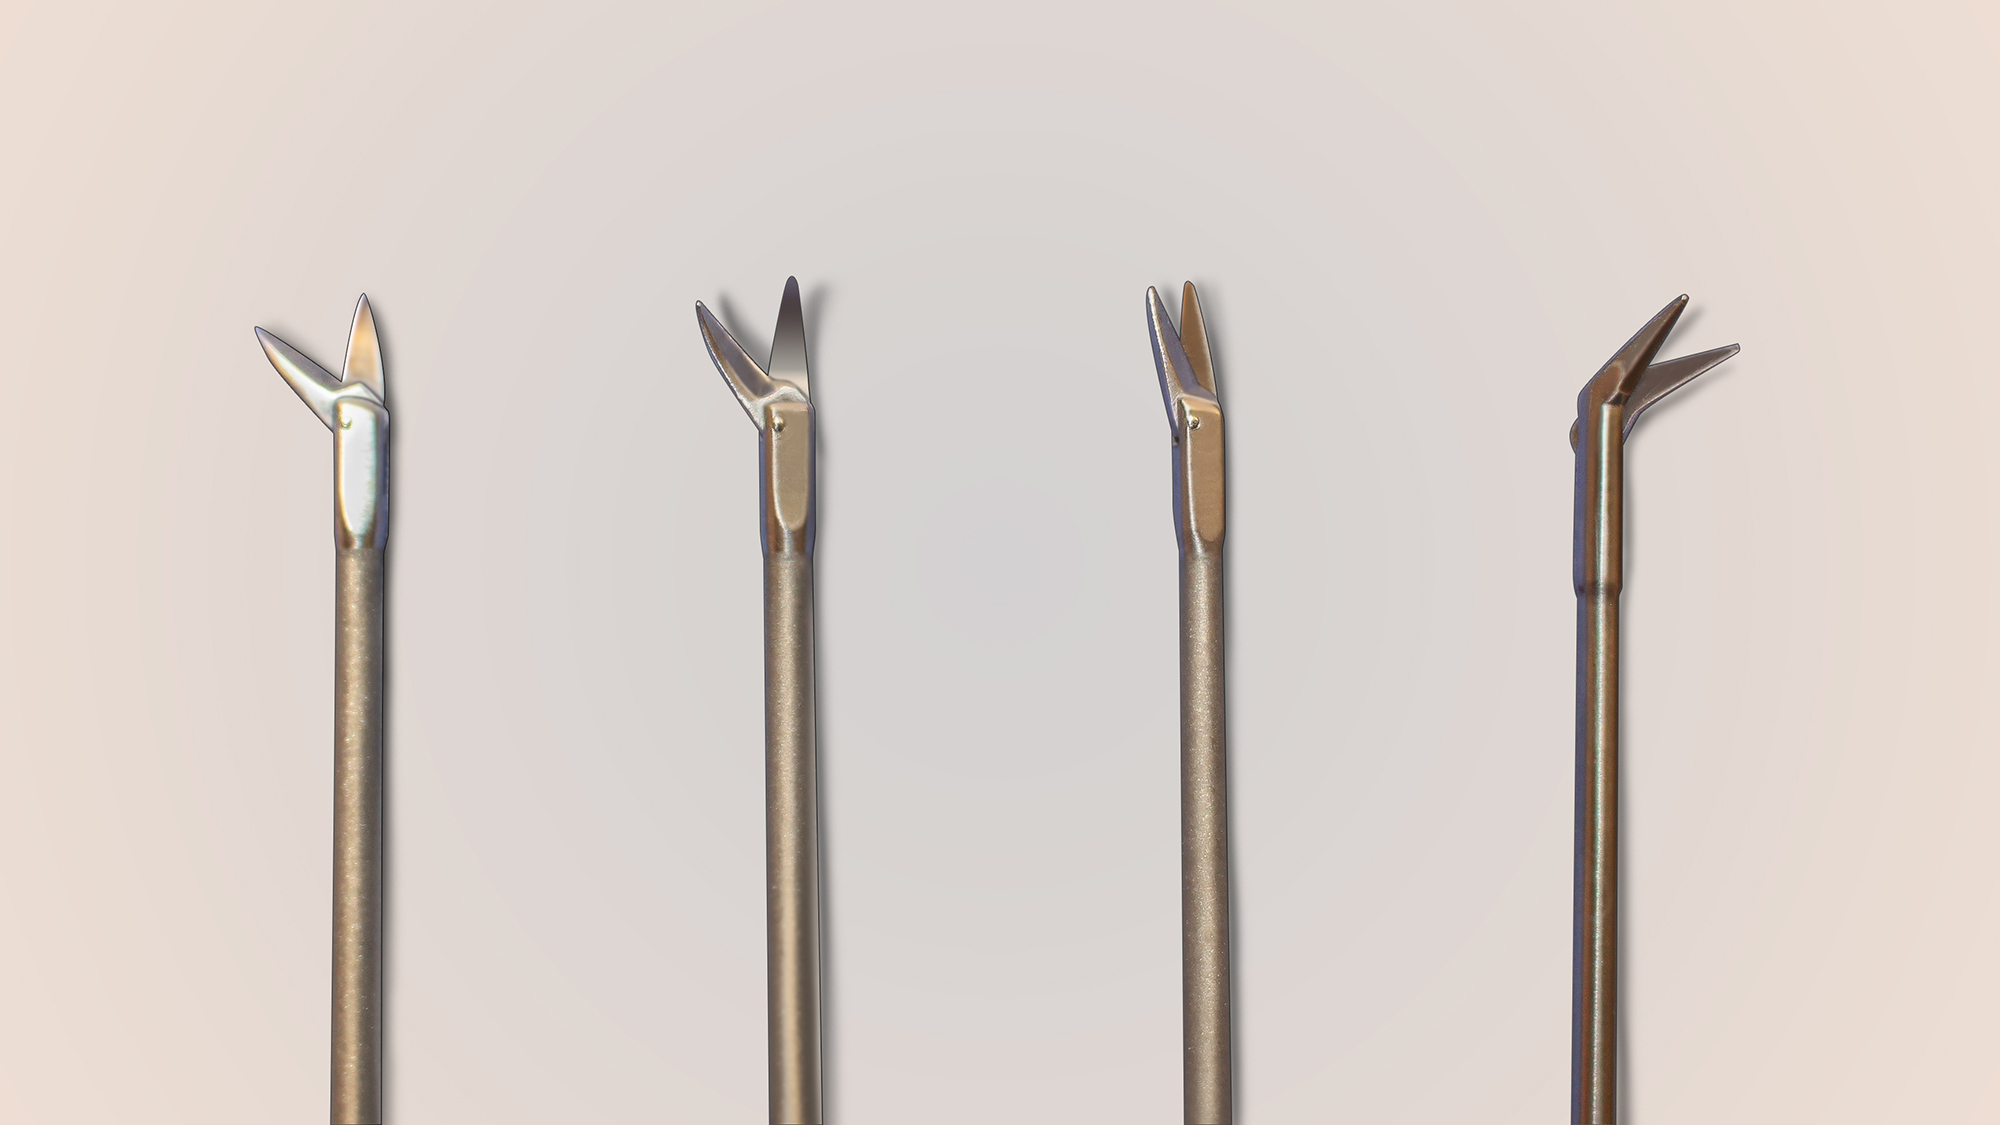
Figure 6: Angled and curved microscissors are indispensable for allowing sharp microdissection.
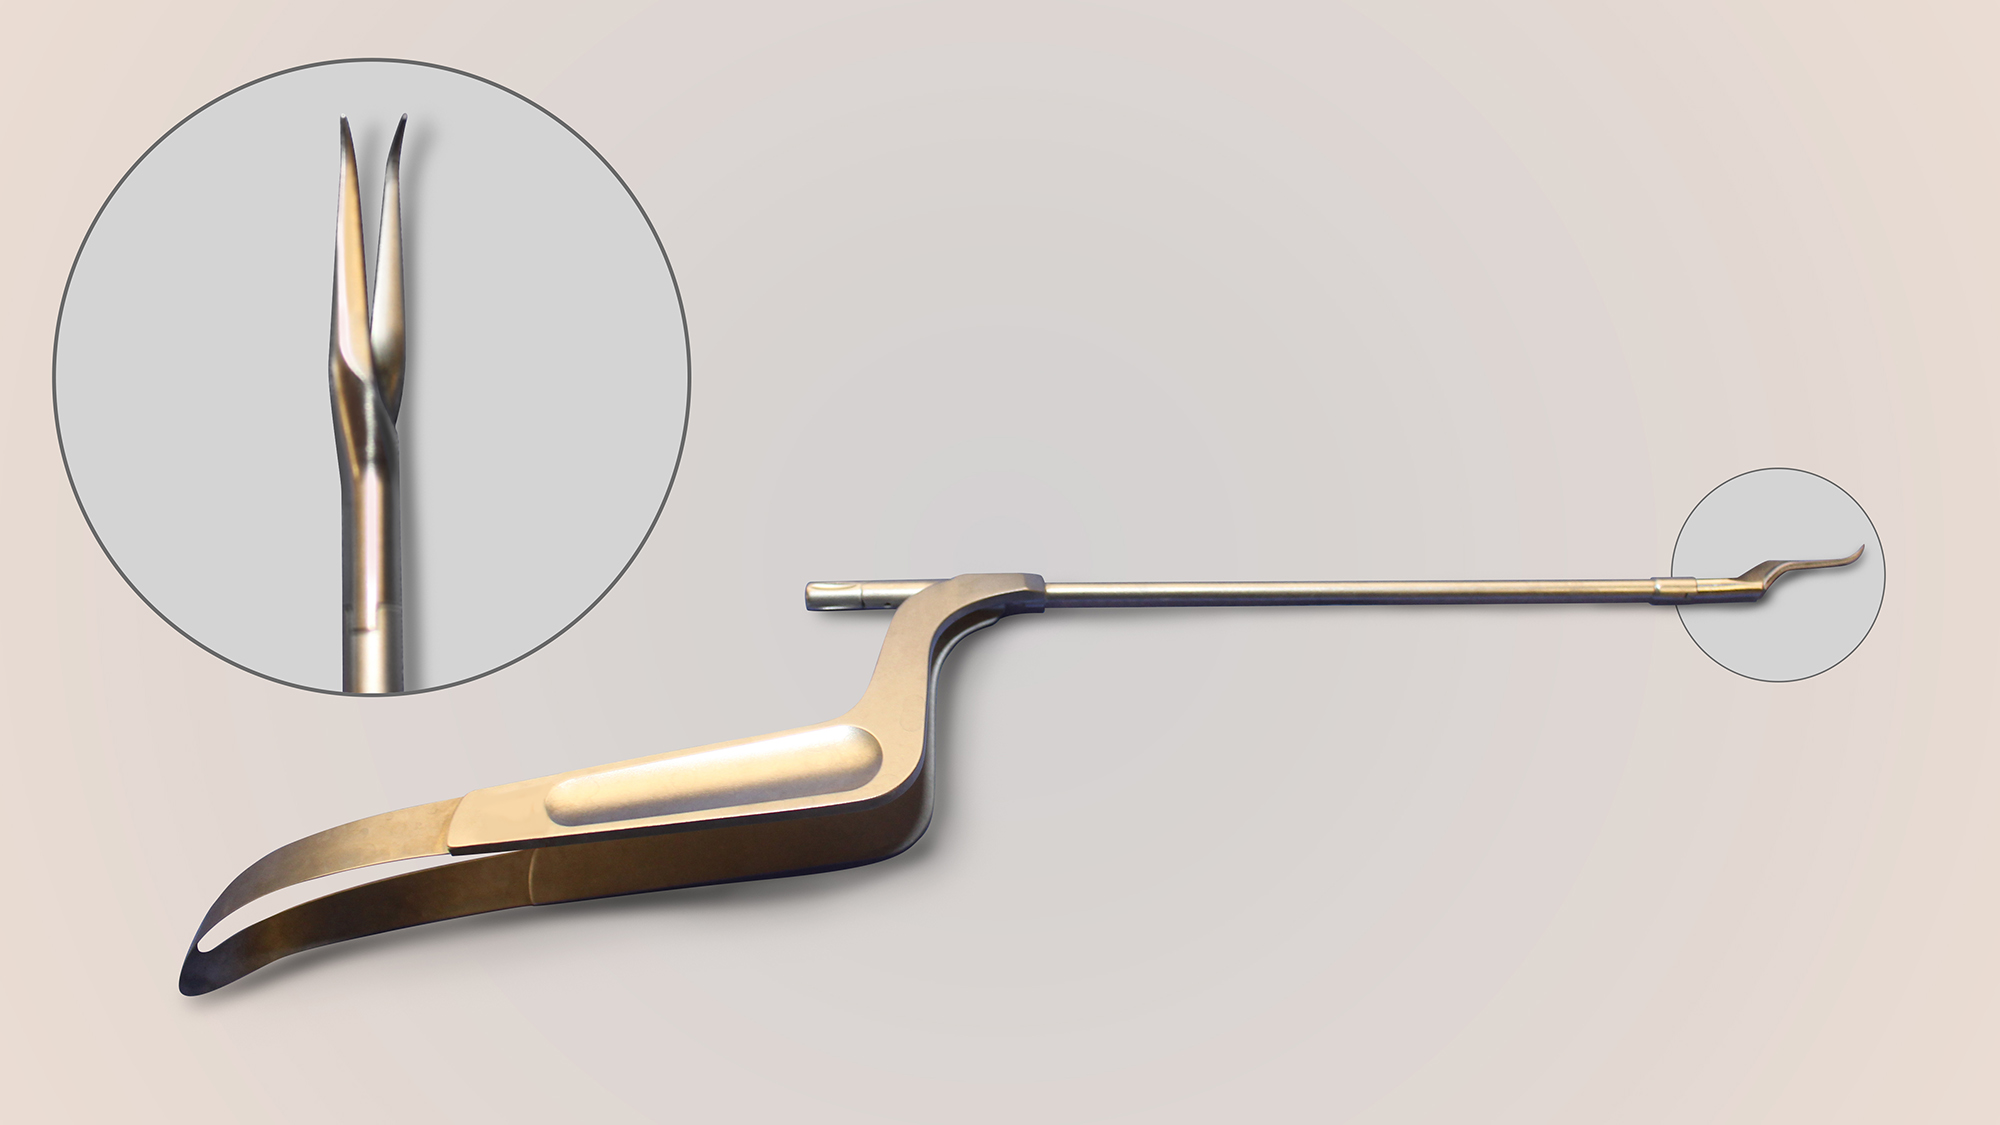
Figure 7: Multi-angled microscissors also provide an advantage within difficult-to-reach locations/corners where visualization is compromised. Difficult operative angles should not replace sharp dissection with indiscriminate forceful blunt dissection on the surgical target.
The ultrasonic aspirator is highly effective for removal of firm tumors. Aggressive central decompression of the tumor is critical for its mobilization and delivery via small endonasal operative corridors.
The pathology may necessitate switching to a “four-hand technique” in which the otolaryngologist operates the endoscope with one hand and provides suction and counter traction on the tumor capsule (using a pituitary rongeur) with the other hand. This maneuver for the pursuit of deeper intracranial lesions requires longer skull-base endoscopes because the instruments are forced more parallel and closer to the midline axis. The camera head is placed further away from the surgical field to allow greater maneuverability of instruments closer to the surgical target.
Epidural bleeding is controlled via hemostatic packing. Intradural hemostasis is performed via the use of endonasal bipolar coagulation. Again, these microsurgical techniques parallel those in their transcranial counterparts. The angled dissectors and endoscopes expand the operative angles through restricted transnasal spaces. Pulling on tumor fragments through operative blind spots is fraught with disaster.
The various aspects of different skull base procedures will be further discussed in detail in their appropriate chapters in this volume.
Closure and Reconstruction
Careful inspection should be performed after the resection stage is complete. Angled scopes are used to inspect all aspects of the operative field for remaining tumor and ongoing bleeding.
Hydroscopy is a valuable technique wherein active irrigation through the endoscopic irrigation channel is allowed to fill the operative field and underwater inspection occurs. Hydroscopy allows visualization in small spaces where the camera tends to rapidly be obscured with blood. The focal point must be adjusted when entering or leaving hydroscopy.
Finally, hemostasis is confirmed. Two very useful adjuncts are warm irrigation, which provides excellent hemostasis for low-flow venous ooze, and gelatin foam soaked in thrombin on a long-tipped applicator. The latter stops venous bleeding from the epidural space, bone vasculature, denuded mucosalized surfaces, and cavernous or intercavernous sinuses.
Once hemostasis is obtained, a decision must be reached regarding the method of reconstruction. For further details regarding this stage of the operation, please refer to the Skull Base Reconstruction and CSF Leak Repair chapter.
Postoperative Care
For cases with an expected high-flow defect, a lumbar drain is placed at the start of the procedure, and used beginning on postoperative day one for 3 to 5 days to support the closure.
Nasal packings are left in place for 5 to 7 days, and antibiotic prophylaxis with a first-generation oral cephalosporin is continued until they are removed. The patient is instructed to avoid Valsalva maneuvers, nose blowing, and other related activities that can significantly increase intracranial pressure.
Contributors: Charles Kulwin, MD, and Jonathan Ting, MD, MS, MBA
DOI: https://doi.org/10.18791/nsatlas.v5.ch06.1.5
For additional illustrations of using endoscopes during skull base surgery, please refer to the Jackler Atlas by clicking on the image below:

Please login to post a comment.