Anterior Communicating Artery Aneurysm


This is a preview. Check to see if you have access to the full video. Check access
Clip Ligation of an Anterior Communicating Artery Aneurysm
Anterior communicating artery (ACoA) aneurysms are the most common aneurysms associated with spontaneous aneurysmal subarachnoid hemorrhage (aSAH,) accounting for ~30% of all ruptured aneurysms. In addition to SAH concentrated along the interhemispheric fissure, they may also present with intraparenchymal hemorrhage (ICH) within the basal frontal lobe or intraventricular hemorrhage (IVH) through the lamina terminalis into the third ventricle.
An isolated spontaneous basal frontal lobe (gyrus rectus) ICH, even without a clear history of associated severe headache, requires a vascular study to rule out an underlying vascular lesion.
The most common aneurysm type inadvertently overlooked during workup of patients with the diagnosis of “angio-negative” SAH is an ACoA aneurysm. This phenomenon is related to cross filling of an ACoA aneurysm from bilateral A1 arteries, leading to very rare instances when the contrast fails to fill a small ACoA aneurysm.
Very small ACoA aneurysms can present as “blister” pseudoaneurysms. Clip ligation of such aneurysms is treacherous because an authentic aneurysm neck is often not identified. The surgeon is subsequently led to apply the clip with some degree of parent vessel stenosis. A catheter angiogram with three-dimension (3D) reconstruction images is necessary for adequate preoperative planning in such cases.
Such a study is especially necessary for suspicion of a blister aneurysm or when CTA is not clearly exposing the aneurysm morphology. The chance of aneurysm recurrence after treatment of blister pseudoaneurysms is high and vigilant followup imaging is warranted.
Traditionally, ACoA aneurysms are categorized based on the direction of their dome relative to ACoA: inferiorly, anteriorly, superiorly, or posteriorly.
Indications for the Procedure
Currently, both endovascular and microsurgical options are available for treatment of most ACoA aneurysms. Depending on the aneurysm morphology and orientation, there is often a need to remove a small portion of the gyrus rectus and manipulate the regional perforating feeders to the septal region, hypothalamus, and anterior perforating substance. Therefore, there is some risk of cognitive decline associated with microsurgery, especially for high-functioning patients. This risk is especially real for the superiorly and posteriorly pointing aneurysms.
For this reasons, I consider endovascular options before offering microsurgery. Reasonable candidates for microsurgery include young patients (<50 years old) with a broad-based neck or thrombotic aneurysm. Rarely, a patient may also present with mass effect on the chiasm from a partially thrombosed large ACoA aneurysm. In this situation, microsurgery can effectively relieve the mass effect through clip ligation, intrasaccular clot evacuation and resolution of pulsatility from the aneurysm sac.
The recent introduction of balloon and stent-assisted embolization techniques has further expanded the realm of endovascular alternatives for management of this complex aneurysm subtype. The natural history of small neck remnants after coil embolization is unknown, but the risk of SAH is likely to be relatively low.
Atherosclerotic aneurysms pose a risk of flow compromise within the A2 outlets during their clip ligation. Extravascular inspection may not demonstrate any obvious intraluminal stenosis and flow compromise within the afferent and efferent vessels. Such a discrepancy may cause postoperative ischemia in the distal territories of A2 branches, despite a lack of any obvious clip-induced stenosis on the postoperative angiogram.
Presently, there is no practical method to reliably quantify flow intraoperatively within the parent and branching arteries after clip ligation. Intraoperative fluorescence assesses flow qualitatively. Therefore, I believe highly atherosclerotic or calcified aneurysms are more safely managed via endovascular methods.
Preoperative Considerations
Computed tomography angiography (CTA) has become the study of choice for most cerebral aneurysms. The bony skull base can affect the resolution of the CTA for detailed disclosure of the morphology of ACoA aneurysms. I have therefore a low threshed for requesting a catheter arteriogram with 3D reconstruction sequences if the CTA is not providing adequate information for this complex vascular territory, especially in the case of small ACoA aneurysms that can mimic blister aneurysms.
Anatomical factors that should be studied preoperatively include: the size and projection of the aneurysm, the side of A1 dominance, the height of the ACoA complex from the cranial base and the orientation of the ACoA complex in sagittal and coronal planes. The presence of calcification and atherosclerosis affects the mode of therapy. Due to the complexity of the operative anatomy in this region, a careful study of preoperative images minimizes the risk of surprise intraoperative findings.

Figure 1: ACoA aneurysms frequently cause hemorrhages within the interhemispheric fissure or gyrus rectus (left upper CT) and CTA continues to play an important role in their diagnosis (right upper image). A typical anteriorly projecting ACoA aneurysm is shown (middle row). These aneurysms and their associated vasculature demonstrate exceptional variations in their morphology (lower images).
Operative Anatomy
The origin of the ACoA defines the transition from the A1 to A2 segments of the anterior cerebral artery (ACA). The ACoA aneurysms are often associated with an unbalanced anatomy of A1s’ calibers. The dome of the aneurysm points in the direction of flow through the dominant A1, so a right-dominant A1 usually results in an aneurysm dome that projects to the left. This information is important for surgical planning because the direction of the aneurysm dome guides the side of approach. For reliable proximal vascular control, the craniotomy should preferably be contralateral to the direction of the aneurysm dome.
Angiography commonly demonstrates aplasia of the nondominant A1. Surgical exploration, however, invariably demonstrates a small but functional A1 or an anatomic vestige rather than true absence of an A1 branch. I locate both A1 arteries during surgical exploration (despite a seemingly absent contralateral A1 on the arteriogram) to ensure adequate proximal control before tackling the aneurysm.
A lack of proximal control over both A1 branches in the face of intraoperative premature rupture may lead to torrential bleeding, a frenzied decision-making process and undesirable results.
Up to 14 arteries may need to be identified during exposure of the ACoA complex. Ten of them are paired arteries: the right and left A1s’and A2s’, recurrent arteries of Huebner, orbitofrontal arteries, and frontopolar arteries. Contralateral recurrent arteries of Huebner, orbitofrontal arteries, and frontopolar arteries are not typically exposed during dissection. Of the remaining four arteries, two consist of the ACoA itself and the hypothalamic perforators. The last two are possible anatomic variants that should be kept in mind, otherwise they will be ovderlooked and harmed: a third A2 segment, and an aberrant early-branching callosomarginal branch that may arise from the A2 in addition to the orbitofrontal and frontopolar arteries.
The ipsilateral recurrent artery of Heubner is a small vessel identified early during dissection. It represents the last of the medial lenticulostriate arteries arising from the A1, and most often emerges from the lateral aspect of the ACA just distal to the ACoA at the very proximal A2. It courses under the anterior perforated substance directly parallel and superior to the A1, providing perforators that ascend to supply the head of the caudate nucleus, putamen, outer globus pallidus, and anterior limb of the internal capsule. Occlusion of this vital artery leads to a caudate stroke and the classic triad of contralateral face and arm weakness, and aphasia (if the stroke is in the dominant hemisphere.)
In the majority of patients, the recurrent artery’s origin lies within 4 mm of the ACoA. This anatomic relationship is a reliable guide; one can trace the recurrent artery and localize the ACoA, especially when the A1 segment arcs steeply superiorly out of the operator’s view.
Although the recurrent artery of Heubner is often carefully protected during dissection, a minority of patients unfortunately will suffer from infarction of its territory postoperatively. This complication is most likely related to retraction on the artery, transient flow alterations and potentially resultant arterial dissection. Minimal collateral vascularization renders this territory a low tolerance to hypoperfusion.
Although in theory the ACoA has a flat course in the coronal plane between the two ACA’s, in practice, the unbalanced anatomy of the dominant A1 results in rotation of the ACoA complex in the coronal or sagittal plane. In fact, the ACoA usually resides in an oblique plane. This anatomic variation often disorients the surgeon and impacts the dissection strategy.
The rotation of the ACoA can dramatically affect the location of the branches that must be identified. These aberrations in surgical anatomy compound the technical complexity of microdissection in this region; therefore, the surgeon must be intimately familiar with the potential arterial pathoanatomy to achieve a successful outcome.
A thorough study of the preoperative angiogram is imperative to understanding the 3D vascular anatomy from the desired operative approach. The vascular tree adjacent to the aneurysm should be carefully explored and understood before clip application. Hasty and imperfect clip placement is one the most common causes of poor outcome.
The ACoA also has several vital perforators that project posteriorly and superiorly to supply the anterior hypothalamus, infundibulum, columns of fornix, corpus callosum, septum pellucidum, and optic chiasm. Any compromise of these vessels is a major cause of cognitive morbidity after ACoA aneurysm surgery.
Careful identification and meticulous dissection (or avoidance, if possible) of these fine and delicate vessels is critical. They are prone to dissection injury even with minimal manipulation. They may also arise from distal A1 or the proximal A2 branches. Any perforator, no matter how small, is vital and must be preserved to minimize the risk of neuropsychological and memory deficits.
Distal to the origin of the recurrent artery of Huebner and branching off the A2, is the origin of the orbitofrontal artery that courses perpendicular to the gyrus rectus and the olfactory tract, turning toward the orbitofrontal cortex. The orbitofrontal artery is the first branch after Huebner and supplies the gyrus rectus and the olfactory bulb and tract. The frontopolar artery is the second cortical branch of A2, after Huebner, and supplies the frontal pole, travelling along with the A2 within the interhemispheric fissure. There is a risk that these branches, especially the orbitofrontal artery, may be mistaken for the A2 branch because of their anterior course parallel to the floor of the frontal fossa.
The A2 segment has many possible anatomic variants. If one A2 segment supplies both hemispheres, it is referred to as azygous ACA. If there are two A2 segments, but one contributes predominantly to both hemispheres, it is called a bihemispheric ACA. If three A2 segments are found, the third is called an accessory ACA.
Not uncommonly, there may be two or three ACoAs (often a plexus.) Such fenestrated variants should be recognized during dissection of the ACoA; clip application should avoid sacrificing a functional segment of the ACoA and its associated perforators. Most commonly, the aneurysm is situated on the most distal ACoA. These anatomic variations may not be readily visible on preoperative imaging, especially on CTA, and should therefore be sought after intraoperatively.

Figure 2: A right-sided subfrontal view of the anterior circulation as related to ACoA aneurysm surgery. Note the recurrent artery of Heubner (white arrow) coursing posteriorly parallel to A1. The ACoA is located along the anterior aspect of the chiasm and has been moved outside the interhemispheric fissure. The orbitofrontal artery (blue arrow) should not be confused with an A2 branch (image courtesy of AL Rhoton, Jr.)

Click here to view the interactive module and related content for this image.
Figure 3: The hypothalamic perforating arteries are demonstrated (left image). An inferior endoscopic view of the ACoA is included (right image) (images courtesy of AL Rhoton, Jr.)
MICROSURGICAL CLIP LIGATION OF ANTERIOR COMMUNICATING ARTERY ANEURYSMS
Please refer to the Cranial Approaches Volume for a detailed description of the extended pterional and supraorbital craniotomies. In this chapter, I elaborate on the specifics of these approaches as they pertain to exposure of ACoA aneurysms.
I use extended pterional and supraorbital craniotomies (through an eyebrow incision) for clip ligation of most ACoA aneurysms. I do not believe an orbitozygomatic osteotomy is routinely necessary. The supraorbital approach is reasonable for small unruptured aneurysms.
A posterolateral orbitotomy may be added for additional exposure of large or complex aneurysms. These lesions are located at the base of the frontal fossa; therefore, the inferior extent of the frontal craniotomy should be along the roof of the orbit to minimize frontal lobe retraction. Extensive sphenoid drilling provides more flexible inferior to superior working angles. A minimal subtemporal craniectomy is adequate.
The patient’s head is rotated away only ~20 degrees to readily allow dissection across the floor of the frontal fossa. The anterior edge of the craniotomy extends lateral to the midpupillary line. The inner table of the frontal bone and the roof of the orbit are drilled and flattened to facilitate an unobstructed operative view of the subfrontal exposure.

Figure 4: The roadmap for approaching an ACoA aneurysm through the pterional approach is illustrated. Only the anterior aspect of the Sylvian fissure is split and the A1 branch is identified before entering the interhemispheric fissure. The exposure of the ICA bifurcation is not necessary.
The Side of Approach for ACoA Aneurysms
There is some debate about which side ACoA aneurysms should be approached from during surgery. Two main factors affect the selection of the side of exposure: 1) the direction of the dome projection and 2) the handedness of the surgeon.
In general, aneurysms should be approached from the side away from the dome’s projection, thereby offering an opportunity for earlier proximal control and generous aneurysm neck exposure. Right-sided pterional approaches are technically easier for a right-handed surgeon. However, since proximal control over both A1‘s can be readily secured early during the intradural journey, some of my colleagues advocate a right-sided approach for all ACoA aneurysms.
Exceptions to this rule would be unusual circumstances such as the presence of a giant aneurysm with an isolated left A1 supply, or a left-sided intracerebral hemorrhage that dictates the side of approach in order to spare the only healthy basal frontal lobe.
Other colleagues believe left-sided approaches are not significantly more technically difficult and prefer to routinely access the aneurysm neck away from the dome. Based on this philosophy, intraparenchymal hematomas are on the side opposite to the surgeon (on the side of the dome,) but they are easily evacuated as they extend to the level of the aneurysm.
I prefer approaching all aneurysms with intraparenchymal hematomas ipsilateral to the hematoma to avoid any injury to the only intact contralateral gyrus rectus. I also believe that the direction of the aneurysm dome is the most important factor in determining the most appropriate side of approach.
In other words, ACoA aneurysms should be exposed contralateral to the projection of the dome. Importantly, ACoA aneurysms almost always originate from the A1-ACoA or the A2-ACoA junction, and not from the ACoA alone. Therefore, generous visualization of the ipsilateral ACA segments is important for optimal neck exposure and clip application. Since the medial walls of the A1 and A2 are within the operator’s blind spot, the surgeon often underestimates the extension of the aneurysm neck on the ipsilateral A2 and the resultant incomplete clipping is the most common cause of intraoperative premature rupture or residual aneurysm filling.
INTRADURAL PROCEDURE
Initial Exposure
Before the dura is opened, if the brain feels “tight” upon palpation over the dura, a burr hole is placed at the Kocher point and a ventriculostomy catheter is inserted into the frontal horn for cerebrospinal fluid (CSF) drainage. This maneuver may be especially important for ruptured aneurysms because the brain is often swollen and intraventricular blood may not allow adequate CSF communication among the basal cisterns and intraventricular space.
Once the dura is opened, I gently elevate the posterior orbital surface of the frontal lobe (just anterior to the Sylvian fissure,) lateral to the olfactory tract, to expose the optic nerve. The arachnoid bands over the opticocarotid cistern are opened sharply and CSF is drained to achieve brain relaxation.
The anterior or horizontal segment (sphenoidal portion) of the Sylvian fissure is then dissected open and this arachnoid incision is carried medially over the carotid artery and optic nerve. Despite generous CSF drainage, the brain remains frequently tight in ruptured cases. Aggressive retraction will lead to cortical venous bleeding and further injury. For further details regarding the techniques for limited anterior Sylvian split, refer to the Techniques of Sylvian Fissure Split chapter.
Extensive opening of the distal Sylvian fissure is not needed because only the A1 branches need to be dissected. The junction of A1 and the internal carotid artery (ICA) may not be exposed because it is often more cranially situated and its exposure requires significant frontal lobe retraction. I identify the A1 branch along the posterior aspect of the optic chiasm to secure proximal control.

Figure 5: The initial exposure requires an anterior Sylvian fissure split. The basal frontal lobe is dissected away from the optic apparatus, thus exposing the A1 segment. Sharp dissection using an arachnoid knife is preferred to avoid microvascular injuries to the optic nerve and chiasm. The aneurysm complex is located in the interhemispheric fissure and not within the suprachiasmatic space. Therefore, suprachiasmatic dissection is safe and can be performed expeditiously. As an exception, an inferiorly pointing aneurysm can adhere to the chiasm; permanent clip application may be necessary before proximal control over contralateral A1 is established.
Microdissection to Secure Proximal Control
The arachnoid bands tethering the frontal lobe to the chiasm are placed on stretch and sharply divided. The cuts are extended medially and laterally to generously free up the frontal lobes. The optic nerve is then followed posteriorly until the ipsilateral A1 and recurrent artery of Huebner are identified. The distal A1 branch is circumferentially freed from its attachments to the frontal lobe and chiasm. The recurrent artery of Heubner is minimally manipulated.
The exposure of the A1 branch provides early proximal control without exposing the ICA bifurcation. Occasionally, the A1 branch can be challenging to identify if it arcs superiorly; the artery of Huebner can be used as a landmark to locate the ACoA. Because the medial lenticulostriate arteries originate from the superior surface of the A1, the safe dissection plane is on the inferior surface of the artery toward the ACoA.
Although I avoid rigid retractors, other operators prefer their use. If so, the retractor blade is adjusted medially to rest on the lateral border of the gyrus rectus. The artery of Huebner and A1 should be away from its vectors of compression.
It is important to secure contralateral A1 proximal control before proceeding further. The contralateral A1 is found easily using the following rule: At the location along the ipsilateral optic nerve where the ipsilateral A1 turns medially to enter the interhemispheric fissure, I turn my attention to the contralateral optic nerve. Following the contralateral optic nerve posteriorly, just lateral to the junction of the contralateral optic nerve and chiasm, I will invariably find the opposite A1.
Understanding the Microsurgical Anatomy
The gyrus rectus is elevated using dynamic retraction and the handheld suction device or retractor blade and the interhemispheric fissure is entered to expose the ipsilateral A2. The interhemispheric fissure may be microsurgically split to avoid the need for further retraction.
The rotation of the ACoA complex now affects the surgeon’s exposure. If the ipsilateral A1 is dominant, the complex may rotate away from the surgeon so that the ipsilateral A1-A2 junction points anteriorly. This configuration brings the ipsilateral A2 toward the operator and out of the interhemispheric fissure, making its identification easier.
Conversely, if the complex is rotated toward the operator, the ipsilateral A1-A2 junction points posteriorly and the ipsilateral A2 is pushed deep into the interhemispheric fissure. The complex can also be tilted up or down. If the ipsilateral A1-A2 junction is tilted inferiorly, the A2 will remain outside the fissure, making its exposure easier. If the ipsilateral A1-A2 junction is tilted superiorly, the A2 is found deep into the interhemispheric fissure, and the A1 is pulled up under the frontal lobe.

Figure 6: Gentle retraction on the frontal lobe lateral to the olfactory tract will reveal the gyrus rectus and the interhemispheric fissure covered by multiple layers of thickened arachnoid. The recurrent artery of Heubner travels parallel to, but opposite, the direction of the A1 and should be left attached to the lobe. Careful use of dynamic nonrigid retraction, bipolar forceps and suction are imperative to avoid mechanical or thermal injury to this important and delicate artery.
Gyrus Rectus Resection
Not uncommonly, simple elevation of the gyrus rectus is insufficient to expose the ipsilateral A2. Moreover, the ruptured aneurysm dome may project inferiorly and adhere to the chiasm, precluding any significant frontal lobe mobilization. In these instances, I proceed with a small gyrus rectus resection. If a retractor is used, it is placed just lateral to the olfactory tract, causing the gyrus rectus to herniate under the tip of the retractor blade.

Figure 7: Often two retractor blades are needed to reach the gyrus rectus overlying the aneurysm. The herniating brain between the tips of these retractor blades is all that needs to be removed. There are two surfaces of pia surrounding the gyrus rectus, the lateral surface facing the surgeon, and the deep medial surface facing the interhemispheric fissure.
The lateral surface of the gyrus rectus is coagulated and opened sharply. The orbitofrontal artery, which may be draped directly over the center of this gyrus, is protected. A small portion of this area is then gently and subpially suctioned, exposing the translucent medial pia overlying the aneurysm and ipsilateral A2. Next, I carefully coagulate/cut the medial pia and peel back this pial plane to reveal the proximal A2 and ACoA complex.
The retractor is then adjusted so its tip rests within the subpial resection cavity. Venous bleeding often interrupts subpial dissection of the gyrus rectus, and care should be taken not to coagulate vigorously and remain patient. Gentle pressure with small pieces of thrombin-soaked Gelfoam will generally arrest any venous oozing. Vigorous use of bipolar coagulation can cause heat injury to the surrounding vessels.

Figure 8: Limited subpial resection of the gyrus rectus exposes the ACoA complex, the origin of the recurrent artery and the ipsilateral A2 segment. The complex can be exposed both above and below the ACoA (shown in green arrows). Aggressive dissection above and posterior to the ACoA should be performed after institution of ipsilateral A1 temporary occlusion.
These seemingly simple steps involve several nuances. First, it is imperative that the recurrent artery of Huebner and the cortical branches of the ACA (orbitofrontal and frontopolar) are identified and mobilized away from the gyrus rectus before the pial incision is undertaken. The consequences of gyrus rectus resection are minimal, but sacrifice of these vessels (particularly the recurrent artery of Huebner) can be devastating.
Second, the goal of this subpial resection is to expose the proximal ipsilateral A2. This branch is usually located slightly posterior to the dissection plane up until this point, and thus the surgeon may be tempted to dissect too anteriorly, wandering out onto the aneurysm dome.

Figure 9: The ACoA complex needs to be dissected on its ventral aspect. The projection of the aneurysm dome affects the particular steps of dissection. In this illustration, the contralateral A1 is prepared for temporary clipping, and clipped only if necessary. The lower intraoperative photo demonstrates careful inspection of the relevant vessels.
These initial steps are the same for all ACoA aneurysms approached from the side opposite to the dome. The following steps are specific to the projection of the aneurysm dome. Each of the four possible aneurysm projections blocks access to a different artery, and thus each demands its own distinct dissection strategy and offers unique technical challenges.
In general, visible arteries should be dissected first, followed by temporary clipping of the proximal dominant A1 and then dissection of hidden arteries while mobilizing the aneurysm sac. Aggressive manipulation of perforators around the sac without temporary occlusion of patent vessel(s) can lead to intraoperative rupture.
Aneurysm Dissection and Clip Application
Anteriorly Projecting Aneurysms
Anteriorly projecting aneurysms block the origin of the contralateral A2 and the distal neck of the aneurysm. After the initial dissection of the ipsilateral A1 and A2 as described above, the next step is identification of the contralateral A1. Because of the position of the patient’s head in the pterional approach, the location of the contralateral A1 can be confusing—it is not on the contralateral optic nerve, but rather posterolateral to the chiasm.
In addition to the nuances mentioned above, a reliable way to locate the contralateral A1 is to trace the ipsilateral A1 distally until it leaves the chiasm to enter the interhemispheric fissure. At that point, the dissection should stay on the chiasm; you may then proceed across the midline to find the same point on the other side of the chiasm where the contralateral A1 can be found.
The contralateral A1 is situated just lateral to the junction of the contralateral optic nerve and chiasm. This maneuver is safe even for inferiorly projecting aneurysms, as they rarely project onto the chiasm itself, resulting in a safe plane of sharp dissection flat across the chiasm that is posterior to the aneurysm.
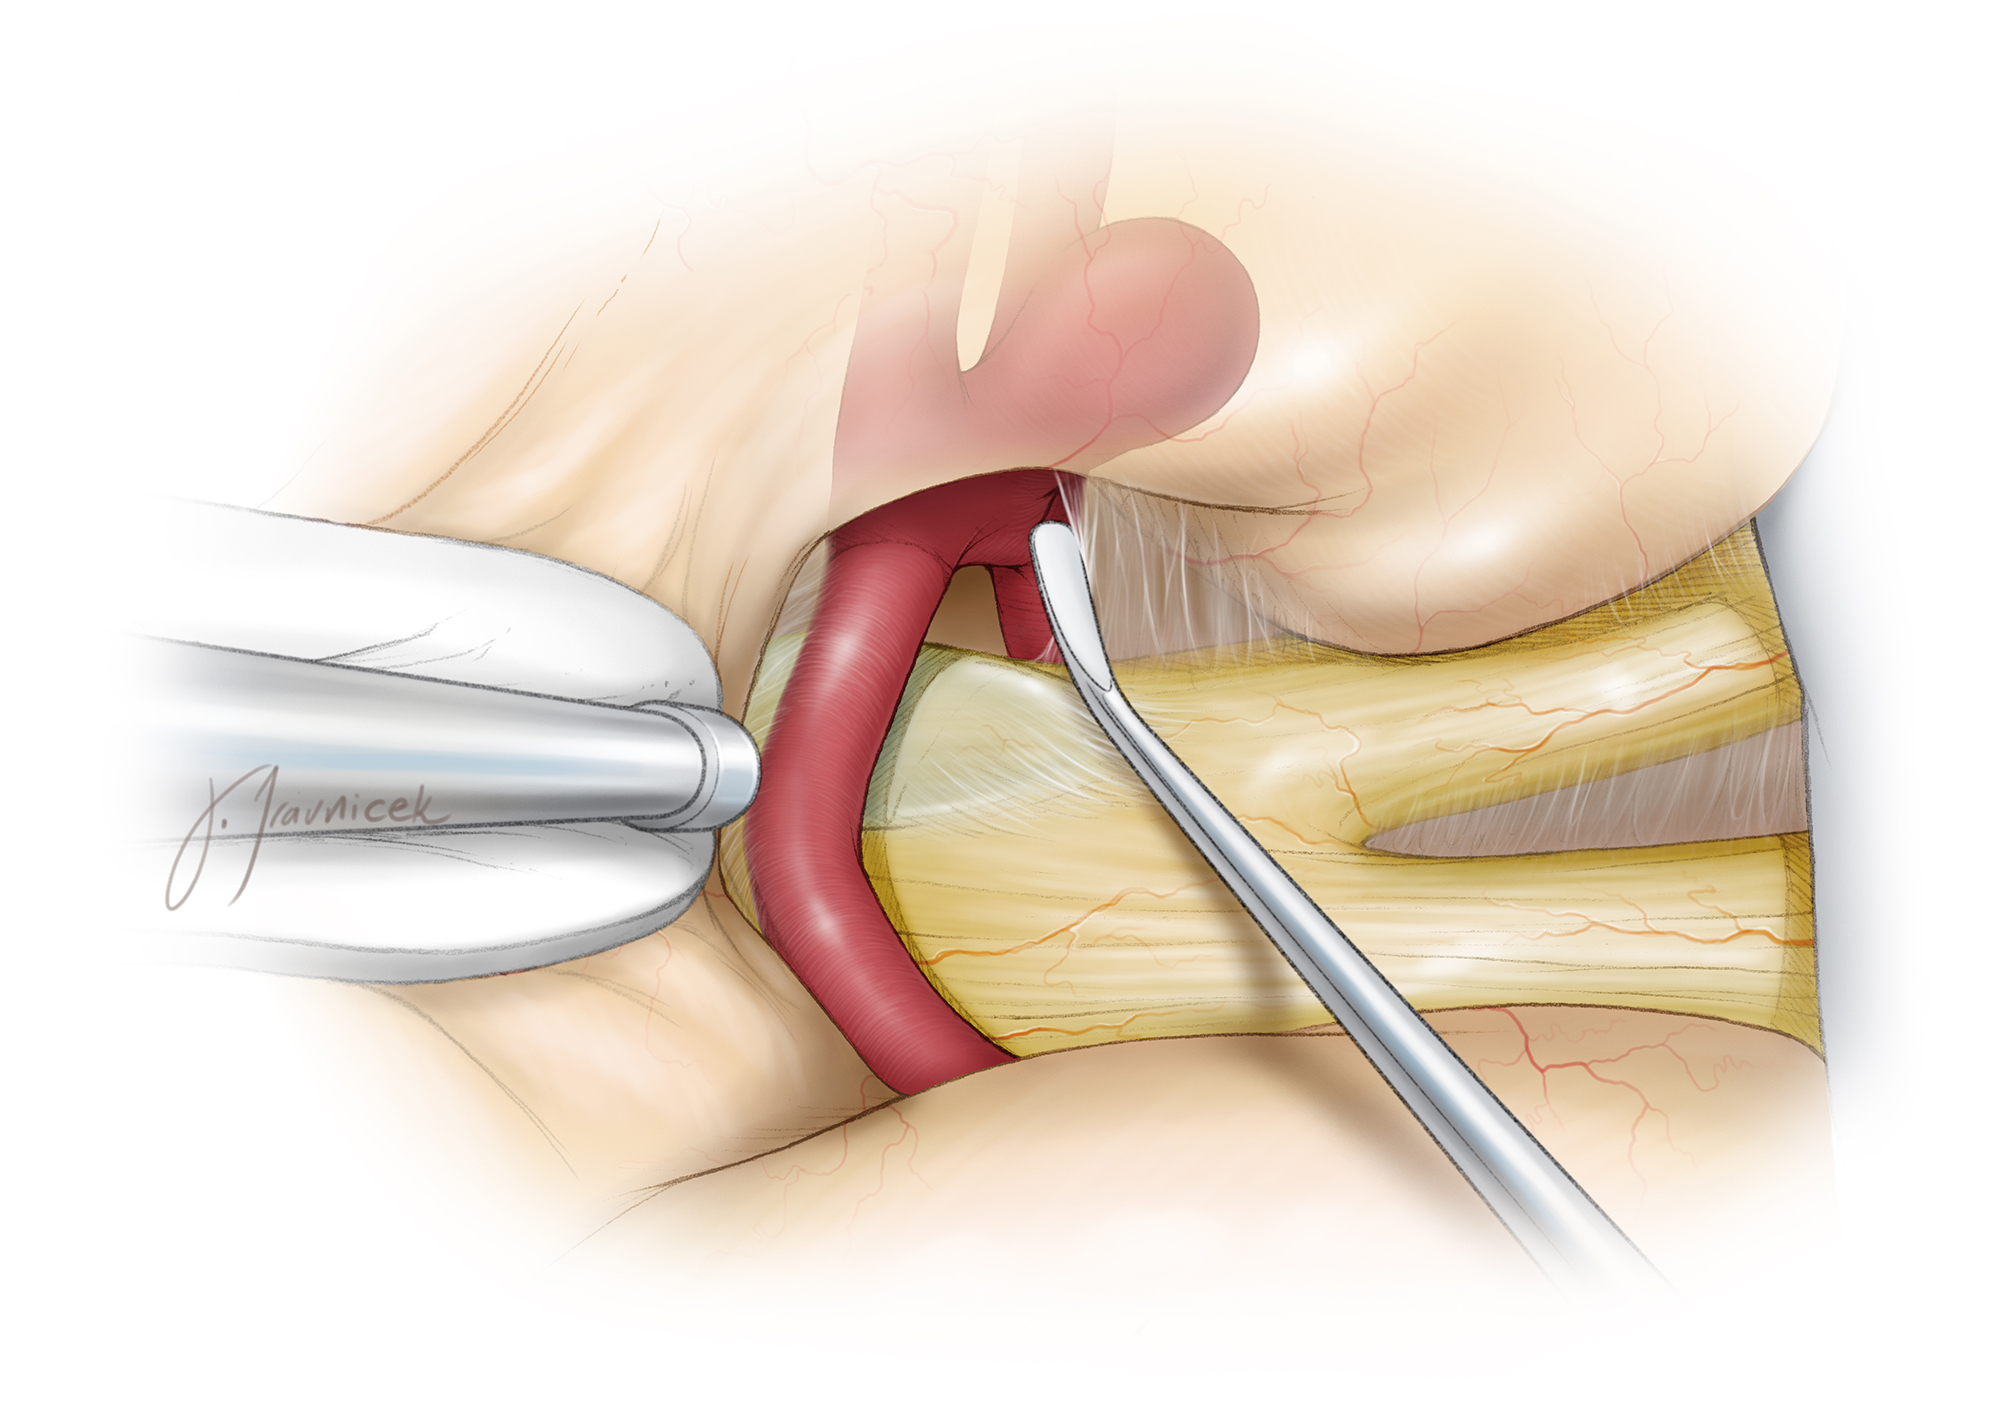
Figure 10: The contralateral A1 is situated just lateral to the junction of the contralateral optic nerve and chiasm.
The temporary clip on the dominant A1 should be placed as far away from the interhemispheric fissure as possible to avoid crowding the final operative space. If the contralateral A1 is dominant, I temporarily clip the contralateral A1 first because a temporary clip on the ipsilateral A1 will block access to the contralateral A1.
The recurrent artery of Huebner should not be included in the blades of the temporary clip and not placed under the retractor blades. I avoid using fixed retractor systems until permanent clip application is planned. With the blade acting as a third instrument to temporarily hold the brain, both the suction device and clip blades are used to mobilize and manipulate the adjacent vascular anatomy to ensure accurate clip application.
Once the dominant A1 has been temporarily clipped, I gently “nudge” the aneurysm with the suction tip to confirm adequate aneurysm decompression is achieved. If this maneuver does not ensure aneurysmal softening, it is possible that the temporary clip blades are not positioned adequately across the A1; clip repositioning may be necessary. Alternatively, the atherosclerosis and calcification within the walls of the A1 may prevent a complete closure of the temporary clip blades. Additional clips may be required.

Figure 11: Temporary clips may be applied on either or both of the A1 segments at any time during the surgery. I prefer to secure contralateral control early, given that application of a clip onto the contralateral A1 is technically challenging if there is an intraoperative rupture. Care should be taken to position the clip’s spring system away from the operative view of the ACoA complex. Commonly, a slightly curved temporary clip is useful for this purpose. Application of one temporary clip on the dominant A1 is all that is needed to deflate the aneurysm enough while maintaining some flow within the ACA complex.
In patients with bilateral A1 co-dominance, it is generally safe to place a temporary clip on the opposite A1 as long as collateral vascular supply is ensured through the ipsilateral vessel. This maneuver secures one vessel if rupture occurs.
The next step is identification of the contralateral A2, the operative blind spot for anteriorly projecting aneurysms. Dissection is carried over the deflated neck and midbody of the aneurysm and across the interhemispheric fissure to find the distal A2, which is then traced proximally to the aneurysm neck. This challenging step may be aided by temporary clipping of both A1s, which allows safe dissection of the distal neck of the aneurysm. Fighting with an aneurysm containing significant turgor leads to premature rupture.
Anteriorly projecting aneurysms frequently involve the orbitofrontal and frontopolar arteries, which can be adherent to the dome. Although the aneurysm can sometimes be clipped without dissecting these arteries (and this should be the case if there is a fragile aneurysm wall,) these arteries can also interfere with permanent clipping or they may tether the dome, rendering clipping unsafe.
In these instances, adjacent arteries are sharply dissected from the sac under high magnification and under the protection of temporary clipping. I also identify the perforators posterior to the aneurysm, coursing straight back between the ipsilateral A1 and A2. They are gently dissected from the posterior wall and neck, clearing the path for the posterior clip blade.

Figure 12: For the anteriorly projecting aneurysms, a straight fenestrated clip is used to occlude the neck, encompassing the ipsilateral A2 within the fenestration. The origin of the contralateral A2 branch at the tip of the blades should be carefully inspected to ensure its patency (upper image). Middle and lower images demonstrate a similar principle, however, the distal neck of the atherosclerotic aneurysm was collapsed via a fenestrated clip posterior to the ipsilateral A2 while the proximal neck was clipped anterior to the A2.

Figure 13: Asymmetric neck anatomy is depicted in this illustration. The neck of most anteriorly pointing aneurysms arises from the medial wall of the dominant A2 branch and ACoA. A fenestrated clip is used to occlude the aneurysm neck, encompassing the ipsilateral A2 within the fenestration. The portion of the neck residing on the ipsilateral A2 must be included in the clip blades by placing the clip in a slightly anterior-to-posterior oblique configuration. If the clip blades are not appropriately applied to close the A2 portion of the neck, incomplete aneurysm obliteration and persistent aneurysm filling will occur.

Figure 14: To occlude the portion of the aneurysm neck on the ipsilateral A2, I also use a tandem clip configuration to ensure complete neck coverage. The proximal clip blades aim to close the distal neck, while the distal blades capture the portion of the neck situated on the ipsilateral A2.

Figure 15: Bulbous and broad-necked aneurysms present a challenge. The operative blind spot along the medial wall of the ipsilateral A2 can lead to improper clip application and residual aneurysm filling (left image). Larger and atherosclerotic aneurysms require more than one clip for their complete neck closure. The contralateral A2 perforators may be at risk (right image).
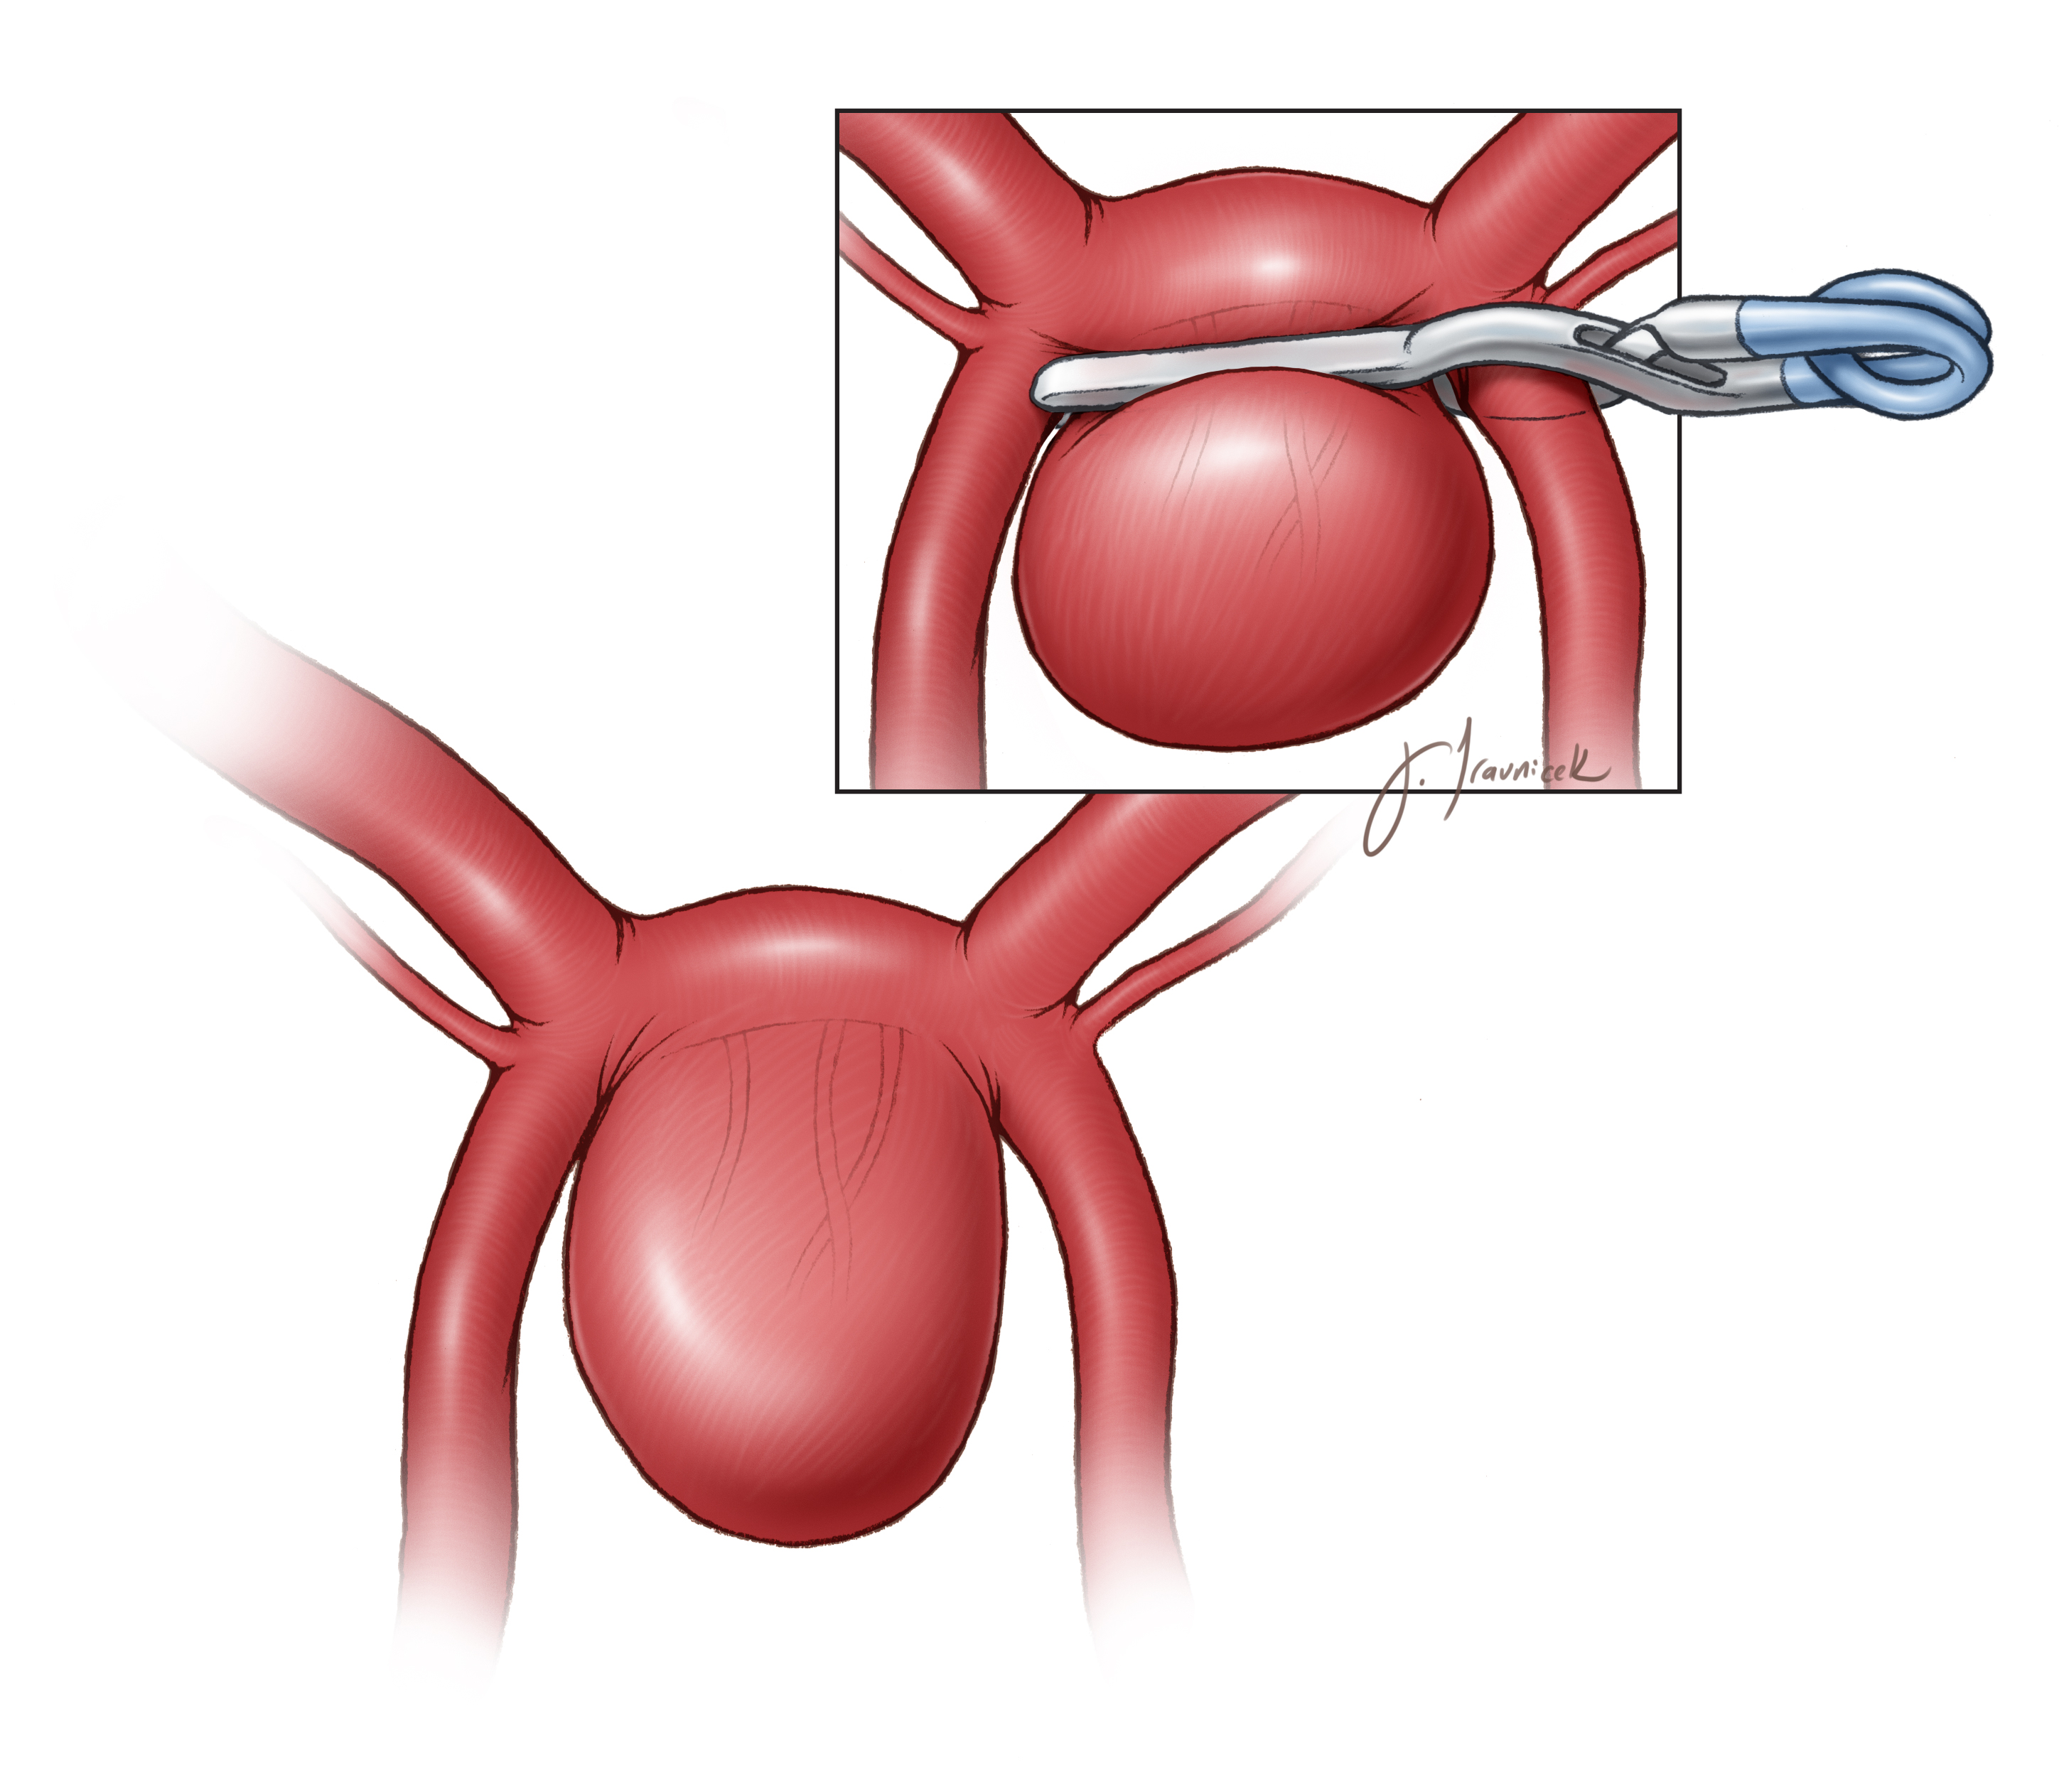
Figure 16: Symmetrical anatomy of the aneurysm neck along the ACoA is shown. The aneurysm neck incorporates some of the ACoA perforators. A fenestrated clip may be used while the patency of ACoA is ensured.
Permanent clip application may be performed using simple or fenestrated straight clips while the surgeon carefully avoids the perforators and the contralateral A2. As the distal clip blades are closing, the operator gets a glimpse of the origin of the contralateral A2 and the distal neck. Nonetheless, this limited view allows last minute fine adjustments in the operator’s working angle to guide the blade tips to avoid the A2 and produce the desirable clip construct.
A right-angled (ophthalmic clip) is very useful for ACoA complexes that are rotated in the sagittal plane so that the blades can avoid the contralateral A2 (see Figure 17 below.) In rare circumstances, I have coagulated the aneurysm dome under temporary occlusion (aneurysmorrhaphy:) this maneuver is effective for revealing hidden anatomy and simplifying clip application via shrinking the aneurysm dome.
Anteriorly Projecting ACoA Aneurysm
Inferiorly Projecting Aneurysms
Inferiorly projecting aneurysms block the contralateral A1. In addition, the dome may be adherent to the optic apparatus or the dura of the frontal fossa, making early elevation of the frontal lobe precarious. However, the contralateral A2 and hypothalamic perforators course away from the aneurysm neck and thus are simple to dissect or avoid.
After the ipsilateral A1 and A2 branches are identified, dissection proceeds across the ACoA over the neck of the aneurysm to identify the origin of the contralateral A2. The hypothalamic perforators are identified and left untouched. A plane is also developed underneath the neck of the aneurysm, posterior to the point of the attachment of the dome. Next, the neck is clip ligated with a straight clip parallel to the ACoA. These aneurysms are often clipped without contralateral proximal control. I therefore advise approaching them via the side of the dominant A1.

Figure 17: Inferiorly pointing aneurysms are excluded using a straight clip. If necessary, contralateral proximal temporary clip application may occur posterior to the ACoA complex; this maneuver potentially requires dissection over the recurrent artery of Heubner and should be avoided.
Once the permanent clip is deployed, the contralateral A1 must be carefully inspected to ensure it safety. Certain anatomical configurations provide another option for contralateral proximal control. The contralateral A2 may be pursued proximally past the ACoA to expose the origin of the contralateral A1. Gentle depression of the aneurysm neck with a small piece of cotton under the tip of the suction device can potentially facilitate distal A2 exposure.
Clip ligation of the aneurysm can occasionally result in traction on the aneurysm dome and its avulsion off of the frontal dura. Gentle “squeezing” of the aneurysm neck by fine forceps before clip placement can warn me if this event might occur, and the dome should then be carefully dissected off the dura under the protection of temporary clipping.
If the aneurysm is buried within the chiasm or optic nerves, it should not be dissected off as this maneuver risks loss of vision.
Inferiorly Projecting ACoA Aneurysm
Superiorly Projecting Aneurysms
Superiorly projecting aneurysms block the contralateral A2. After the ipsilateral A1 and A2 are identified, the dissection is carried across the chiasm under the aneurysm neck to identify the contralateral A1. This is similar to the dissection process for anteriorly projecting aneurysms described above. However, unlike anteriorly projecting aneurysms, the contralateral A2 cannot be exposed by simply dissecting into the interhemispheric fissure because the aneurysm dome is located there.
The dissection trajectory posterior to the ipsilateral A2 is often the most effective path to the contralateral A2. After generous gyrus rectus resection, the ipsilateral A2, orbitofrontal, and frontopolar arteries are identified and mobilized anteriorly. This dissection should be above and posterior to the artery of Huebner, as the space in the axilla between the artery of Huebner and the A2 is too narrow.
ACoA perforators should be carefully dissected from the aneurysm sac via early temporary clipping and sac decompression rather than aggressive perforator manipulation.
Once the contralateral A2 is identified, the dissection is carried proximally to define the plane between the contralateral A2 and the aneurysm neck. This is the most challenging step for manipulation of superiorly projecting aneurysms. However, the resultant softening of the sac through temporary regional vascular arrest aids in this dissection.
Next, the preparation is made to proceed with permanent clipping. The application of straight fenestrated clips with the ipsilateral A2 within the fenestration is ideal.

Figure 18: Most superiorly projecting aneurysms care clip ligated via straight fenestrated clips. However, they may also be excluded via angled clips in the anterior-posterior plane. The contralateral A2 is obscured by the aneurysm dome and requires thorough inspection after clip application. The clip must be the correct length (not too long) in order to avoid placing the posteriorly located ACoA perforators at risk.
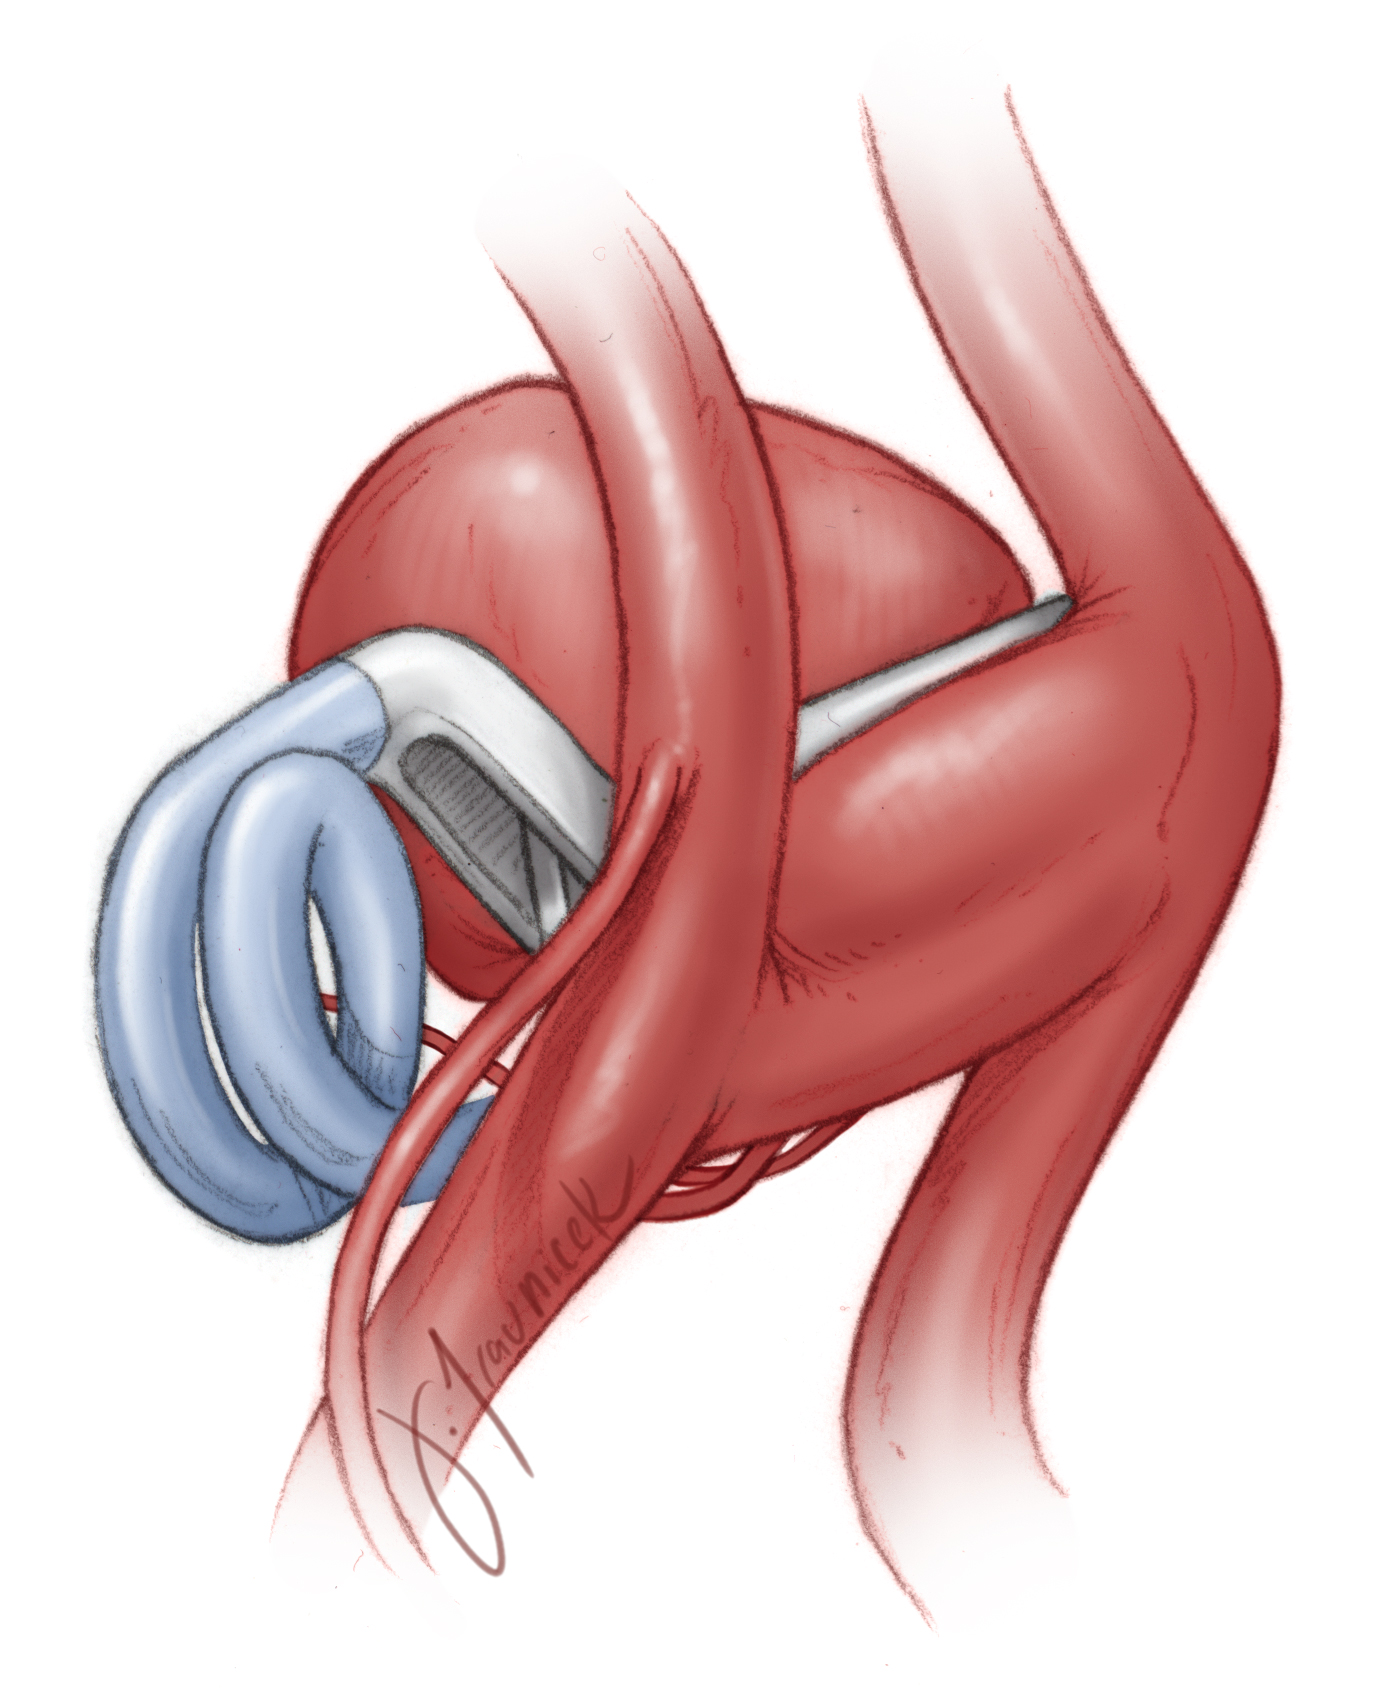
Figure 19: Another clipping strategy for ligation of superiorly projecting aneurysms is demonstrated.
Small Superiorly Projecting ACoA Aneurysm
Posteriorly Projecting Aneurysms
Posteriorly projecting aneurysms block the hypothalamic perforators. Although all of the other arteries are relatively straightforward to dissect, the adherent perforators deep in the interhemispheric fissure pose daunting challenges regarding their dissection. With the ipsilateral A1 and A2 identified, the surgeon crosses to the contralateral anatomy to find the contralateral A1 and A2.
Next, the gyrus rectus is generously resected while the dissection is carried posterior to the ipsilateral A2. Temporary clip ligation of both A1s with the resultant dramatic aneurysm sac softening facilitates careful dissection of the perforators. In particularly difficult cases, small temporary clips may be placed on either side of the ACoA, allowing perfusion of the distal ACA branches.

Figure 20: Posteriorly pointing aneurysms deep within the interhemispheric fissure may be clip ligated using a straight clip. Careful dissection of the ACoA perforators from the aneurysm neck and dome are necessary. Please note the use of bilateral A2 temporary clip ligation for effective sac decompression. The temporary clips are applied so that they remain outside the surgeon’s working zone.
The aneurysm can then be punctured and suction decompressed, after which, the aneurysm is mobilized anteriorly and the perforators isolated and protected. Similar to the procedure for superiorly projecting aneurysms, clip application may be attempted in the anterior-posterior plane because the ipsilateral A2 can be between the surgeon and the aneurysm.
I prefer the use of straight fenestrated clips while keeping the ipsilateral A2 within the fenestration to minimize the risk to ACoA perforators. I do seriously consider endovascular therapy for posteriorly pointing aneurysms because of the real risk to the perforators during microsurgery.
Posteriorly Projecting ACoA Aneurysm
Postoperative Considerations
The postoperative care of patients who have undergone clip ligation of their ACoA aneurysms is not significantly different from that of other aneurysm patients. Despite meticulous dissection, minimal gyrus rectus resection and avoidance of fixed retractors, the risk of a blunt affect is real; this affect usually significantly improves within one month after surgery.
Postoperative anticonvulsants are recommended and can be tapered off beginning one week after surgery.
Pearls and Pitfalls
- Use of fixed retractors must be minimized to avoid inadvertent injury to the basal frontal lobe and medial perforators.
- A thorough understanding of vascular anatomy and its variations are critical for success. The most common cause of disappointment is a lack of thoughtful planning to tackle the aneurysm.
- Exercise patience upon premature rupture of the aneurysm. Intraoperative bleeding rarely leads to unfortunate outcomes, but the surgeon’s response in the event of bleeding makes the most important difference.
- Let the aneurysm and vascular anatomy lead you to the correct decision. Do not force a premature preoperative agenda.
Contributor: Gustavo Luzardo, MD
References
Batjer HH. Aneurysms of the anterior communicating artery, in Samson DM (ed): Intracranial Aneurysm Surgery: Techniques. Mount Kisco, NY: Future Publishing, 1990.
Lawton MT. Anterior communicating artery aneurysms, in: Seven Aneurysms: Tenets and Techniques for Clipping. New York: Thieme Medical Publishers, 2011.
Related Materials
Available Through the Atlas
-
The natural course of unruptured cerebral aneurysms in a Japanese...
-

Microsurgical anatomy of the anterior cerebral anterior communica...
-
Microsurgical anatomy of the distal anterior cerebral artery
-
Routine intraoperative angiography during aneurysm surgery
-
Surgical anatomy of the proximal anterior cerebral artery
-
Long-term cognitive deficits in patients after surgery on aneurys...
-
Use of spiral computerized tomography angiography in patients wit...
-
Hemodynamic study of the anterior communicating artery
-
Surgery for angiographically occult cerebral aneurysms
-
Treatment of anterior communicating artery aneurysms: Complementa...
-
Aneurysms arising from the proximal (A1) segment of the anterior...
-
Cognition following subarachnoid hemorrhage from anterior communi...
-
Neurobehavioural disturbances, rehabilitation outcome, and lesion...
-
Recovery of cognitive function after surgery for aneurysmal subar...
-
Preservation of the olfactory tract in bifrontal craniotomy for a...
-
Clipping of very large or giant unruptured intracranial aneurysms...
-
Clinical presentation and management of giant anterior communicat...
-
Surgical anatomy of the cerebral arteries in patients with subara...
Unavailable Through the Atlas
-
Amnesia Following Basal Forebrain Lesions
-

Safety and efficacy of endovascular treatment of acutely ruptured...
-
Is the aspect ratio a reliable index for predicting the rupture o...
-
Aneurysms
-
Transorbital keyhole approach to anterior communicating artery an...
-
Microsurgical anatomy and clinical significance of the anterior c...
-
Aneurysmal and microaneurysmal “angiogram-negative” subarachn...
-
Microneurosurgical management of anterior communicating artery an...
-
Analysis of intraoperative rupture in the surgical treatment of 1...
-
An orbitocranial approach to complex aneurysms of the anterior ci...
-
Neuropsychological assessment after microsurgical clipping or end...
-
Surgically Treated Aneurysms Previously Coiled: Lessons Learned
-
Anatomic and clinical study of the orbitopterional approach to an...
Please login to post a comment.