Burr Holes and Bone Flaps Free


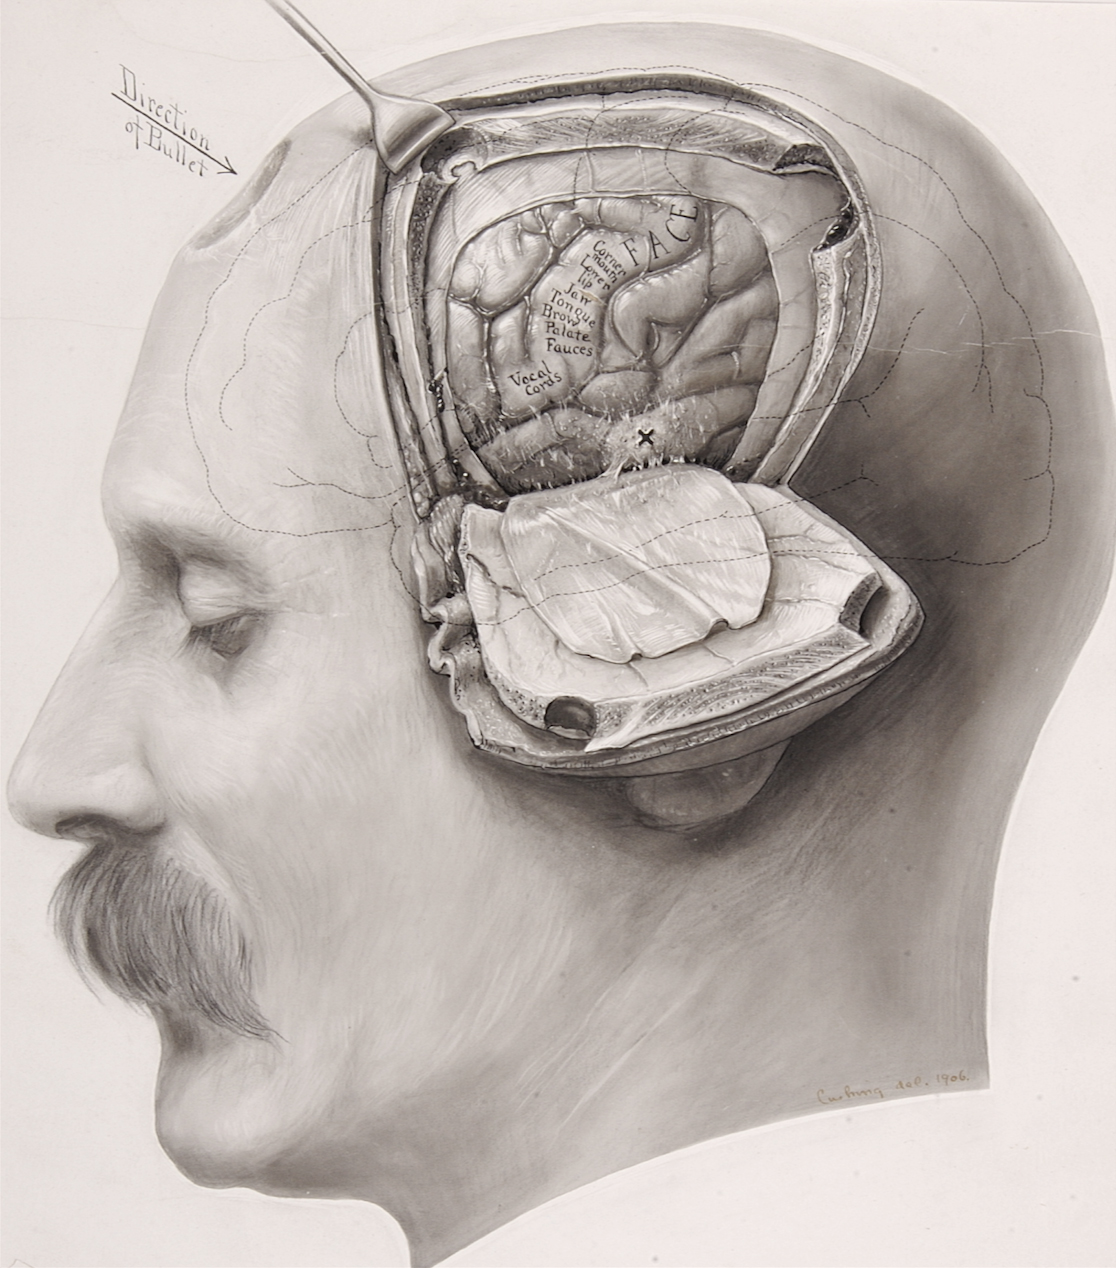
Figure 1: Harvey Cushing illustrated an osteoplastic craniotomy and cortical mapping in a patient who suffered from a gunshot wound (illustration courtesy of the Cushing Brain Tumor Registry at Yale University).
The creation of burr holes and bone flaps is among the most fundamental procedures in cranial surgery and their timely completion improves operative efficacy. Although simple and straightforward, these procedures are not without risks. Most importantly, the operator should be intimately familiar with complication avoidance strategies to minimize morbidity from these relatively basic steps of the operation.

Figure 2: The skull bone contains the outer and inner cortical bone layers (tables) separated by cancellous bone. This anatomic relationship is important during creation of the burr hole because the operator can safely drill expeditiously through the outer table and cancellous bone, but should gently shell out the inner cortical layer to avoid direct transmission of the drill vibrations to the dura and cortex.
Burr Holes
Creation of the burr holes deserves special precautions that involve the following:
- protection of the dural venous sinuses,
- preservation of the dural integrity,
- avoidance of the air sinuses,
- careful handling of the lesions that infiltrate the skull and obscure epidural landmarks, and
- smooth, gentle, and seemingly “effortless” use of the drill to avoid the transmission of vibrations to the brain (these vibrations can cause contusions or subarachnoid hemorrhage).
Forceful use of the drill burr to push against the inner cortex or plunge into the dura or brain can lead to cortical injury that would have been avoidable.
The number and the size of burr holes needed to safely complete the craniotomy depends on multiple factors, including:
- the size and location of the craniotomy (over the dural sinuses or cranial sutures),
- the nature of the lesion (its involvement with the bone),
- the patient’s age, and
- the overall adherence of the dura to the inner table of the skull bone.
I prefer to place the burr hole(s) behind the hairline to minimize cosmetic deformity caused by bone loss. Generous burr holes allow effective separation of the dural beyond the margins of the burr hole. The dura should be manipulated underneath the planned borders of the craniotomy and not separated beyond the edges of the craniotomy because this separation can lead to occult epidural hematoma formation, especially with young patients.

Figure 3: Placement of a hole along the root of the zygoma is shown here. After the outer table and cancellous bone (yellow arrow) have been drilled under ample irrigation, the inner cortical layer (blue arrow, right upper image) is carefully thinned out and a small area of the dura exposed (left middle image). Next, a Kerrison rongeur or curette removes additional pieces of the thin shell of inner cortical bone (right middle image). This tactic expands the inner rim of the burr hole beyond the edges of the outer rim (undercutting the inner table) to allow the tip of the dural dissector to achieve acute working angles and stay tangential to the inner table, avoiding an inadvertent dural tear (left lower image). These maneuvers allow the dural dissector to travel well beyond the burr hole to effectively separate the entire section of the dura undergoing a craniotomy (right lower image). These methodologies expand the working zone of the dissector and most often facilitate elevation of large bone flaps using only one or two burr holes.
Placement of Burr Holes over the Dural Venous Sinuses
Forceful insertion and uncontrolled maneuvering of the dural dissector (Penfield #3 dissector) should be avoided because this can lead to dural tears and potentially cortical injury. If the dura is not readily separating from the inner surface of the skull, additional burr holes should be created. The dura can be especially adherent along the skull sutures, and the drill footplate has the potential to violate the dural integrity when it changes direction or turns to approach the skull base. Therefore, the dura should be effectively separated in these areas. To do so, during the craniotomy, I gently toggle the drill footplate to further separate the dura with the tip of the footplate.
If the dura is torn initially during placement of the burr hole, the hole should be expanded to expose intact dura that will be used as a landmark to separate the sections of the dura underlying the planned bone flap.
The location of the burr holes for a variety of craniotomies is discussed in their corresponding chapters in the Cranial Approaches volume. In this chapter, I review some basic concepts.

Figure 4: The burr hole for a standard pterional craniotomy is placed at the junction of the frontotemporal line and the frontal process of the zygomatic bone. Because of the difference in the thickness of the skull at the frontal and temporal bones (the frontal bone is thicker), the tip of the acorn-shaped bit can reach the dura inside a portion of the burr hole before the entire base of the burr hole is removed. This phenomenon can lead to cortical injury, especially in patients with a “tight” brain. Careful use of the drill will minimize the risk of this complication. This is one of the reasons why I prefer to use a single burr hole just inferior to the superior temporal line for pterional craniotomies. Another reason is the need to minimize bone resection in cosmetically visible regions (such as the area in front of the hair line, such as the keyhole, that is not covered by the temporalis muscle).

Figure 5: I use only one burr hole for creation of a bifrontal craniotomy to minimize cosmetic deformity as long as the dura is easily separable. A B1 drill bit without a footplate may be used to create the most inferior osteotomy parallel to the skull base. This maneuver will allow controlled transection of the anterior and posterior frontal sinus walls. The use of the footplate in this region can be problematic because the skull is very thick near the air sinuses, and forceful maneuvering of the drill can lead to dural and cortical injuries.
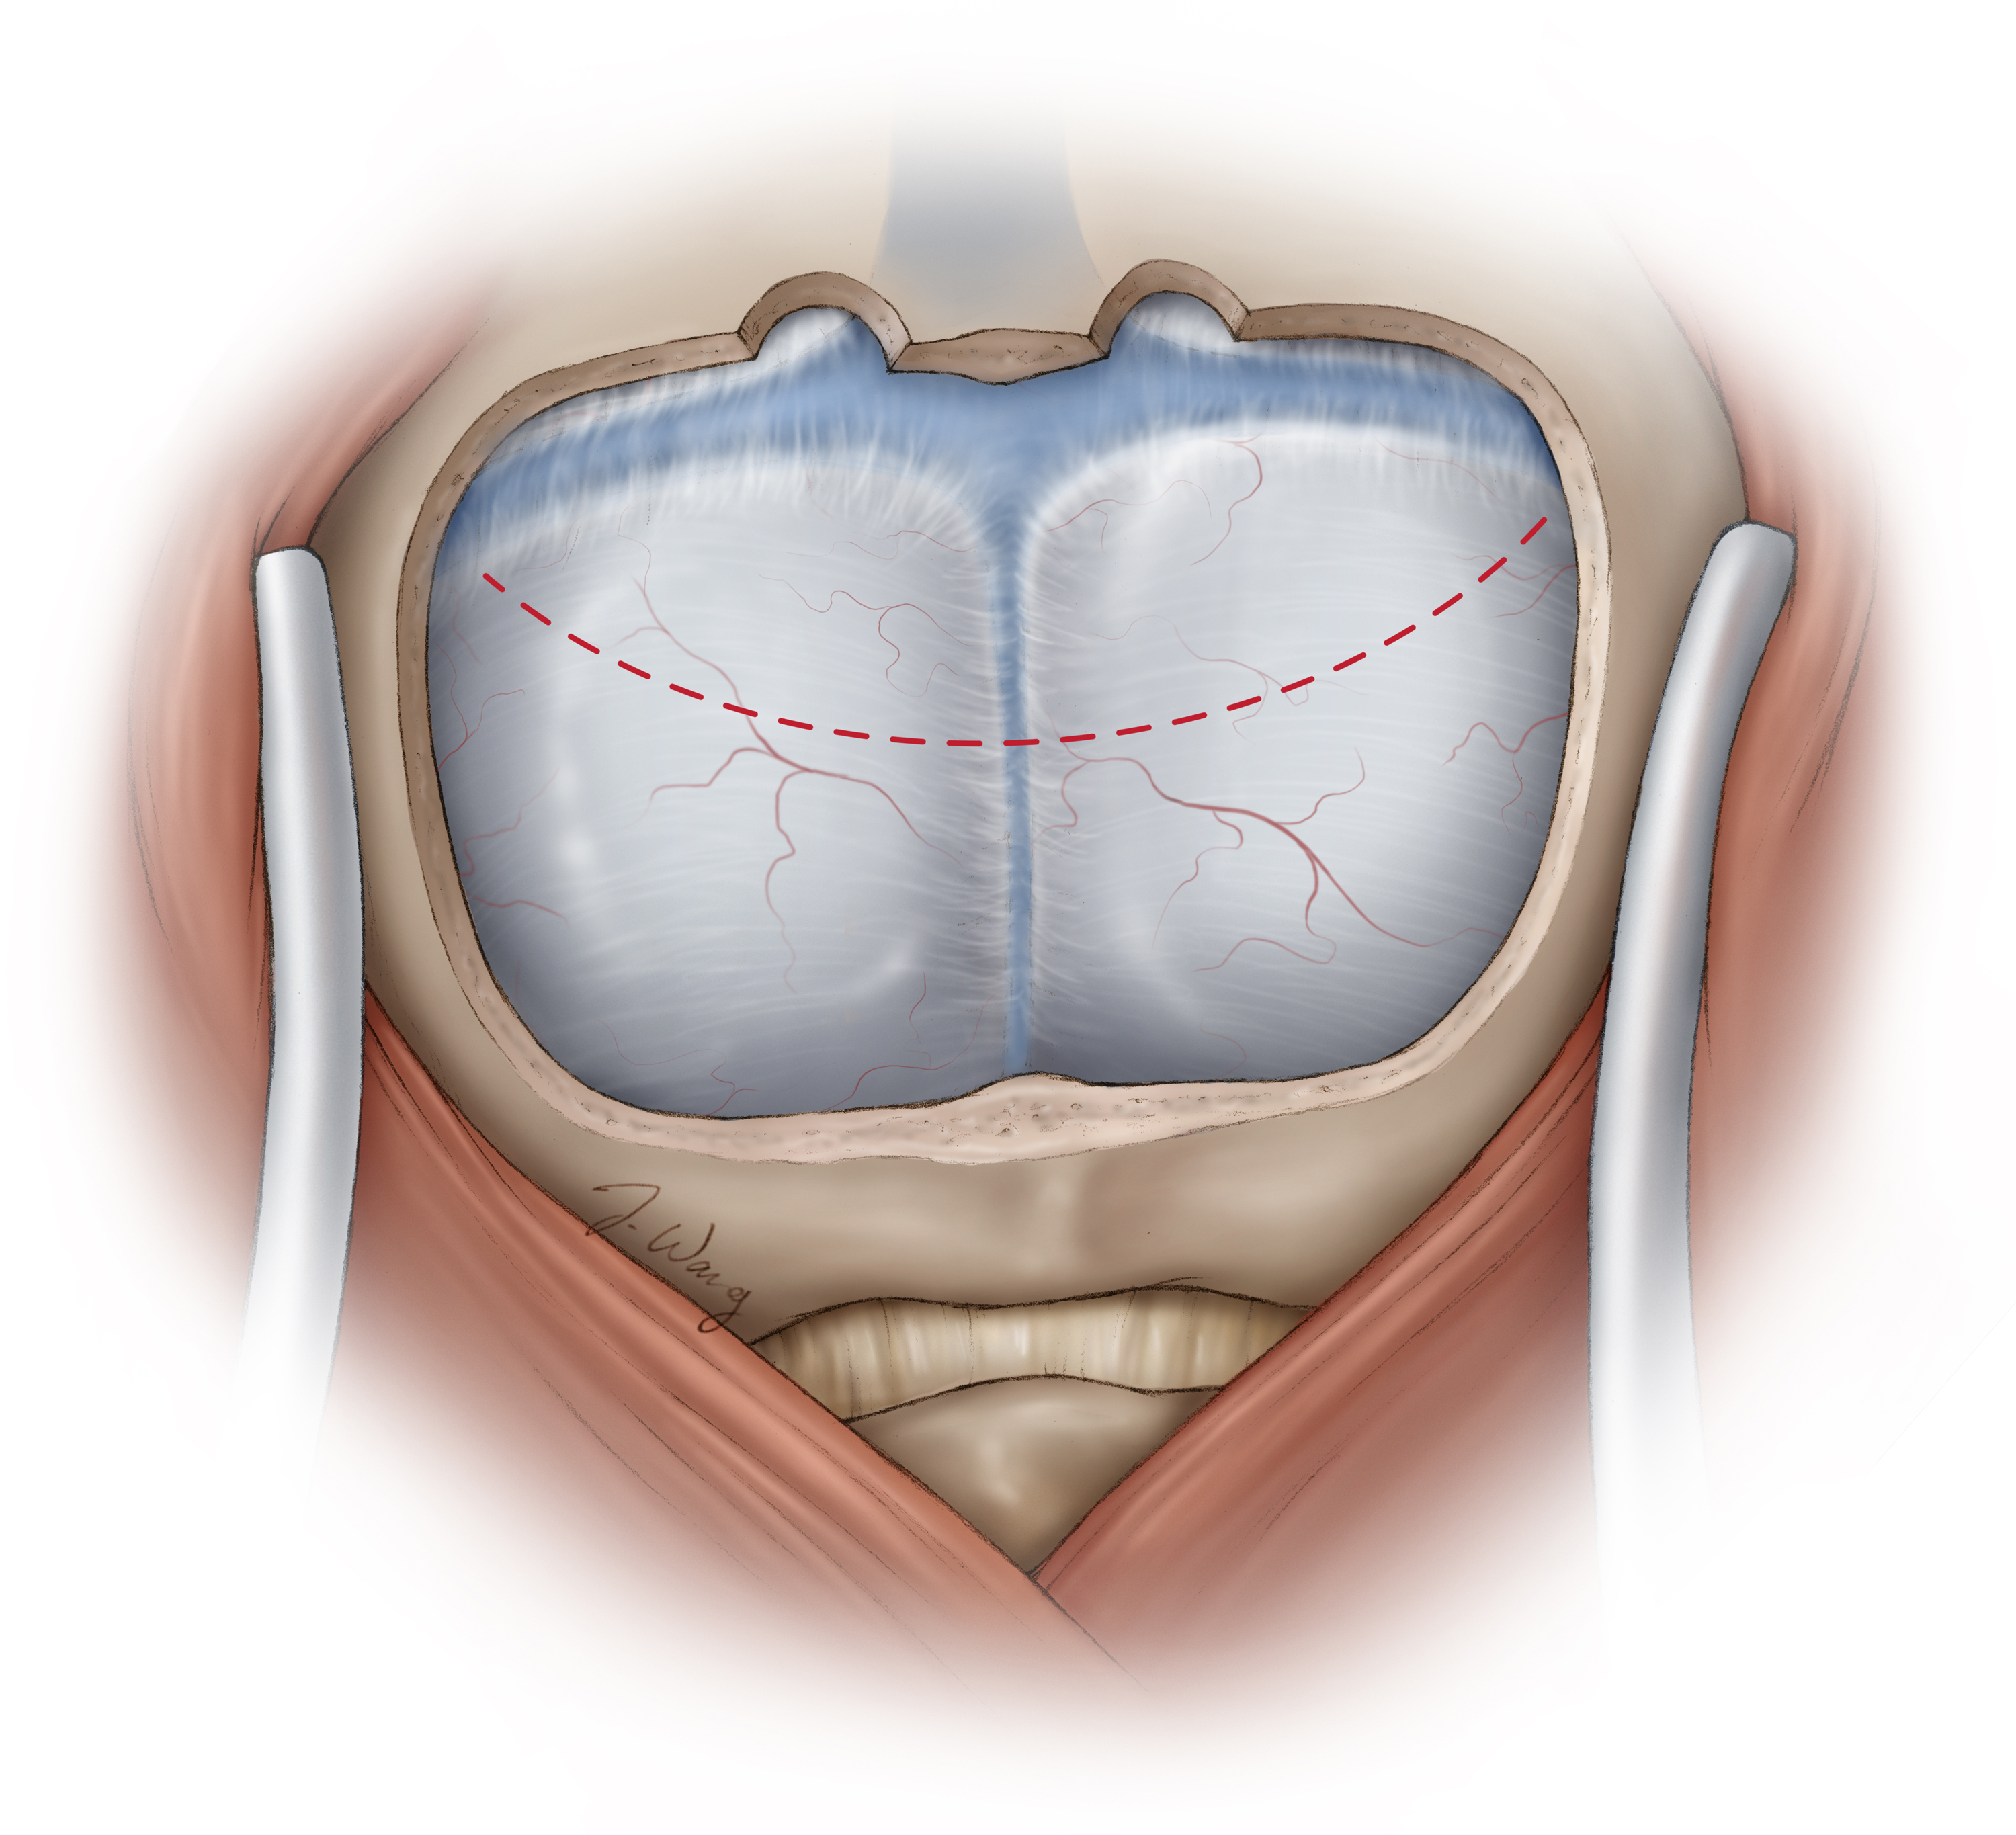
Figure 6: The fear of a dural venous injury should not deter the operator from generously uncovering these structures to allow expansion of the supracerebellar operative corridor through mobilization of the dural sinuses superiorly. Placement of burr holes over the transverse sinuses is relatively safe, and correct use of the footplate tip pursuing the contours of the inner table leads to a single-piece bone flap exposing the dura and the roof of the venous sinuses.
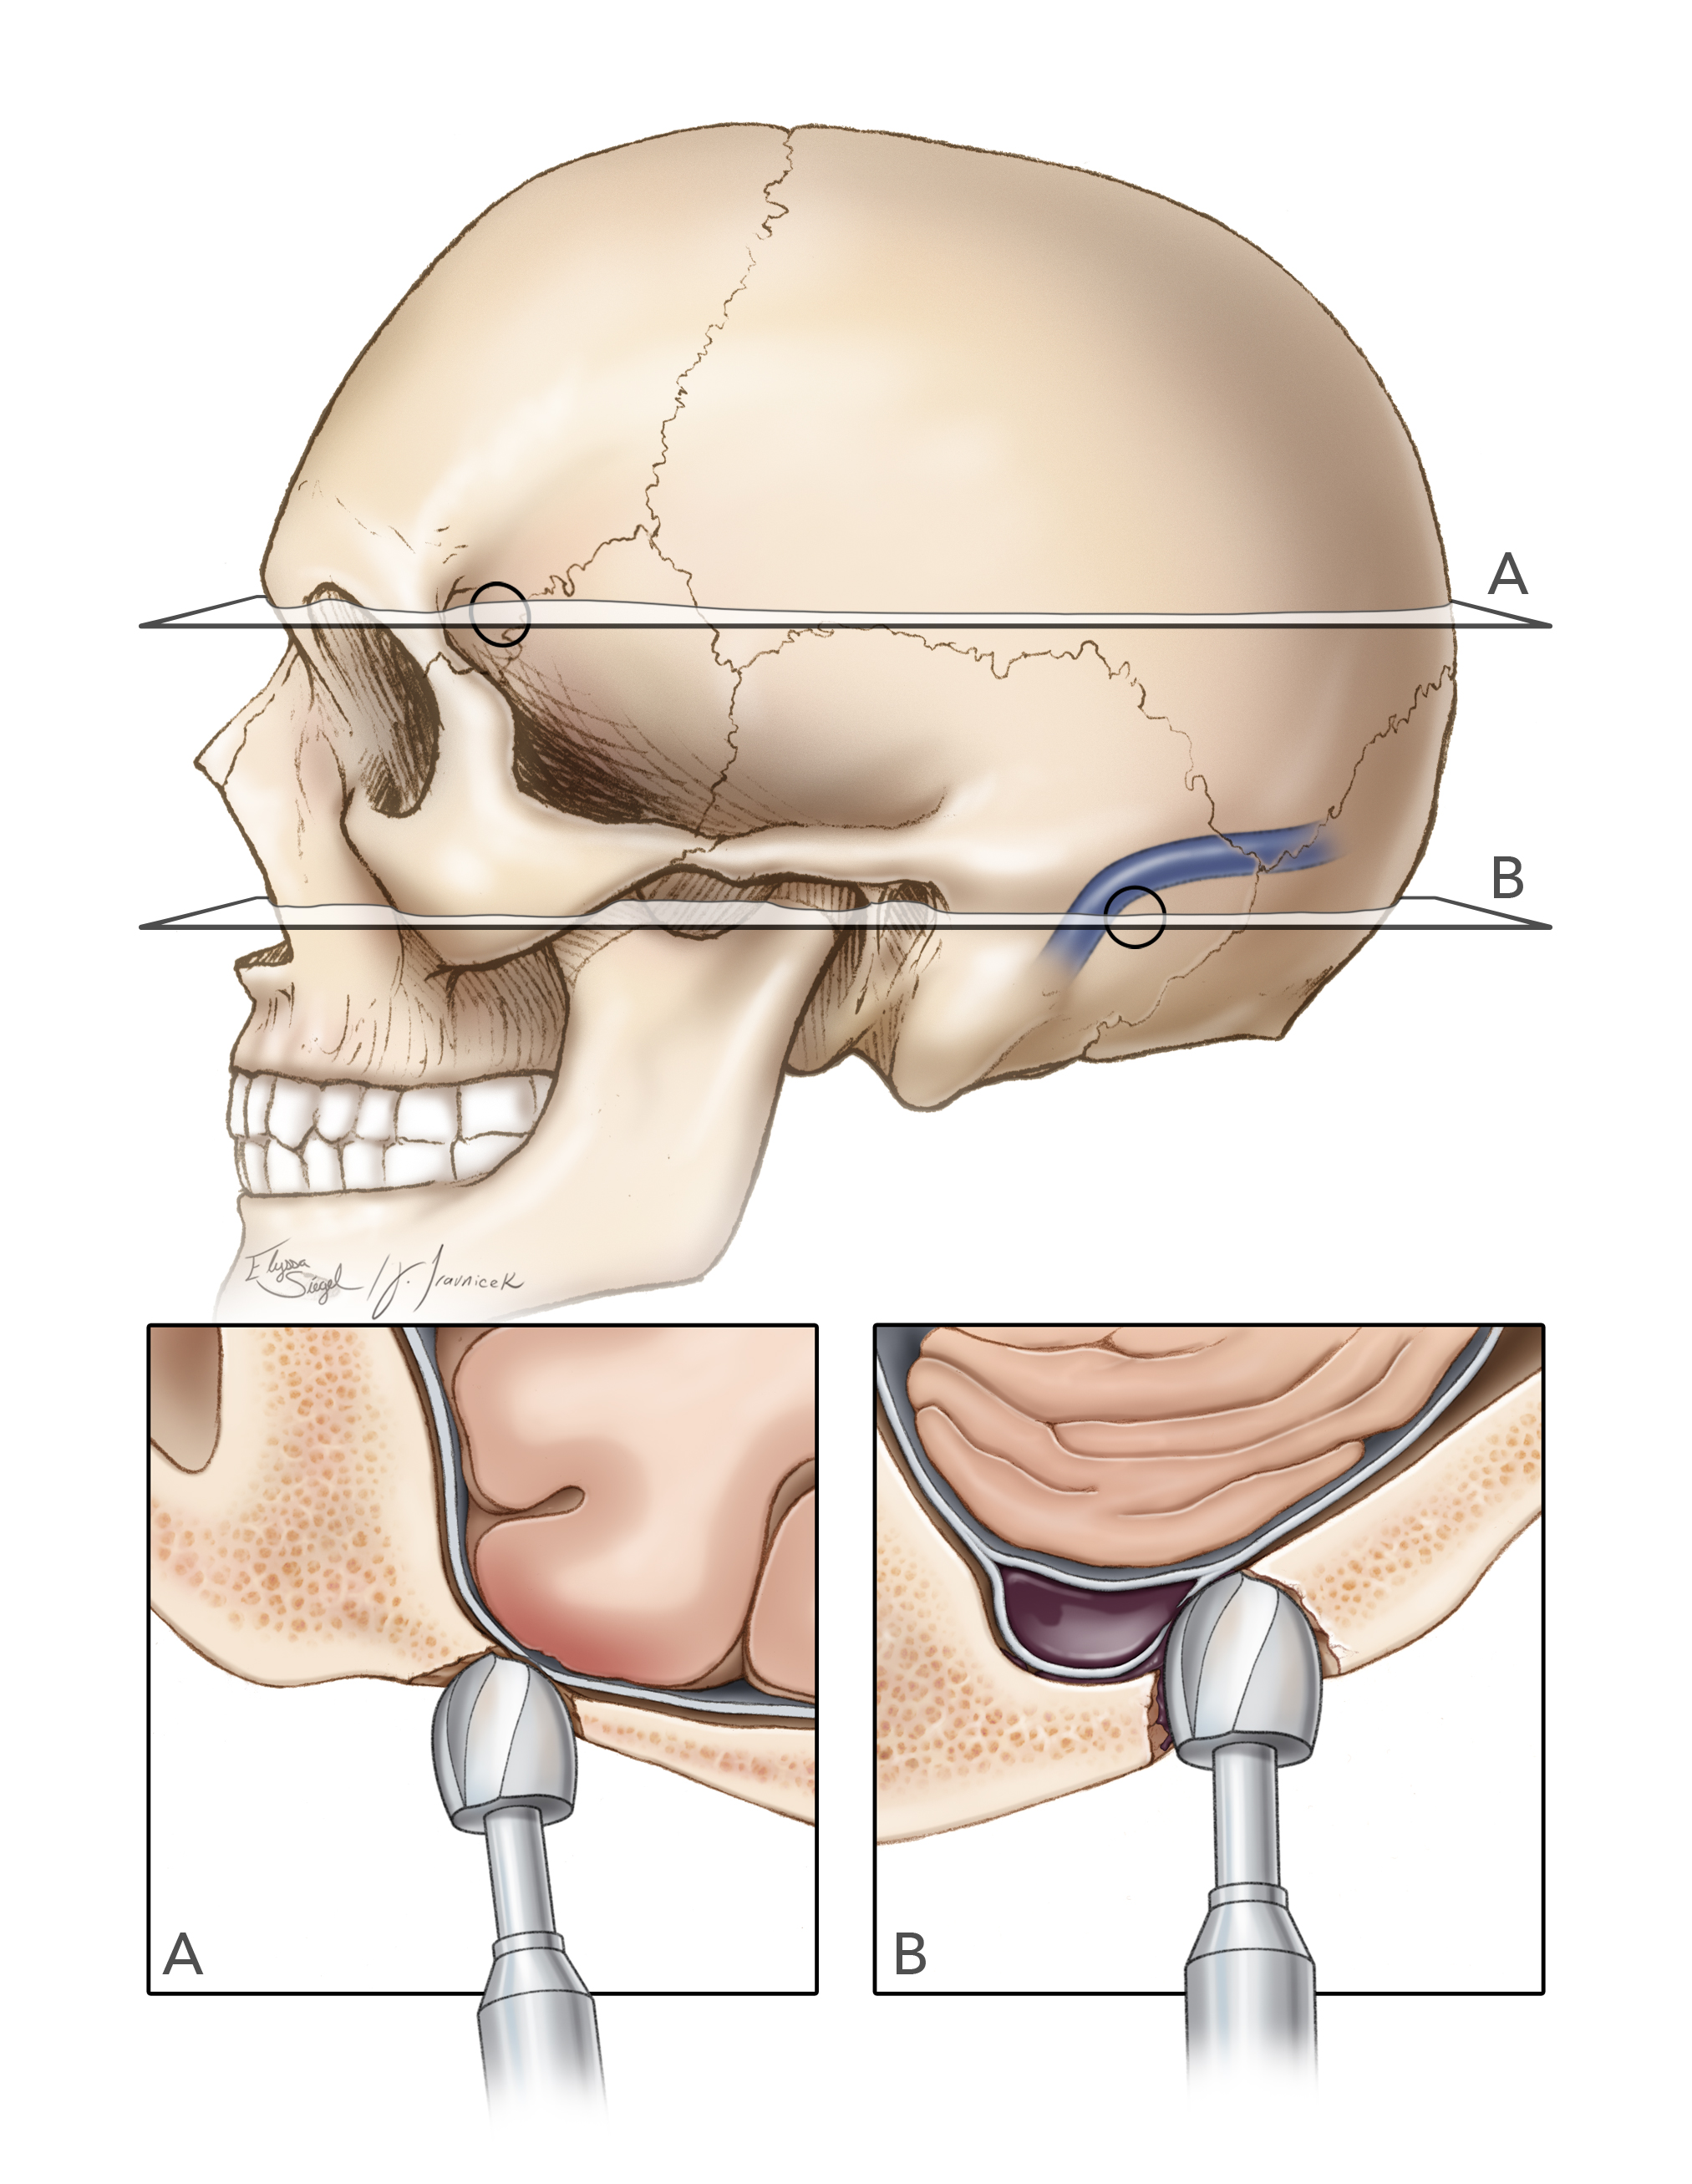
Figure 7: The uneven skull thickness (for example, within the key hole or around the venous sinuses) can be a significant cause of cortical, dural and venous sinus injury because the cutting burrs along the equator of the acorn bit can reach the dura covered by the thinner temporal section of the skull or the wall of the sinus while the tip of the drill is still working on the adjacent thicker frontal or occipital bone within the burr hole, respectively.
This event is especially problematic when the surgeon is making burr holes over the dural sinuses for parasagittal and retromastoid craniotomies. Because the walls of the dural sinuses embed themselves within the inner table, the cutting burrs on the side of the drill bit can injure the sinus wall while the drill tip works on the thicker bone covering the sidewalls of the sinus.
I do not routinely place two burr holes, one on each side of the dural venous sinuses. In fact, a single burr hole and effective separation of the wall of the sinus is often adequate to safely complete the craniotomy. Bone work near the sigmoid sinus is an exception because this sinus is not only very adherent, but also is almost always embedded in the mastoid bone.

Figure 8: Increased intracranial pressure is a real risk for subdural hematoma, subarachnoid hemorrhage, and cortical injury during drilling and consequent transmission of vibrations to the part of the brain pushed against the skull. The drill should be used carefully and the footplate maneuvered smoothly to minimize direct transmission of the unnecessary excessive vibrations to the brain. The use of lumbar CSF drainage can dramatically decrease the risk.
Craniotomy and Elevation of the Bone Flap
Once the dura is separated, the burr holes can be connected using a B1 bit with the footplate attachment (craniotome). The operator practicing the technique of bone flap creation should consider the following details:
- The footplate cannot make sharp turns, rather it is designed to make wide turns; wide turns will minimize the risk of a dural tear.
- The surgeon must consider the anatomy of the calvarium in relation to the skull base, including the lateral sphenoid wing, orbital roof, frontal sinuses, the oblique floor of the middle fossa, and the foramen magnum.
- The drill should effortlessly cut the bone and follow the inner contours of the calvarium. If this is not the case, the footplate is most likely not tangential to the inner surface of the skull or the dura is very adherent. The operator should pause, assess for these two possibilities, and resolve the underlying causes. The operator should not continue to forcefully handle the drill.

Figure 9: For the footplate to remain tangential to the contours of the skull, the drill handle should be perpendicular to the skull surface (top image). If the handle is not perpendicular (lower image), the drill will not advance smoothly and the operator’s struggle to push the drill forward will lead to dural tear and risk transmission of vibrations to the brain.
Appropriate Creation of Burr Holes and Use of the Handheld Drill
If the dura is unduly adherent to the skull, the B1 bit without a footplate is used to create a trough down to the thinned-out inner table that can be removed using fine Kerrison rongeurs or gently fractured to complete the osteotomy.
Bone wax will stop bleeding from the exposed cancellous bone along the craniotomy edges and thrombin-soaked gelfoam powder can stop epidural venous bleeding. The dura is tacked up to the craniotomy edges. Tense bluish dura most likely represents the presence of a subdural hematoma caused during the bone work. If this occurs, the dura should be immediately opened and the hematoma evacuated.

Figure 10: The footplate should stay tangential to the inner surface of the skull to avoid inadvertent dural tears, especially around the dural venous sinuses (inset image). This nuance is often ignored by junior residents. The dural sinuses can embed themselves within the inner table of the skull.

Figure 11: For parasagittal craniotomies, the last bony cut is performed over the dural sinus so that the bone flap can be quickly elevated if sinus injury occurs.
Burr Hole Placement and Craniotomy over the Dural Venous Sinuses; Managing Air Embolism
Pearls and Pitfalls
- When planning the creation of the burr holes, the operator should consider the anatomy of the skull to prevent dural and cortical injuries.
- The regions of the skull with uneven thickness can place the dura at risk during the burr hole placement and craniotomy.
- The drill should be used smoothly. Forceful handling of the drill will lead to cortical injury from transmission of drill vibrations.
Contributor: Jonathan M. Parish, MD
Please login to post a comment.